Preface
This book is for the engineer who used to have an Amiga.
Maybe there was an A500 on the family kitchen table, and you spent a
weekend copying disks and typing endcli into an orange-on-blue Shell
window. Maybe an A1200 with a screwdriver-modified trapdoor was the first
machine you ever wrote a line of C on. Maybe you never owned one, but you
watched a friend swap floppies through Shadow of the Beast and wondered
what the operating system underneath actually was.
Since then you have written millions of lines of code on other platforms. You know your way around a POSIX shell. You understand kernel schedulers, process isolation, memory-mapped I/O and modern GUI toolkits. You do not need someone to explain what a filesystem is.
You do, however, need someone to translate.
The Amiga is not a Unix. It is not a Mac. Its designers made different
choices — some of them brilliantly ahead of their time, some of them
quaintly alarming in 2026 — and those choices propagate through everything
from how you address a floppy drive to how two applications talk to each
other. If you sit down at a modern AmigaOS 3.2 installation and try to
ls /usr/local/bin, you are going to have a bad time.
This book is the translation layer. Every chapter tries to answer two questions at once:
-
What is the Amiga way of doing this?
-
If I already know how it works on Linux or macOS, what is the shortest path from that knowledge to the Amiga equivalent?
You will find side-by-side command tables, C examples that compile with both classic SAS/C and modern GCC cross-compilers, and diagrams that show where the Amiga’s abstractions sit relative to the ones you already know. Where the platform is genuinely weird — device names that end in a colon, preemptive multitasking without memory protection, one shared address space for every running program — the book stops and explains why, because those choices are load-bearing and you will step on them.
Chapter 1. What this book is not
It is not a nostalgia trip. There will be no exhaustive lists of demoscene groups, no reverence for the Video Toaster, no pages of Guru Meditation codes decoded from memory. Those are excellent subjects for other books.
It is not a hardware reference. The Amiga’s custom-chip architecture is one of the most beautifully documented systems of its era, and the Amiga Hardware Reference Manual is a couple of clicks away on archive.org (see the bibliography). We touch on Agnus, Denise and Paula only where they matter to understanding the OS.
It is not a beginner’s programming book. You already know how to program. We will spend our budget on the parts of Amiga programming that are different.
Chapter 2. How to read it
Chapters 1 through 4 give you enough historical and mental-model context to sit down at the machine without wincing. Chapters 5 through 8 cover day-to-day OS use: Workbench, filesystem, and Shell. Chapters 9 through 12 are the programmer’s core: C, Intuition and the graphics chips, ARexx, and networking. Chapter 13 brings the story up to the present with AmigaOS 3.2, 4.1, MorphOS and AROS.
The appendices are for the desk: a Linux-to-Amiga command cheatsheet, and a bibliography.
If you only have an afternoon, read chapters 4, 6 and 7 — terminology, filesystem, Shell. Those three unlock almost everything else.
Chapter 3. Conventions
Amiga command names, device names and filesystem paths are set in
monospace. Because the Amiga is case-insensitive we render commands
the way Commodore’s documentation did: initial caps for command names
(Dir, List), all caps for device and assign names (DF0:, SYS:,
RAM:). You may type them however you like.
Side-by-side comparisons use two-column tables with the reader’s current platform on the left and the Amiga equivalent on the right:
| Linux / macOS | AmigaOS |
|---|---|
|
|
|
|
Where a screenshot or diagram is referenced, the caption cites the
source. Some images are not distributed with the book; see
images/README.md for suggested sources and licences.
Part I: Part I: Foundations
Chapters 1 through 4 set the ground. Read them in order the first time; you can skip back to [Terminology and Mental Model] at any time as a lookup reference.
|
Platform coverage: classic 68k AmigaOS 3.x is assumed; AmigaOS 4 (PowerPC), MorphOS, and AROS notes appear where they diverge. |
Chapter 4. Introduction: Why the Amiga, Why Now
The Amiga is a working operating system in 2026.
That sentence is not sentimental. Hyperion Entertainment shipped AmigaOS 3.2 for the original 68k line in May 2021, and updated it (3.2.2) with new drivers and Shell improvements in the years since; AmigaOS 4.1 Final Edition, targeting PowerPC hardware, has received continuous update packages on the same schedule.[1] MorphOS 3.18 runs on PowerBook G4 and PowerMac G5 hardware you can still buy on eBay for the price of a takeaway meal. AROS — the open-source reimplementation — has 68k, x86 and ARM ports, and boots on modern laptops as a hosted system alongside Linux.
None of this is a museum piece. All of these systems accept new C programs today, host active user communities on Discord and IRC, and distribute software through Aminet (over 90,000 files, still curated) and OS4Depot.[2]
So the question is not whether the Amiga still exists. It does. The question is what you get out of learning to use it.
4.1. What you get out of it
A different mental model of what an OS can be. POSIX has been the water we swim in for so long that its choices feel like natural laws. The Amiga makes different ones. It has shared libraries loaded on demand into a single address space; message-passing IPC that predates Erlang by a decade and is functionally similar; a graphical shell (Workbench) and a command shell that are peer siblings, not parent-and-child; a filesystem with named volumes and no root directory; preemptive multitasking implemented on hardware without a memory management unit; a display coprocessor that reprograms video registers in step with the scan-line beam; a system-wide scripting language (ARexx) that any application registers a message port with by default.
Some of those choices are outright dangerous by modern standards. A wild pointer takes down the whole system rather than one process; the security model has one user and trusts every running program with complete access to every other program’s data; a networked service crashes and the machine reboots. Others quietly beat their Unix counterparts: message-passing IPC with kernel-mediated wake-up is cheaper than a POSIX pipe; the assign system (chapter 6) gives you per-user, first-class-in-the-filesystem symbolic paths that appear in every filesystem tool without special support; the boot process takes seven seconds. Both categories are educational.
The single biggest thing you learn is what an OS looks like when it is designed as a tightly-coordinated whole rather than an accretion of decades of layers. Every part of the Amiga knows about the other parts — the message-port abstraction Exec provides is what Intuition uses for window events, what dos.library uses for its packet-based file operations, and what ARexx uses to deliver scripting commands to applications. That single primitive composes cleanly across half a dozen layers.
A machine you can hold in your head. A stock Amiga 500 shipped with
512 KB of chip RAM, a 7 MHz 68000, and a ROM containing an operating
system that fit in 256 KB. The AmigaOS 3.2 ROM is 512 KB. You can, if
you want, read most of the Amiga ROM Kernel Reference Manuals in a
long weekend and come out understanding the whole stack, from
Exec/AllocMem through Intuition/OpenWindow. Very few modern systems
offer that. The Linux kernel alone is now roughly 40 million lines of
C. macOS is not much smaller. Both are opaque to almost every
engineer that uses them.
The Amiga is readable. Every OS structure has a documented layout.
Every library function has a one-page reference in the RKM autodocs.
The whole boot process is transparent from the moment the CPU comes
out of reset to the moment LoadWB finishes starting Workbench.
You can trace exactly how a keystroke moves through the OS, from
the keyboard IRQ, into input.device, through Intuition’s event
router, onto a window’s UserPort, into your program’s Wait(). On
Linux this path exists but is spread across hundreds of files and
thousands of engineer-years of accreted history. On the Amiga you
can print it on a single sheet of A4.
A working retrocomputing target. If you write demos, games or tracker music, the Amiga is one of the most vibrant retro platforms alive. There are annual competitions (Revision, Assembly, Datastorm) with active Amiga categories; new commercial games ship on floppy and cartridge every year; the tooling (vasm, vbcc, hollywood, Amiga Bloodwych) is being actively maintained. The scene has never really gone away.
Because you missed it the first time. This is a perfectly good reason. The Amiga’s peak commercial period was 1985 to 1994; many readers of this book were nine years old at the end of that. There is no age at which it stops being interesting to learn what your predecessors were doing. If you learned about protected memory, shared address spaces, message-passing kernels, or coroutine schedulers in an undergraduate OS course — the Amiga is a working existence proof of most of those ideas, ten years before Linux 0.01.
4.2. The engineering-lens argument
Set aside nostalgia. Ask instead: what is architecturally interesting about this system that is worth studying?
Preemptive multitasking without an MMU. How do you build a multitasking OS on hardware that gives you no memory protection? Exec’s answer is: you don’t try. You provide fast context switching, a strict priority scheduler, and enough primitives (semaphores, message ports, signal bits) that well-behaved programs can share correctly. Every program is trusted. This is a design point most modern OSes did not seriously explore and one that mobile-microkernel research groups occasionally re-invent.
The library dispatch model. Every OS service is a
struct Library whose entry points live at fixed negative offsets
from a base pointer you obtain by name. OpenLibrary("dos.library",
39) returns a base pointer; -30(a6) is Read, -36(a6) is
Write. This is dead simple, extends to new libraries without any
kernel changes, and gives you per-caller refcounting for free. It
also enables patching: SetFunction() swaps out an entry point at
runtime, and every subsequent call goes through your replacement.
This is how utilities like SnoopDos work — patch the library, log
every call, forward to the original.
Cheap message-passing IPC. An Exec message is a
struct Message embedded in whatever caller-owned structure you
want; sending is PutMsg(port, msg) and takes on the order of
fifty cycles; receiving is a Wait() on a signal bit followed by
GetMsg(). There is no kernel copy — the receiver reads the
sender’s memory directly. Compare to a POSIX pipe, which requires a
system call, a data copy, and typically a buffered kernel object.
The Amiga’s cheapness of IPC is what makes it viable to structure
almost every subsystem around messages. Filesystem operations are
packets sent to a handler’s port. Keyboard events are messages.
Timer expirations are messages. All of it composes cleanly, on
1985 hardware, at speed.
Datatypes as pluggable format handlers. The system-wide
datatypes.library (chapter 8) is a registry: applications register
"I can handle image/gif" or "I can handle text/plain" and any
consumer says "please display file X" without knowing what X is.
This is a decade before macOS’s UTI system and two decades before
Linux’s mimetype handling caught up in polish. When you install a
new datatype, every application that opens files gets the new
format for free.
ARexx as system-wide automation. Every well-written Amiga
application opens a named message port and accepts commands as
strings. Any ARexx script can ADDRESS "PPAINT" "LoadBrush foo"
and Personal Paint receives the message, executes the command, and
replies with a status. This is DBus service dispatch in 1987.
Cross-application scripts — save a picture from a paint program,
insert it into a word processor, email the result — are dozens of
lines and rely on no glue code beyond what the OS provides.
The custom chipset as a coprocessor family. Rather than making the CPU do everything, the Amiga hardware team split the work between three custom chips (Agnus, Denise, Paula) that share the chip-memory bus with the CPU via time-slicing. The Copper (inside Agnus) is effectively a small display-list processor that runs a program of its own, synchronised with the beam. This lets a 7 MHz 68000 do things that a 25 MHz 386 could not do at all, because most of the work is offloaded to hardware. The lesson generalises: partition the work between fast-and-general (CPU) and slow-but- plentiful (fixed-function coprocessors) at the design level, not after the fact.
None of the ideas above are unique to the Amiga; some appear in QNX, in classic Mac OS, in the Atari ST, in a couple of academic kernels. But the Amiga is where they compose into a system that a user actually turned on every day for a decade.
4.3. What this book is not
It is not a nostalgia trip. There will be no exhaustive lists of demoscene groups, no reverence for the Video Toaster, no pages of Guru Meditation codes decoded from memory. Those are excellent subjects for other books.
It is not a hardware reference. The Amiga’s custom-chip architecture is one of the most beautifully documented systems of its era, and the Amiga Hardware Reference Manual is a couple of clicks away on archive.org (see the bibliography). We touch on Agnus, Denise and Paula only where they matter to understanding the OS, and we spend one section in chapter 10 on the Copper because it is a fascinating primitive that changed my thinking about what a display subsystem can be.
It is not a beginner’s programming book. You already know how to program. We will spend our budget on the parts of Amiga programming that are different — the library model, the memory model, the message-passing IPC, the tag-list convention, the paranoid-cleanup pattern — and skip past the parts that are the same as everywhere else.
It is not an assembly-language tutorial. 68k assembly is a beautiful CPU to write in and there are excellent books on it (see the bibliography), but this book stays in C, ARexx, and the Shell.
It is not a complete Aminet catalogue. We name the applications you would actually install in 2026 (chapter 8), but the archive has 90,000+ files and any attempt to be exhaustive would be out of date before the ink dried. Aminet’s own category tree (https://aminet.net/) is the right index.
4.4. What this book assumes about you
You already know how to program. Concretely, this book expects:
-
You can read C. Not necessarily write clever C; just read it and recognise what a pointer, a struct and a linked list are doing. Where the Amiga’s C style is unusual (BPTRs, tag lists, base pointers), we explain the idiom.
-
You have a shell you are comfortable in — bash, zsh, fish, PowerShell, doesn’t matter — and you understand redirection, pipes and environment variables.
-
You have used at least one desktop environment (macOS Finder, GNOME, KDE, Windows Explorer) and you understand the vocabulary of windows, menus and clipboards.
-
You are willing to run an emulator or set up real hardware. We cover both in Chapter 6.
You do not need to know 68000 assembly, and this book does not teach it. If you want to go there afterwards, Motorola’s original M68000 8-/16-/32-Bit Microprocessor User’s Manual is the primary source, and Ranck & Wilkinson’s Programming the 68000 (Sybex, 1983) is the readable secondary source. Both are cited in the bibliography.
You do not need any prior Amiga experience. If you had an A500 in the loft, you will find chapter 3 fast to read; if you never did, you will find it slower, and everything after that is the same. The book is calibrated for either starting point.
4.5. A note on versions
The word "Amiga" covers thirty years of hardware and at least four mutually incompatible operating-system lineages:
-
Classic 68k AmigaOS (1.0 through 3.9, plus Hyperion’s 3.1.4, 3.2, 3.2.1, 3.2.2 for original hardware) — this is where most of the book lives.
-
AmigaOS 4.x — Hyperion’s PowerPC continuation, native on the AmigaOne series.
-
MorphOS — a separate PowerPC OS from a different team, source code independent of AmigaOS, but broadly source-compatible for application programmers.
-
AROS — a clean-room open-source reimplementation of the classic AmigaOS 3.1 API, portable across CPU architectures.
When a chapter says "the OS" without qualification, it means classic 68k AmigaOS 3.1 or newer, running on either real hardware or emulation. Where a topic differs between OS 3.x and OS 4.x, or where AROS and MorphOS diverge in an interesting way, the text calls it out.
4.6. A note on the code examples
The C examples in this book are tested against three toolchains where practical:
-
SAS/C 6.58 — the classic on-Amiga development environment. Freeware since 2007.
-
vbcc 0.9h or later — a modern retargetable C compiler with both 68k and PowerPC back-ends.
-
bebbo’s amiga-gcc — a GCC-6.5-based cross-compiler that installs cleanly on macOS via Homebrew and on Linux via the project’s own installer script.
Where an example is toolchain-specific it says so. The default
assumption throughout is "modern build, either native SAS/C on the
Amiga or cross-compiled GCC on your Mac or Linux host." Runnable
sources are in the book’s code/ directory.
4.7. How to read it
Chapters 1 through 4 give you enough historical and mental-model context to sit down at the machine without wincing. Chapters 5 through 8 cover day-to-day OS use: Workbench, filesystem, Shell, and the applications you would install for common tasks. Chapters 9 through 12 are the programmer’s core: C, Intuition and the graphics chips, ARexx, and networking. Chapter 13 brings the story up to the present with AmigaOS 3.2, 4.1, MorphOS and AROS.
The appendices are for the desk: a Linux-to-Amiga command cheatsheet, and a bibliography with the primary and secondary sources cited in each chapter, plus community resources for further reading.
If you only have an afternoon, read chapters 4, 6 and 7 — terminology, filesystem, Shell. Those three unlock almost everything else. If you have a weekend, add chapter 9 for the programming model.
4.8. Conventions
Amiga command names, device names and filesystem paths are set in
monospace. Because the Amiga is case-insensitive we render commands
the way Commodore’s documentation did: initial caps for command names
(Dir, List), all caps for device and assign names (DF0:, SYS:,
RAM:). You may type them however you like.
Side-by-side comparisons use two-column tables with the reader’s current platform on the left and the Amiga equivalent on the right:
| Linux / macOS | AmigaOS |
|---|---|
|
|
|
|
Where a screenshot or diagram is referenced, the caption cites the
source. Images from Wikimedia Commons are used under their Creative
Commons or public-domain licences; fair-use screenshots of
copyrighted OS UIs (Commodore, Hyperion) are used for identification
and educational commentary. Full source and licence per file are in
images/README.md.
[graphviz] and [ditaa] blocks in the source render to SVG at
build time via the asciidoctor-diagram extension; you can edit
the diagram source in place and rebuild. Rendered SVGs are not
tracked in git; run asciidoctor -r asciidoctor-diagram book.adoc
to regenerate.
See Chapter 6 for how to pick a version and start it up.
Chapter 5. History and Context
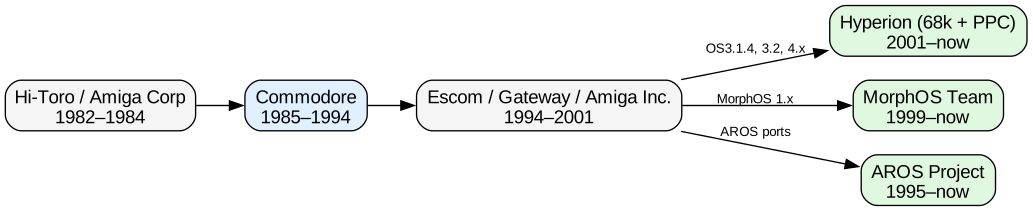
The Amiga is what happens when a group of hardware engineers is left alone with a blank sheet of paper, a Motorola 68000 and, briefly, no adult supervision. Understanding the machine’s history explains an alarming amount of its present-day behaviour, so this chapter is a tour from 1982 to 2026 — enough to place every acronym you will meet later, and enough of the design context to understand why the choices were made.
The lineage in one picture:
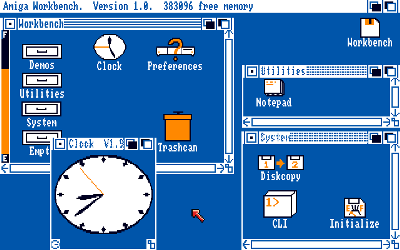
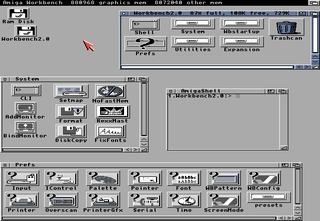
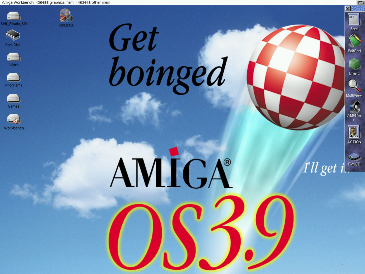
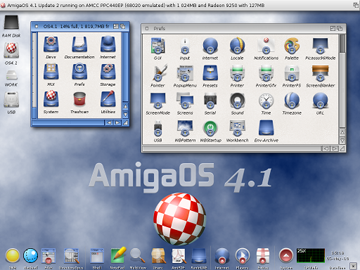
Four snapshots of Workbench across three decades, so you can see how much (and how little) the desktop metaphor changed:
5.1. The Hi-Toro years, 1982–1984
Hi-Toro was founded in 1982 by Jay Miner, Larry Kaplan, Dave Morse and several others. Miner had designed the Atari 2600 and 800 custom-chip sets and knew exactly what he wanted next: a next-generation home-computer chipset that would leave the current crop of Apple II clones and IBM PCjrs in the dust. The plan was a games console codenamed Lorraine (after the wife of one of the founders), built around a custom chipset paired with the then-new Motorola 68000 CPU.[3]
The choice of 68000 mattered. In 1982 the alternative was Intel’s 8088 (which powered the IBM PC and its clones) — a 16-bit CPU with a 20-bit segmented address space and a slow memory bus. The 68000 was a 16/32-bit CPU with a flat 24-bit address space, more registers, faster clocks, and a cleaner instruction set. Motorola sold it for less. Apple picked the 68000 for the Macintosh in 1984; Atari picked it for the ST; Amiga picked it for Lorraine. For half a decade the Motorola-camp home computers all had architectural advantages over the Intel-camp ones and lost on market share anyway. But that is a different book.
Hi-Toro renamed itself Amiga Corporation early on for legal reasons (the name "Hi-Toro" collided with a Japanese lawn-mower manufacturer, which was not the association the founders wanted). The company ran short of money as the 1983 videogame crash hit — Atari’s implosion sucked the oxygen out of the whole console market. Amiga survived by taking bridging loans from Atari itself, which came with strings attached: Atari acquired the rights to the Lorraine chipset for use in an Atari-badged product, and Amiga would be paid a licence fee. If Amiga couldn’t pay back the loan by June 1984, Atari would own the chipset outright.
The loan came due. Commodore paid Amiga’s debt to Atari on the day, bought Amiga Corporation the following week, and kept the chipset. The Atari-owned "Amiga" console never shipped. What did ship, seven months later, was the Amiga 1000 from Commodore.
The operating system was written under contract by a small team at
MetaComCo in Bristol, England, led by Dr Tim King. King’s team
were BCPL people from way back — BCPL is a pre-C systems language
Martin Richards designed at Cambridge in the late 1960s — and they
wrote AmigaDOS (the filesystem and command layer) in BCPL. This
was a pragmatic choice: MetaComCo had a mature BCPL compiler, the
language produced compact code that fit in the Amiga’s tight ROM
budget, and the team could ship on schedule. It was also a
long-lived source of Amiga-user bewilderment. BCPL’s heritage
leaked into user-visible details for a decade: filename length
limits, the shape of return codes, the persistence of "BPTR"
(BCPL pointer) types in the DOS library API well past the point
where the underlying implementation had been rewritten in C. If
you have ever wondered why the Amiga has separate dos.library
and exec.library sitting on top of each other, that seam is
where the two teams' code met.
Meanwhile, in Los Gatos, RJ Mical was building Intuition — the windowing system — in 68000 assembly, and Dale Luck was building the Boing Ball demo that would be the launch showcase. The demo was written overnight for the Consumer Electronics Show in January 1984, running on prototype hardware still soldered to breadboards. It became one of the most famous marketing pieces of the decade — a 3-D bouncing beach ball with realistic shading, at a time when the state of the art on IBM PCs was Lotus 1-2-3 in monochrome text mode.[4]
5.2. The Amiga 1000, 1985
Commodore launched the Amiga 1000 in July 1985 at the Lincoln Center in New York, priced at US$1,295 for the computer alone (monitor extra). The machine had:
-
A 68000 CPU at 7.16 MHz (NTSC) or 7.09 MHz (PAL).
-
256 KB of chip RAM, expandable to 512 KB via a front-panel slot.
-
Two custom chips: Agnus (bus arbitration, Copper, Blitter) and Denise (video and sprites). Paula (sound and floppy) came later — the 1000 used discrete parts for audio.
-
One built-in 3.5" 880 KB double-density floppy drive.
-
NTSC or PAL composite video, RGB analog, and RF output.
-
Two mouse/joystick ports, one serial (RS-232), one parallel (Centronics), and — uniquely on the 1000 — a "Zorro I" side expansion bus.
-
No hard drive support in the base configuration.
The 1000 shipped without an OS in ROM. It had a small
"Kickstart" bootstrap that loaded the OS from a Kickstart 1.0
floppy into 256 KB of "writable-then-locked" RAM. You inserted
the Kickstart disk, watched it load, ejected it, inserted the
Workbench disk, and were on your way. This "soft-Kickstart"
scheme made early OS updates trivial — just ship a new
floppy — but it wasted 256 KB of the machine’s total 512 KB on
the OS. Later Amigas moved Kickstart into ROM and reclaimed
that RAM.
The 1000 was expensive and did not sell in large numbers — a few hundred thousand units over its lifetime. But it established everything the later Amigas would build on: the chipset, the OS, the developer story, and the reputation for graphics and sound that would carry the platform for a decade.
5.3. The Amiga 500, 1987
The A500 is the machine most Europeans think of when they hear the word "Amiga." Commodore launched it in 1987 at approximately US$700 with the goal of putting Amiga hardware in the price range of the Commodore 64 crowd — mass-market home computers, not workstations.
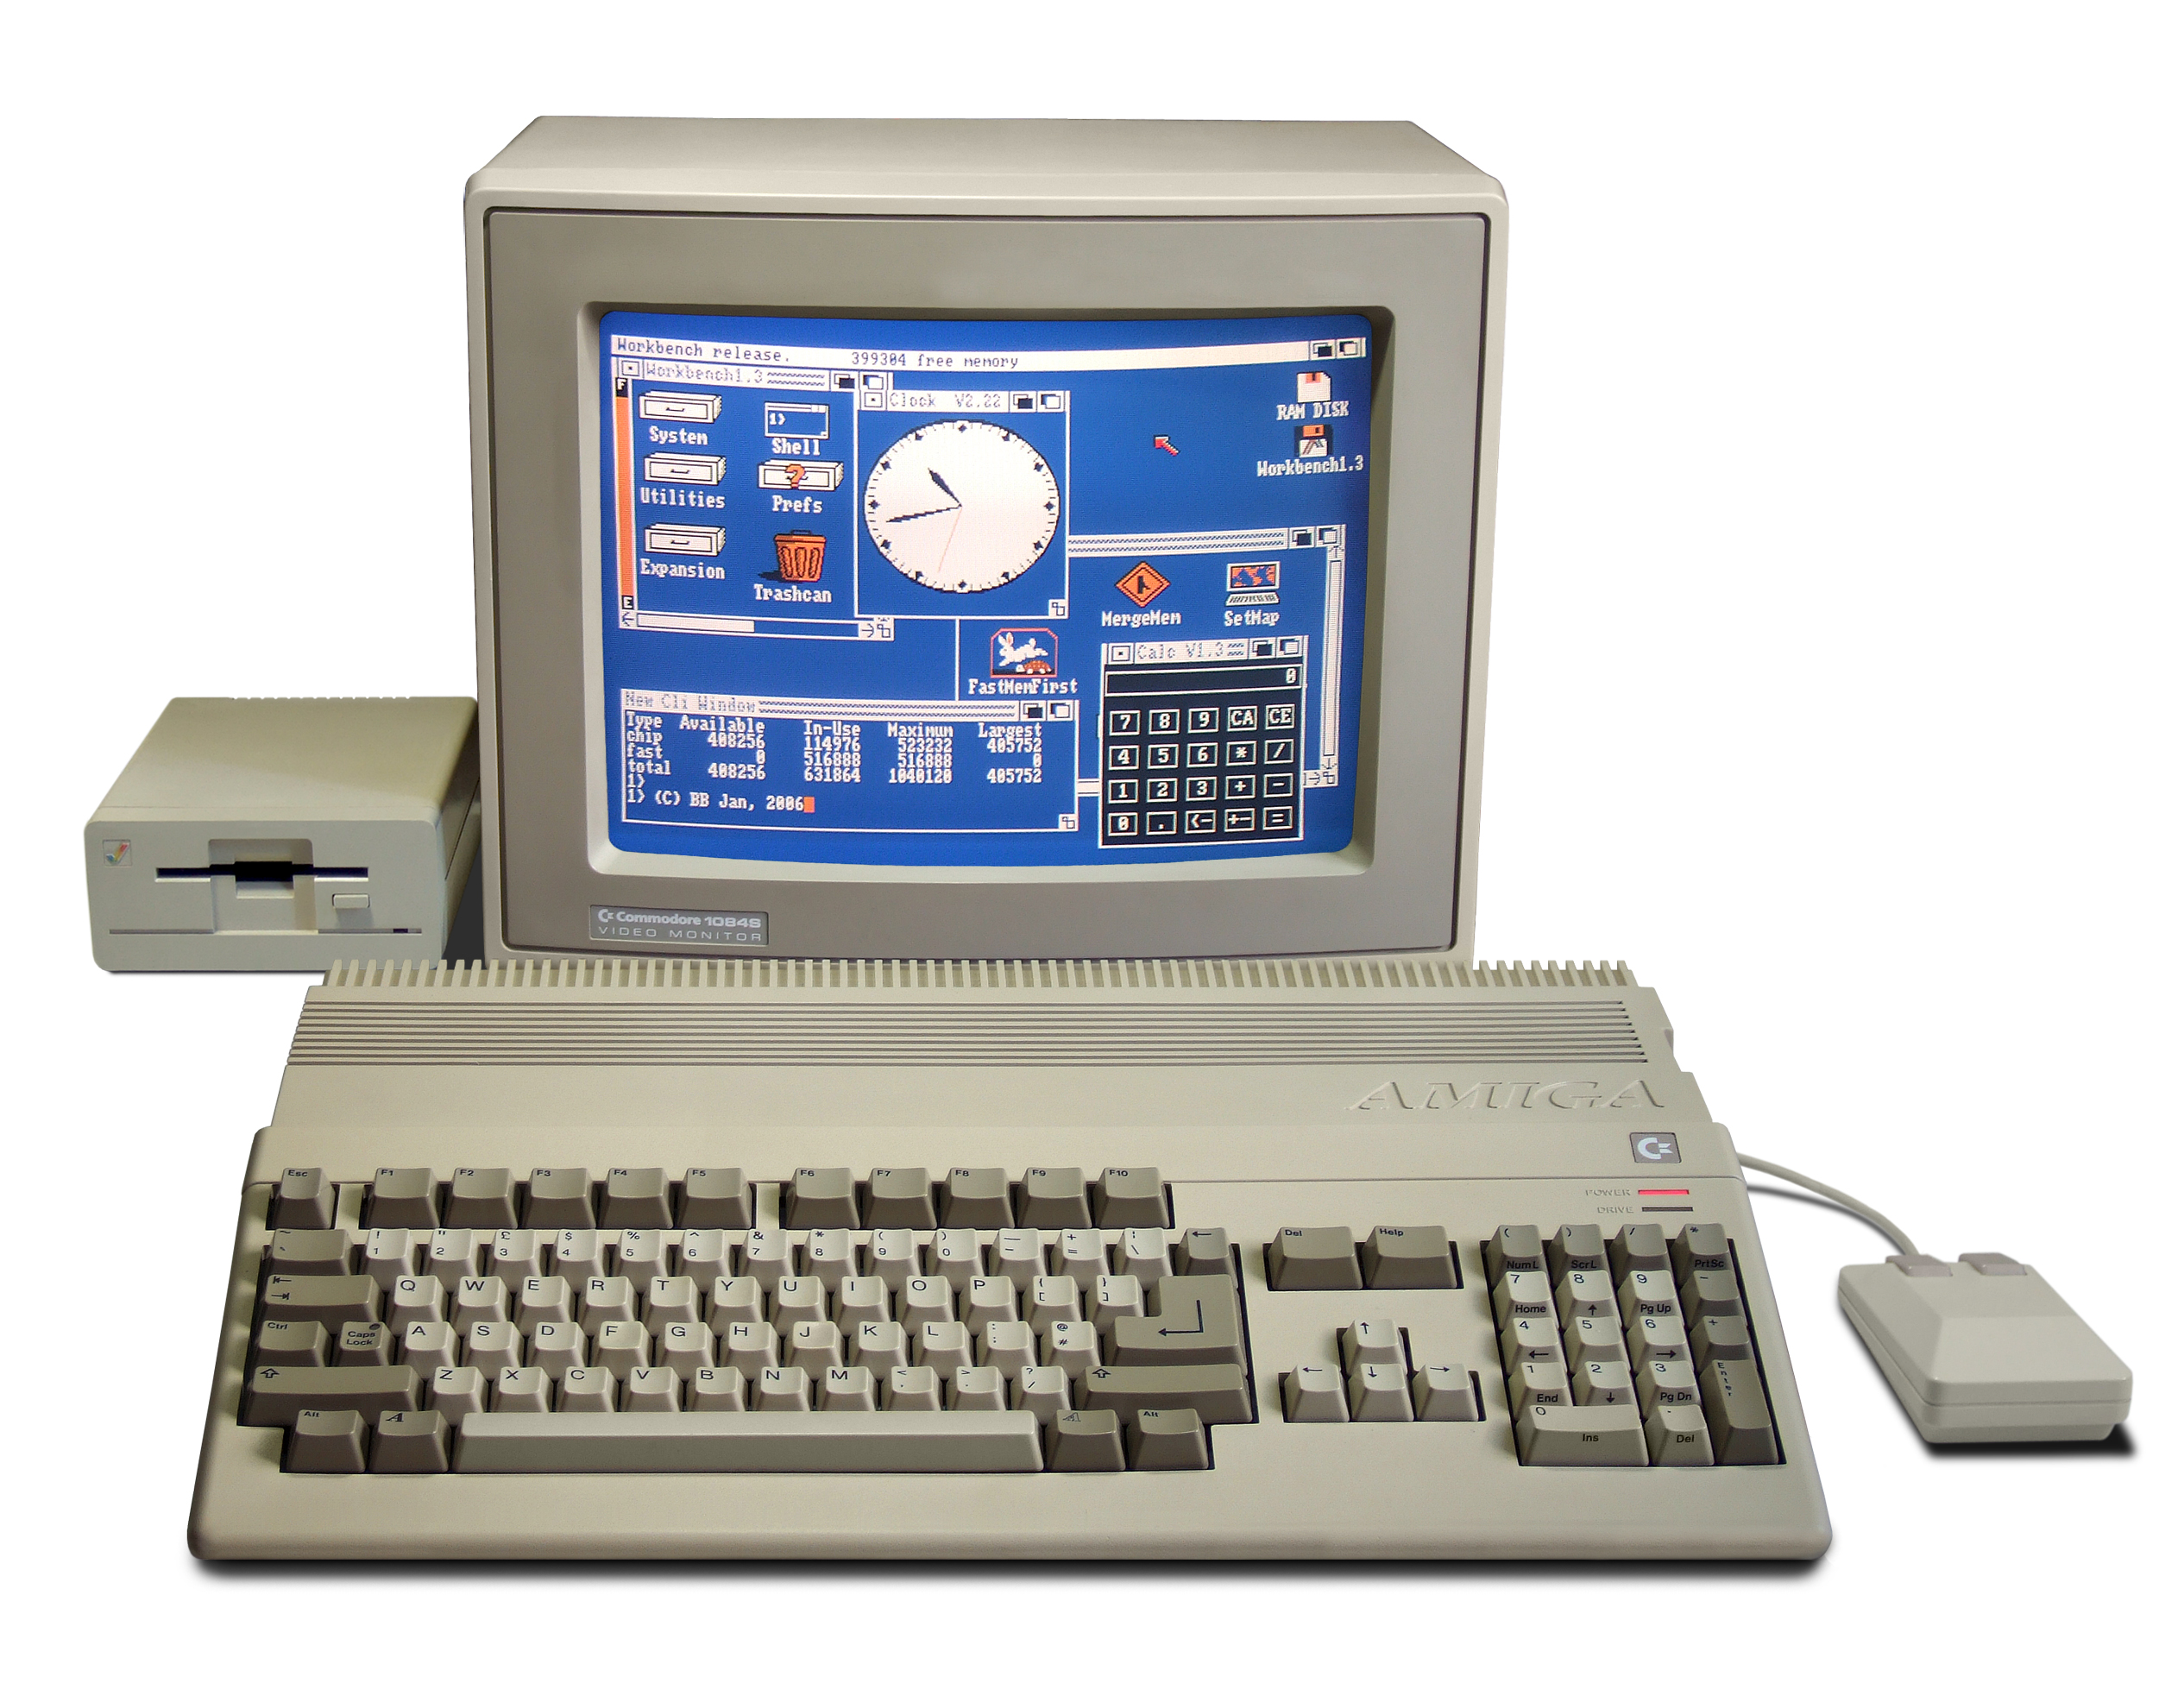
The 500 traded the 1000’s rack-mount styling for a wedge-shaped "all-in-one" case with the keyboard built in and everything on a single motherboard:
-
68000 at 7.16 / 7.09 MHz — same as the 1000.
-
512 KB of chip RAM (upgradeable to 1 MB via the "trapdoor" slot on the underside).
-
Kickstart in ROM — first with 1.2, later 1.3, later optionally 2.04 and 3.1 via ROM upgrades.
-
One built-in 880 KB floppy, expandable to four via daisy- chained external drives.
-
Same expansion port as the 1000, cost-reduced.

The 500 sold in the vicinity of six million units over its lifetime, and it did most of them in Europe. In the UK, Germany, France, the Netherlands and Scandinavia it was for several years the single best-selling home computer, particularly for games — Speedball 2, Lemmings, Kick Off 2, Shadow of the Beast, Sensible Soccer, thousands of others.
The Amiga 500 was so successful commercially that Commodore’s American management repeatedly assumed the platform was purely a games machine, which shaped the marketing (targeted at kids) and which cost the platform a whole class of business software that went to Macs and PCs instead. This is a recurring theme in Amiga history.
The A500+ followed in 1991: internally an A500 with the newer ECS (Enhanced Chip Set), 1 MB of chip RAM standard, and Kickstart 2.04 in ROM. Otherwise identical.
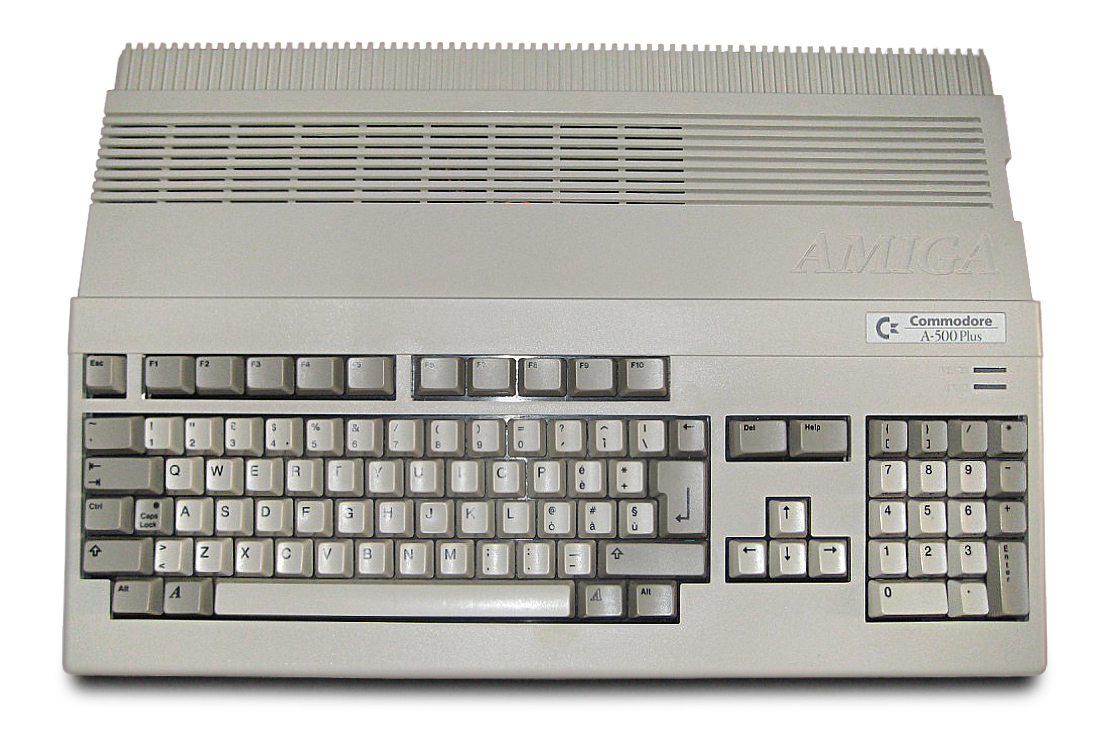
5.4. The Amiga 2000, 1987
The A2000 was Commodore’s answer to the "what do we sell for business use" question, and it was built by a different team in Braunschweig, Germany — the ex-employees of the German Amiga subsidiary bit-cross Systeme. The 2000 was a proper professional tower:
-
68000 at 7.16 MHz base (accelerator cards took it to 68020, 030, 040, or 060).
-
Room for 9 MB of RAM total (1 MB chip + 8 MB fast) on the motherboard, more with expansion boards.
-
Five 16-bit Zorro II expansion slots — the same electrical bus as the 1000’s, standardised into a proper slot form factor.
-
Four internal drive bays for 3.5" floppies, hard drives, or the famous Video Toaster card.
-
Full desktop-tower styling with a separate keyboard.
The Video Toaster is worth a paragraph. NewTek’s product was a Zorro card that turned an A2000 into a broadcast-quality video mixer with hardware chroma keying, effects, and character generation. It was used on national television — Babylon 5, seaQuest DSV, Home Improvement, Late Night with Conan O’Brien — and for a while the Amiga owned a real slice of the video production industry. Commodore never quite grasped what this meant for their marketing strategy.[5]
5.5. The Amiga 3000, 1990
The A3000 was Commodore’s late attempt to build a proper workstation. It shipped with:
-
A 68030 at 16 or 25 MHz — the first Amiga with a genuine 32-bit CPU as standard.
-
2 MB of chip RAM (with the "Fatter Agnus" allowing addressing beyond the 1 MB the OCS Agnus could reach).
-
Kickstart 2.0 in ROM — the first machine to ship with the significantly rewritten AmigaOS 2.0. The blue/orange 1.3 look was replaced by the grey 3D look you see in Workbench 2.0.
-
Built-in SCSI controller with a 40 MB hard drive as standard.
-
A flicker-fixer that could drive a VGA-compatible monitor — the previous Amigas were locked to 15 kHz signals no VGA monitor would accept.
-
Zorro III (32-bit) expansion slots.
The 3000 was a genuinely good workstation and had a fair run in video production and in graphics-arts circles. There was even an official Unix port — Amiga Unix (AMIX), based on System V Release 4 — that made it a legitimate small-office Unix server for anyone who wanted one. AMIX did not sell in significant numbers; the market for a $5,000 68030 Unix machine was small against Sun workstations at that price. But it existed, and it runs today on 3000 hardware under an emulator, and it is a fascinating artefact of what Commodore could have done if they had had a coherent strategy.
5.6. The Amiga 500 replacements: 500+, 600, 1200, 4000
By 1991–1992 the original A500 was showing its age. Commodore’s response was a family of replacements:
-
A500+ (1991) — the A500 with ECS chipset and Kickstart 2.04. Cost-neutral upgrade path.
-
A600 (1992) — a cost-reduced A500+ in an even smaller case, with a built-in IDE controller for a 2.5" hard drive and a PCMCIA slot on the side. No numeric keypad. Aimed at first-time buyers; sold poorly because everyone would rather buy the A1200 which came out at almost the same price a few months later.
-
A1200 (1992) — the AGA chipset in the A500 form-factor. 68020 at 14 MHz, 2 MB of chip RAM, built-in IDE controller, PCMCIA slot. Kickstart 3.0 in ROM.
-
A4000 (1992) — the AGA workstation. 68030 or 68040, up to 16 MB fast RAM, tower or desktop cases, Zorro III. The successor to the 3000 as the flagship.
The AGA ("Advanced Graphics Architecture") chipset was Commodore’s attempt to catch up with the SVGA cards that were becoming standard on PCs by 1992. AGA gave 256 colours from a palette of 16 million (up from ECS’s 64 from 4096), sped up the Blitter, added higher-resolution modes, and made HAM8 possible — a hold-and-modify display mode that could show all 262 144 colours simultaneously.
AGA was not enough to compete with contemporary SVGA cards, which were pushing 1024×768 in 24-bit colour by 1993. Commodore had a successor chipset in development — the AAA ("Advanced Amiga Architecture") — that would have added true 24-bit graphics and multiple simultaneous displays, but AAA was still in development when Commodore ran out of money.
5.7. CD32 and the end, 1993–1994
The CD32 launched in 1993 as Commodore’s answer to the Sega Mega-CD and the still-rumoured PlayStation. It was an A1200 with a CD-ROM drive in place of the floppy, in a low-slung games- console case, with a gamepad instead of a keyboard. It sold well in the six months of its life (roughly 100,000 units in the UK alone), demonstrating that Commodore could still produce hardware that people wanted to buy.
The problem was the balance sheet. Commodore had over-invested in factories, under-invested in R&D, over-committed to the failing Commodore 64 line for far too long, misfired badly on the US market, and burned cash trying to develop AAA. In April 1994 Commodore International filed for bankruptcy. All development stopped. The Braunschweig German engineering team was let go. The AAA silicon was never manufactured. The Amiga trademark and intellectual property went to the highest bidder in the liquidation.[6]
5.8. The wilderness, 1994–2001
The Amiga’s intellectual property passed through a sequence of owners — Escom (1995), Gateway 2000 (1997), Amino/Amiga Inc. (2000) — none of whom shipped substantial new products. Escom briefly re-manufactured the A1200 and A4000 in 1995 before its own bankruptcy in 1996; Gateway held the rights for two years without doing anything meaningful with them; Amiga Inc. was a succession of small shells that promised much and delivered little through the late 1990s and early 2000s.
In this period the software community kept the platform alive on its own. Aminet, founded 1992 by Urban Müller in Switzerland, had by 1998 grown to the largest single archive of software for any platform in the world at the time (measured by file count). Third-party companies — Village Tronic, phase 5, ELBOX, DCE — built RTG graphics cards, accelerator boards, SCSI controllers, network cards, and CPU expansions that kept the hardware running. Haage & Partner released AmigaOS 3.5 in 1999 and 3.9 in 2000 with a Commodore licence, adding modern icons, docked launch bars, RGB icon support, and updated commands. Software companies continued to ship: Personal Paint, PageStream, Lightwave, ImageFX, Directory Opus, Wordworth all had major releases in the late 1990s.
Two developments in this decade shape everything after:
-
UAE, the "Unusable Amiga Emulator" (later "Ubiquitous"), was first released by Bernd Schmidt in 1995. Written in portable C, UAE emulated the 68000, the custom chips, and the audio and floppy hardware accurately enough to run Amiga games — at first, slowly; by 1998, at real-time speeds on a Pentium 200 MHz. UAE is now the substrate on which modern Amiga use largely runs. It has forked into WinUAE (still actively developed by Toni Wilen, the reference implementation) and FS-UAE (cross-platform wrapper by Frode Solheim). Cloanto’s Amiga Forever product bundles a legally licensed Kickstart ROM on top of these.
-
AROS, the Amiga Research (originally Replacement) Operating System, started in 1995 as a clean-room reimplementation of the AmigaOS 3.1 API, initially targeting x86. Its existence means the AmigaOS API is now a portable target, independent of the ownership of the classic codebase.
Both projects were driven by community volunteers with no commercial support; both are alive and healthy thirty years later.
5.9. The PowerPC divergence, 2001–present
In 2001 a small Belgian company, Hyperion Entertainment, was contracted by Amiga Inc. to port AmigaOS to PowerPC. Hyperion had done a series of well-regarded game ports to AmigaOS (Shogo, Descent Freespace) and had the systems-programming credibility. The result — AmigaOS 4 — shipped in 2006 after a long and troubled development, targeting the AmigaOne series of PowerPC boards (Eyetech, later A-Eon Technology). AmigaOS 4.1 arrived in 2008 and 4.1 Final Edition in 2014, with continuous update packs since. Hyperion is still, in 2026, the active developer of AmigaOS 4.x.
In parallel, a separate PowerPC OS with different lineage — MorphOS — reached its first stable release in 2002. MorphOS runs Amiga applications through an emulation layer (a JIT compiler called Trance) and native PowerPC applications directly. It is source-code independent of AmigaOS but broadly source- compatible with the API. It runs on several Apple PowerPC machines — notably PowerBook G4 and Power Mac G5 — and on the Pegasos motherboards from Genesi.
Meanwhile, Hyperion also acquired the rights to the classic 68k OS and shipped AmigaOS 3.1.4 in 2018, 3.2 in 2021, and point releases since. These target the original 68k hardware (and its FPGA recreations — Vampire, MiSTer, Minimig).
The upshot for a returning engineer is: there are four living Amiga platforms today.
| Family | CPU | Current version | Notes |
|---|---|---|---|
Classic AmigaOS |
68000 / 68020 / 68030 / 68040 / 68060, or FPGA recreations |
3.2.2 |
The one this book primarily targets; runs on real hardware and under UAE |
AmigaOS 4 |
PowerPC (AmigaOne, X1000, X5000, Tabor) |
4.1 Final Edition + updates |
Hyperion’s PPC continuation |
MorphOS |
PowerPC (various Mac and Pegasos hardware) |
3.18 |
Independent PPC OS, source-compatible with AmigaOS |
AROS |
x86-32, x86-64, ARM, 68k, PowerPC |
Nightly builds |
Open source, clean-room reimplementation |
5.10. Why the Amiga looked the way it did
Two design decisions from the mid-1980s explain most of what feels alien to a modern eye.
5.10.1. Custom chips do the work the CPU cannot
The 68000 at 7.16 MHz is not fast enough to bit-blit graphics for a 320×256 hardware-scrolling game. It executes roughly 700 000 instructions per second at that clock. Filling a full-screen 320×256 8-colour bitmap with a solid colour takes 40 KB of memory writes, which at 4 bytes per instruction is 10 000 instructions, or about 15 ms of pure CPU time — 6 frames of animation. There is no CPU budget left for game logic.
So the Amiga has Agnus (bus arbitration and the Copper), Denise (video output), and Paula (audio and floppy I/O), each with direct DMA access to the shared chip memory. Agnus contains the Blitter, which is a hardware DMA engine that copies rectangular regions of chip memory in the background while the CPU is doing something else. The same 40 KB screen fill takes 2 ms of Blitter time and zero CPU time.
Agnus also contains the Copper, a display-list coprocessor
that reprograms hardware registers in sync with the video beam.
The Copper runs a program made of WAIT (wait for beam position)
and MOVE (write to a chip register) instructions, letting you
change palette entries, screen resolution, sprite positions, or
scroll offsets between one scan line and the next. This is how
the Amiga achieves things like more than 32 colours per scan
line, hardware split screens, smooth vertical parallax scrolling,
and — most famously — the copper-driven colour bars that appear
in demo credits.
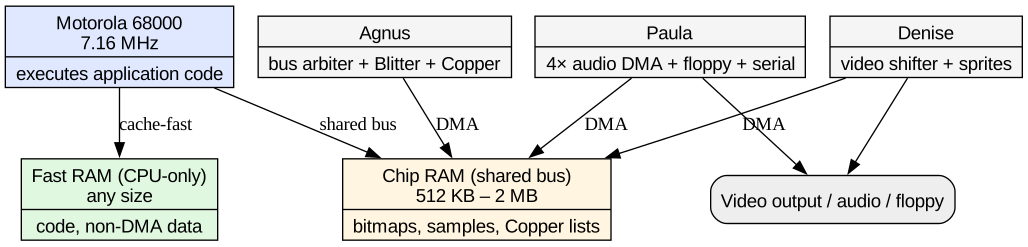
When you write Amiga graphics code you are talking to those chips as much as to the CPU. The definitive reference is the Amiga Hardware Reference Manual, 3rd edition (Addison-Wesley, 1991). The full text is on archive.org at https://archive.org/details/amiga_ham3.
5.10.2. Multitasking without an MMU
The 68000 has no memory management unit worth the name. It has supervisor and user modes and it can generate a bus error when it encounters an odd address, but that is the extent of its memory-protection story. You cannot map virtual pages, you cannot mark pages as unreadable or unwritable, and you cannot isolate a process’s address space from another’s.
The Amiga’s designers wanted preemptive multitasking anyway. The state of the art at the time on home machines was cooperative multitasking (if any) — the classic Mac had none in 1984, the Atari ST had none in 1985, Windows had none until 3.x in 1990. The Amiga shipped with preemptive multitasking, priorities, inter-process communication, and shared libraries in 1985.
They built it on top of a single flat address space. Every task
shares memory with every other task. Any pointer can go anywhere.
There is no fork, because there is nothing to copy — new tasks
are launched by allocating a stack and calling AddTask(). If
you dereference a null pointer, you do not get a segfault; you
get a Guru Meditation and a reboot.
This shapes the API. Every OS structure you allocate must eventually be handed back to the OS in a way that survives whatever else went wrong. There is a whole style of Amiga programming built around "allocate in a paranoid order, free in reverse order, and check for NULL at every step." Chapter 9 covers the idioms in detail.
Modern Amigas can do better — the 68030 and above have MMUs, AmigaOS 4 uses memory protection between processes, MorphOS and AROS have their own approaches — but the classic API assumes the flat-memory model, and everything downstream inherits that assumption.
5.10.3. The library dispatch model
Every OS service is a struct Library — a header followed by a
table of function pointers. You obtain a pointer to the header by
name:
struct Library *base = OpenLibrary("intuition.library", 39);And you call its functions through fixed negative offsets. On the 68000, this is a single assembly instruction:
    move.l    _IntuitionBase,a6
    jsr       -30(a6)               ; DisplayBeep(NULL)
Every library entry point is at a stable offset — -30(a6) is
DisplayBeep, -36(a6) is RemakeDisplay, and so on. This is
the "LVO" (Library Vector Offset) mechanism. In C, the compiler
hides the assembly with inline stub functions; in
assembly, you write the offsets directly (see the _LVO* constants
in the include files).
Because the dispatch is data-driven — the offset table is at
base - 6 — you can patch any library entry at runtime:
SetFunction(IntuitionBase, -30, my_new_DisplayBeep);SetFunction swaps the entry-point pointer in the vector table
for one of your own. Every subsequent call to DisplayBeep
anywhere on the system goes through your replacement. This is
how SnoopDos works (patches every OS entry point, logs the
call, forwards to the original), how Enforcer works (patches
memory-access entries), how the OS 2.0+ AGA patch on OCS
machines worked, and how a generation of utilities extended
the OS without modifying it.
The disadvantage is fragility. Two utilities patching the same entry point can conflict; a bad patch takes down the machine irrecoverably; the LVO mechanism is why AmigaOS 4 abandoned the model in favour of interface tables (see chapter 13). But the composability was extraordinary, and in classic AmigaOS programmes it is a load-bearing idiom.
5.10.4. The message-passing IPC
Every task has a signal mask — 32 bits it can Wait() on.
Every message goes to a message port, which has an owner
task and a signal bit. PutMsg() links a message onto a port’s
list and signals the owner. The owner wakes from Wait(), calls
GetMsg(), processes, and (optionally) ReplyMsg().
Cost: half a dozen instructions per message-send. There is no kernel copy because there is no kernel isolation to copy across. Compare to a POSIX pipe on Linux: a system call, a data copy through the kernel, and a buffered kernel object.
The cheapness of Exec messaging is what makes it viable to
structure everything around messages: filesystem operations,
window events, timer expirations, ARexx command dispatch, inter-
handler communication. In the standard AmigaOS design pattern,
a "device" is a library whose one function (DoIO) takes an I/O
request as a message, delivers it to a queue serviced by the
device’s own task, and blocks until the reply comes back. You
learn the pattern once and it applies to serial ports, hard
drives, network sockets, timers, and everything else.
5.11. Where we go next
The next chapter puts you in front of a running Amiga so you can follow along, either on a modern host under emulation or on real hardware you have restored.
Chapter 6. Getting Hands-On
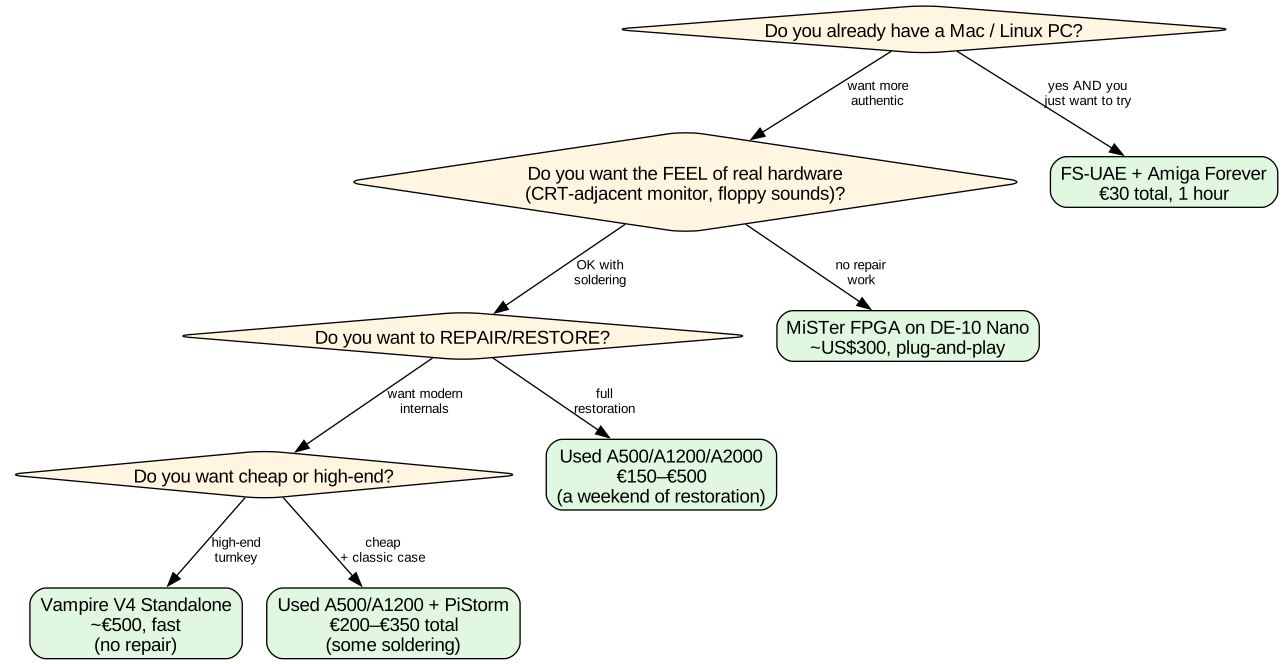
You have three practical routes to a working Amiga in 2026: emulation on the machine you already have, an FPGA recreation, or an original 68k machine off eBay. This chapter walks through each in enough detail that you can pick one, buy or download the parts, and be running Workbench by the end of the day. It closes with a recommended default setup that the rest of the book assumes.
6.1. The decision tree
6.2. Route 1: Emulation (the recommended default)
Emulation is not a compromise. UAE and its descendants have been developed continuously since 1995; on any modern CPU they emulate a 68060 A4000 faster than the hardware itself ran, with cycle-exact timing that is accurate enough for demos and games that depend on Copper trickery. It is also the only way to get instant snapshots, directory-based virtual disks, and painless file sharing with the host.
Three UAE forks matter today:
WinUAE is the reference implementation. Windows-native, updated constantly (monthly betas, quarterly stable releases), and used by every serious Amiga developer for testing. Runs perfectly under Wine on macOS and Linux, but the launcher UI is Win32 through-and-through.[7]
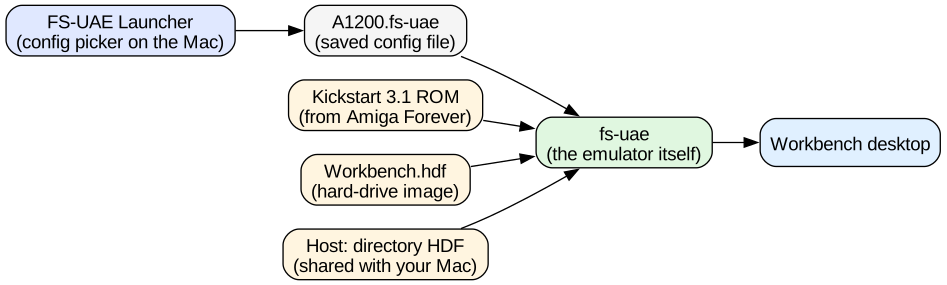
FS-UAE is a cross-platform wrapper (macOS, Linux, Windows) around the WinUAE core, with a friendlier configuration UI and a companion program called FS-UAE Launcher that manages a local library of disks, hard-drive images and configurations.[8] This is what the book assumes unless it says otherwise.
Amiga Forever, from Cloanto, bundles WinUAE with a legally licensed Kickstart ROM set and a curated selection of Workbench disks. It is the easiest legal on-ramp because the Kickstart ROMs are otherwise a legal problem: they are copyrighted, and you are only entitled to a copy if you own the corresponding hardware. Amiga Forever costs money (roughly €30 as of writing) but it is the smoothest path.[9]
6.2.1. A word on ROM legality
Kickstart ROMs are copyrighted by Amiga Inc. (now inherited by Cloanto for classic 68k and Hyperion for OS 4). The commonly-heard folklore is "the ROMs are freely available on the internet" — this is true in the sense that any given ROM file is a few Google searches away, and false in the sense that downloading one without a licence is unambiguous copyright infringement in every jurisdiction with an active copyright regime.
The clean routes:
-
Amiga Forever — bundled with legally-licensed ROMs for the full range (Kickstart 1.2, 1.3, 2.04, 3.0, 3.1, and — with the Plus Edition — 3.X).
-
Hyperion sells Kickstart 3.1.4 and 3.2 ROMs standalone.
-
Cloanto also sells the individual ROMs.
-
If you own the physical hardware, you may dump the ROM yourself for personal use in most jurisdictions. Tools like
Dump Kick(Aminet) or hardware dumpers like the ROM-A-Nator or KryoFlux support this. -
AROS-ROM is a fully open-source Kickstart substitute that will boot Workbench 3.1 disks for most purposes. Not bit-perfect but legally clean and free.
If you plan to publish anything based on your emulator setup — tutorials, screenshots for a book, YouTube videos — the safe default is to buy Amiga Forever and use its bundled ROMs.
6.2.2. Minimum viable setup on a Mac
You want:
-
Kickstart 3.1 or later (Amiga Forever includes it; alternatively, Hyperion sells the Kickstart 3.2 ROM standalone).
-
A Workbench 3.1 or 3.2 install (Amiga Forever includes 3.1; the 3.2 disks are separately purchasable from Hyperion).
-
A configured hard-drive image of at least 100 MB. Use one big HDF file, or point the emulator at a directory on your host filesystem and let it look like a hard drive to the Amiga.
-
Optional but recommended: a second, smaller HDF for a work volume, so you can back up your projects without cloning the whole system drive.
Installation:
$ brew install --cask fs-uae fs-uae-launcher
$ open -a "FS-UAE Launcher"
On first launch:
-
Import your Amiga Forever ROMs (File > Import > Kickstart from Amiga Forever…) or point Launcher at the ROM files directly.
-
Under Configurations, create a new one; pick model A1200, memory 8 MB Fast RAM, Kickstart 3.1 or 3.2.
-
Under Hard Drives, either attach a Workbench HDF or a host directory (a "directory hard drive"). A directory HDF appears as a normal Amiga volume but is really a folder on your Mac — extremely useful for shipping files in and out.
-
Start the configuration. If everything is right, you get the Kickstart hand-holding-a-disk screen, then Workbench.
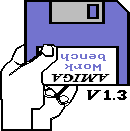
If you get here and no disk is inserted, either the ROM is loaded
but no bootable volume was found, or your emulator is intercepting
the ROM before it reaches your hard drive. Under FS-UAE, open the
running window’s menu and check Media > Hard Drive 0 — is the
HDF or directory actually attached? If yes, the volume’s S/
directory probably doesn’t contain a Startup-Sequence. On a stock
Amiga Forever image, everything is set up; if you built the volume
by hand you may need to install Workbench onto it (drag-and-drop
from a mounted Workbench disk works).
6.2.3. A minimum viable configuration file
FS-UAE configurations are plain .fs-uae text files under
~/Documents/FS-UAE/Configurations/. You can (and should) keep
them under version control. A reasonable starter for a "modern
Amiga workstation," saved as A1200-work.fs-uae:
[fs-uae]
amiga_model                    = A1200
accuracy                       = 1
kickstart_file                 = $BASE/Kickstarts/kick40068.A1200.rom
hard_drive_0                   = $BASE/Hard Drives/Workbench.hdf
hard_drive_1                   = $BASE/Hard Drives/Work
chip_memory                    = 2048
fast_memory                    = 8192
cpu                            = 68020
floppy_drive_0                 = $BASE/Floppies/blank.adf
window_width                   = 1440
window_height                  = 900
fullscreen_mode                = window
scanlines                      = 0
uae_scsi_device0               =
netplay                        = 0
The hard_drive_1 = $BASE/Hard Drives/Work line is the trick: a
plain directory (no .hdf extension) appears inside the Amiga as
a volume called Work:. Every file you drop into that folder on
your Mac appears there in the Amiga, and vice versa. This is the
easiest way to move a C source file back and forth for
cross-compilation.
Under WinUAE (Windows or Wine), the equivalent is Hard drives > Add Directory; the same shared-folder semantics apply.
6.2.4. WinUAE-specific setup
If you are on Windows or you prefer WinUAE’s more configurable UI:
-
Download from https://www.winuae.net/. Latest stable is fine; the beta channel adds features but is not required.
-
Extract into
C:\WinUAE, runwinuae.exe. -
On the launch screen, pick a "Quickstart" — start with A1200 (Fast) as a sanity check.
-
Under CPU and FPU, pick 68020 and check JIT (just-in-time recompilation). This makes the emulator fast enough that it does not matter if you turn on cycle-exact timing.
-
Under RAM, set 2 MB Chip and 8 MB Fast Z3 (32-bit fast RAM on the Zorro III bus).
-
Under Hard drives, either attach an HDF or Add Directory. Point it at a folder on your Windows machine.
-
Under Display, pick a windowed 1024×768; set Interlaced to double-line-doubling if you want a CRT-ish look.
-
Save the config as
A1200-work.uaefor reuse. -
Start.
WinUAE has settings for approximately everything: chip-set revision (OCS/ECS/AGA), CPU cache emulation, floppy-drive sound effects, per-game overrides, RTG graphics-card emulation (Picasso IV, Cirrus GD5446, uaegfx), hardware serial and parallel ports, Ethernet (via slirp NAT or bridge), and a "Directly Boot" mode that skips the boot sequence for one-off testing.
Two features every developer eventually uses:
-
Debugger (Ctrl-D in the emulator window): a 68k monitor with disassembly, memory dump, breakpoints, and step. Not
gdb, but usable for low-level poking. -
Serial capture: enable the serial port with a "raw log to file" target and any
KPrintfoutput from your Amiga programs lands in a text file on your Windows host in real time. This is the standard debug-print channel.
FS-UAE inherits WinUAE’s core so most WinUAE settings are
available; the FS-UAE Launcher UI just exposes fewer of them by
default. The .fs-uae config file accepts every WinUAE key.
6.2.5. Snapshots
Both WinUAE and FS-UAE let you save a snapshot: the complete state of the emulated machine — RAM contents, CPU registers, custom chip state, floppy positions — to a file, and restore it later. This is not just a save-and-quit; it is a genuine time-travel primitive. Half-way through a compile, save. Something goes wrong, restore. Ten seconds later you are exactly where you were.
In FS-UAE, F12 opens the on-screen menu; there is a "Save State" option and a numbered list of slots. In WinUAE, the F12 menu is similar. States survive across sessions.
For development, snapshot at the start of your build (after all tools are loaded and CWD is set) and restore before each new compile. Save yourself 30 seconds of boot every iteration.
6.3. Route 2: FPGA recreations
An FPGA implements the custom chipset and CPU in reconfigurable silicon and pairs it with modern I/O (HDMI, USB, SD card). The result is not emulation; it is a hardware clone. As of 2026 the practical options are:
6.3.1. MiSTer FPGA
The most widely-used retro FPGA platform. Built around the Terasic DE-10 Nano development board (Intel/Altera Cyclone V SoC — a dual-core ARM plus a large FPGA fabric), with community- developed I/O adapter boards for HDMI audio, SD card, USB controllers, and RGB video.
The setup, start to finish:
-
Buy a DE-10 Nano (~US$130 from Terasic direct or Digi-Key).
-
Buy a MiSTer I/O board (~US$45 from any MiSTer distributor). This adds the SD-card slot, USB hub, HDMI audio, real-SCART output, and (optionally) a 128 MB SDRAM module.
-
Buy the SDRAM 128 MB module (~US$45). Amiga cores need this for chip RAM and fast RAM; without it you are stuck at 8 MB total.
-
Buy a good 32 GB micro-SD card (~US$10). Larger is fine.
-
Download the MiSTer main firmware from https://github.com/MiSTer-devel and flash the SD card.
-
Boot the DE-10 Nano off the SD card; the MiSTer main menu appears on HDMI. Menu → Amiga → Minimig-AGA. You are booting Workbench.
Total: ~US$300. The community’s software (Minimig, various add-ons) is under continuous development; you update by pulling the latest firmware onto the SD card and rebooting.
The Amiga core supports A500, A600, A1200, and A4000 configurations, OCS/ECS/AGA chipsets, up to 68040 CPU emulation, and a full RTG graphics card. Every classic Amiga game and demo the community has tested runs correctly.[10]
| Strengths | Weaknesses |
|---|---|
Extremely accurate — FPGA cycle-perfect |
No case; open PCB unless you buy a third-party case |
Cheap (~US$300 all-in) |
Requires assembly (soldering not needed, but stacking cards) |
Runs Amiga cores AND dozens of other retro systems (Atari ST, Neo Geo, C64, SNES, Genesis, etc.) |
Community-driven — support level varies by core |
Active development, monthly firmware updates |
Not a "real" Amiga if authenticity matters |
6.3.2. Vampire V4
The Apollo Team’s Vampire V4 Standalone is an Amiga-shaped FPGA machine (Xilinx-based) containing an implementation of an Apollo Core CPU (a superscalar 68080-compatible with SIMD extensions), 512 MB of RAM, HDMI video, USB, Ethernet, SD, MMC, and a Kickstart-compatible ROM.
The Apollo Core is more than an emulator — it is a next-generation 68k CPU that Motorola never made. It runs classic 68000/020/030 code at speeds equivalent to a 500 MHz+ 68060 (Motorola’s actual last 68k was the 68060 at 66 MHz), and it adds new instructions that AmigaOS 4.x-generation software can take advantage of. The Apollo Team also sells Vampire V4 A600 and V4 A1200 accelerator cards that fit inside real Amigas.[11]
The Standalone ships with AROS m68k as its default Kickstart, which is free-software-clean. You can flash a purchased AmigaOS 3.1/3.2 ROM if you want the commercial OS.
Price: €500 for the Standalone, similar for the accelerator cards. For that money you get an Amiga that is measurably faster than any real Amiga Commodore ever shipped, plus modern I/O.
6.3.3. Minimig-derived boards
The Minimig was the original open-source FPGA Amiga recreation, released by Dennis van Weeren in 2007. Its Verilog core is the ancestor of MiSTer’s Amiga core, and it has been folded into several standalone products over the years. In 2026 the practical descendants are MiSTer (above) and a few niche boards — MiSTeX (a MiSTer-compatible board with better HDMI) and the Turbochameleon 64 (originally for the C64 but with an Amiga core option).
For most users, MiSTer is the right answer in the Minimig family.
6.3.4. Which FPGA route
-
MiSTer if you want the cheapest FPGA option and don’t mind a bare PCB or plastic case. Also right if you want a general retro-computing platform and the Amiga is one of many systems.
-
Vampire V4 Standalone if you want the fastest possible Amiga in an Amiga-shaped case with modern I/O and are willing to pay for it.
-
Vampire V4 accelerator if you already have a real A500, A600, A1200 or A2000 and want a serious speed and RAM upgrade while keeping the original case and chipset.
6.4. Route 3: Original hardware
If you have an A500 or A1200 in the loft, or you buy one on eBay, budget a weekend for restoration.
6.4.1. What to look for on eBay
-
A500 — the most common. €80–€180 for a working, unmodded machine. Cheaper if it needs work. Look for photos of the motherboard; anything with visible battery corrosion is a repair project.
-
A500+ — similar prices but slightly rarer; has the ECS chipset (better than OCS) and a Varta battery that will have leaked.
-
A600 — undervalued and cheap (€50–€100) because contemporary buyers didn’t like the missing numeric keypad. Excellent hobbyist machine: small, built-in IDE controller, PCMCIA slot. Also has a Varta.
-
A1200 — the most popular current-day retro platform, so prices are €200–€500. AGA chipset, IDE, PCMCIA, expandable.
-
A2000 — €300–€700. Big desktop tower, real Zorro II slots. Original condition units are rare and prized.
-
A3000 — €500–€1000. Desirable because of the flicker fixer, the built-in SCSI, and the workstation styling. Battery leaks are a near-certainty.
-
A4000 — €600–€1500. The AGA workstation. Also has a battery-leak risk.
-
CD32 — €200–€500 depending on completeness. Worth having as a games console; can be upgraded with a keyboard and floppy adapter to run as an A1200-equivalent.
-
A1000 — €500–€2000 depending on condition. The launch machine. Collectible more than practical, but a fully-working one is a joy.
Things sellers omit: whether it powers on, what Kickstart is socketed, whether the trapdoor RAM board is present, whether the floppy drive actually reads disks. Ask specifically. If a listing doesn’t show a motherboard photo and doesn’t mention battery status, either haggle low or walk away.
6.4.2. The characteristic failures
Nearly every unrestored Amiga will need at least one of these addressed:
-
Leaking Varta backup batteries on A500+, A600, A2000, A3000, A4000. These will have destroyed the motherboard traces around the battery. Removing the battery and repairing the traces is the standard first hour of restoration. The battery is a Ni-Cd, rechargeable, mounted directly on the motherboard, and it leaks a corrosive alkaline liquid that eats copper. On A2000/3000/4000 the battery is prominent; on A600/A500+ it is in a corner. On some machines the corrosion has spread far enough to lift traces and dissolve component leads within a centimeter or two of the battery.
-
Perishing capacitors, particularly the surface-mount electrolytics on A600 and A1200 boards. After 30 years the electrolyte dries out or leaks; symptoms are a machine that boots but is unstable, has audio noise, or has display glitches. The fix is a full recap — replacing the ~20 SMD electrolytics with modern tantalums or aluminum polymer parts. Kits are available from Amiga stores in Europe and the US.
-
Dead floppy drives. The stepper motor rubber-belt-and-lubricant combination degrades in a predictable way; belts crack, grease hardens, heads develop dirt. Cleanable and repairable in most cases; if not, replacement drives (Chinon FB-354 or Sony MPF-920 harvested from PCs) are cheap.
-
Missing Kickstart ROM chips or wrong ROM revisions. If the board has a socketed ROM, check the label before booting. A running machine with Kickstart 1.2 will still boot Workbench 3.1 disks up to a point; some things won’t work.
-
PSU failure. Original Commodore PSUs from 1987 are running well past their design life; over-voltage on the +5V line will destroy the RAM chips before you know what happened. If the PSU has not been replaced recently, replace it. Modern replacements (from ReAmiga, RetroKitsShop, AmigaKit) cost €30–€80 and are safer than the original.
-
Yellowed plastics. Purely cosmetic; the ABS case yellows under UV. Retrobrite treatment (hydrogen peroxide + UV) reverses it, but is a whole additional weekend and requires care.
6.4.3. Modernising a real Amiga
Even if you keep the original chipset and CPU, there are essentially universal upgrades you will want:
-
Floppy replacement: a Gotek floppy emulator (US$25 from AliExpress, +$0 firmware from GreaseWeazle project) replaces the noisy failure-prone real floppy with a USB stick that presents
.adfimages to the Amiga. Works on every Amiga. -
Storage replacement: a compact-flash to IDE adapter on A600/A1200 or a SCSI2SD on A2000/3000/4000. Both let you boot from a flash card that you can freely image from a modern PC. Faster and quieter than a mechanical HD.
-
Video replacement: an RGB2HDMI or Indivision AGA card converts the Amiga’s 15 kHz RGB output to a signal a modern HDMI monitor accepts. Otherwise you need a CRT or a scaler like the OSSC or Retrotink 5X-Pro.
-
RAM expansion: trapdoor RAM on A500/A500+/A600 (up to 1 MB extra chip RAM), or Fast RAM cards up to 8 MB. Fast RAM makes a substantial difference for anything CPU-bound.
-
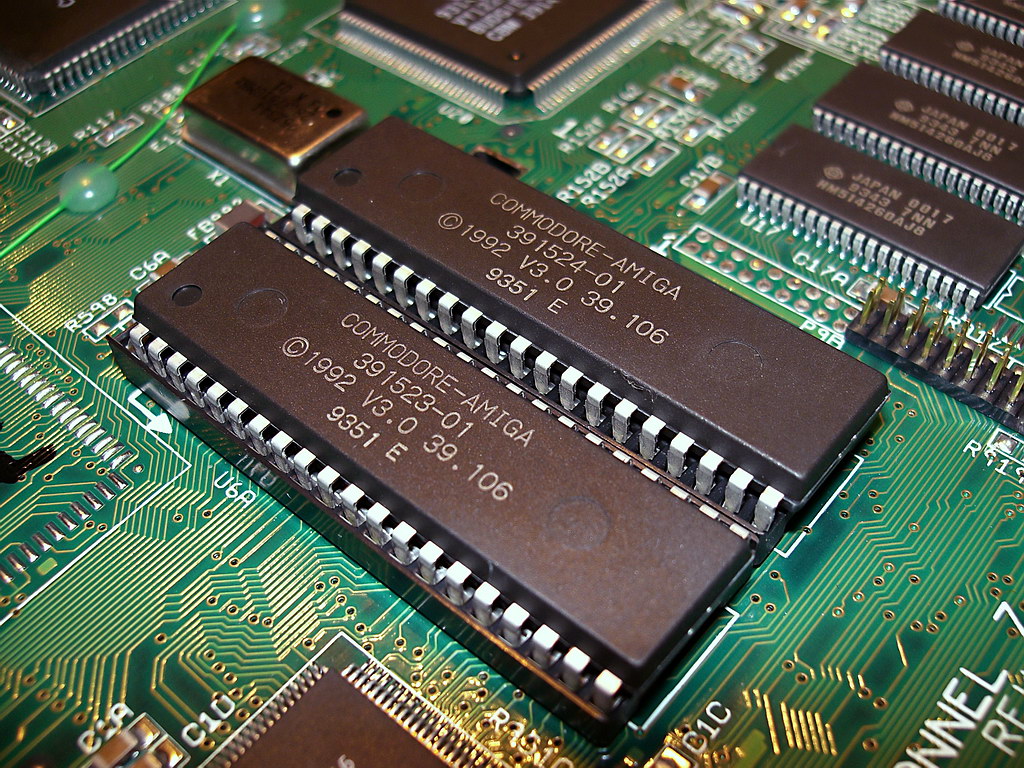
Accelerator card: on A500/A600/A1200/A2000, a modern accelerator adds a faster CPU (68030, 68040, 68060, or the Apollo Core) and MB of Fast RAM. Vampire (see FPGA section), TerribleFire boards (open-source), and Individual Computers ACA boards are the current options. PiStorm is the cheapest.
-
Network card: for A2000/3000/4000 in a Zorro slot; A1200/A600 via PCMCIA. X-Surf and similar. Not needed if you have a PiStorm (which provides Ethernet through the CPU socket).
6.4.4. PiStorm: the transformative upgrade
The PiStorm and PiStorm32-lite are boards that plug into the CPU socket of an Amiga and use a Raspberry Pi (Pi 3A/3B for the original PiStorm, Pi 4 CM4 for the PiStorm32-lite) to emulate a fast 68040 or Apollo Core 68080-compatible CPU, plus hundreds of MB of memory, an RTG graphics card, and an Ethernet adapter — all through the CPU-socket bus.
The result: a stock A500 with a PiStorm becomes something that runs Kickstart 3.2 at 100 MHz-equivalent speeds, has 500 MB of Fast RAM, drives a modern HDMI monitor at 1024×768 in 24-bit colour via emulated RTG, and has SSH/HTTP over Ethernet. Under €100 all-in.
The setup, on an A500:
-
Buy or 3D-print the PiStorm PCB. Order the board from https://github.com/captain-amygdala/pistorm (open-source; any PCB house will manufacture from the Gerbers).
-
Buy a Raspberry Pi 3A+ (~€30) and a suitable microSD card (~€10).
-
Extract the 68000 from the A500’s CPU socket. This is a 40-pin DIP socket; you need a chip-puller or a careful pair of screwdrivers.
-
Plug the PiStorm PCB into the CPU socket. It has a passthrough socket on top for the original 68000, or you can leave the original 68000 out entirely.
-
Flash the PiStorm firmware image onto the Pi’s SD card. This is a small Linux system that boots straight into the PiStorm emulator.
-
Power on the A500. It boots into Workbench with the emulated 68040 CPU visible from Amiga software.
-
Configure the SD card’s
emulator.cfgto point at your Amiga hard-drive image, network settings, and RTG resolution.
The PiStorm community’s documentation on GitHub is excellent and covers every model of Amiga.[12]
6.4.5. Modernising: a recommended combination
For A500 or A600:
-
PiStorm (€40 PCB + €40 Pi + €10 SD) — €90.
-
Gotek floppy emulator (€30 + firmware).
-
Modern PSU (€35).
-
Original monitor kept, or an RGB2HDMI adapter (€30).
Total: €190 for a machine that runs modern Amiga software at modern speeds. Time investment: an afternoon, mostly for the PSU swap and the floppy replacement.
For A1200:
-
PiStorm32-lite or a Vampire V4 accelerator.
-
CF-to-IDE (€10) with a 4 GB CF card.
-
Modern PSU (€35).
-
Optional: Indivision AGA MK3 for VGA output (~€120).
Total: €200-€400 for a full-featured modern Amiga in the original case.
6.5. Picking an OS version
You will hear people evangelise Kickstart 1.3 for the retro authenticity, and Workbench 3.1.4 or 3.2 for actually getting work done. The trade-offs:
| Version | Pros | Cons |
|---|---|---|
1.3 (1988) |
Runs on smallest hardware (256 KB), maximum authenticity |
No modern conveniences: no ARexx, no assign-of-assign, no LFORMAT, no path-adds, small filesystem cache |
2.04 (1991) |
Introduces the grey 3D look, ARexx bundled, better Shell, modern icons |
Still limited in some ways vs 3.x |
3.0 (1992) |
First AGA-aware, adds proper Datatypes |
Superseded by 3.1 |
3.1 (1994) |
Sweet spot for classic Amiga: full ARexx, all standard commands, full modern Datatypes, and last version Commodore shipped |
No native HD icons, dated Shell |
3.9 (2000) |
Modern icon set, docked launch bar, XPK, updated Datatypes, better Shell |
Requires MB of RAM; some 1.3-era software resents it |
3.1.4 (2018) |
Hyperion first pass at modernising 3.1 — full modern Datatypes, ReAction, updated commands |
Modest changes; superseded by 3.2 |
3.2.2 (2023) |
The current 68k Amiga OS. Modern Shell, persistent history, better filesystem, ReAction in ROM, native PNG/JPEG datatypes |
Costs money; slight compatibility issues with a handful of 1.3-era software |
This book targets Workbench 3.1 or 3.2 — old enough to be faithful to the classic API, new enough to include modern conveniences (better Shell, TCP/IP support out of the box, hard- disk-first workflow).
If you have neither and want to try, install AROS m68k on your emulator — it is free and boots most 3.1-era software.
6.6. Verifying your setup
If you can boot to Workbench and open a Shell — the icon lives in
SYS:System/Shell — you are ready. As a smoke test, open a Shell
window and type:
1> Version
Kickstart version 47.111, Workbench version 47.42
That is Workbench 3.2.2. Any 47.x or 45.x tells you you are on OS
3.1.4 or later. Version on OS 3.1 reports 40.68 or 40.63.
Version on OS 1.3 reports 34.5. Keep this number handy — later
chapters occasionally note version-specific behaviour.
Two more smoke tests worth running:
1> Info
Unit  Size    Used    Free Full Errs   Status   Name
DH0:  100M   32.4M   67.6M   32   0  Read/Write Workbench
DH1:   50M    1.2M   48.8M    2   0  Read/Write Work

1> Assign
Volumes:
  Workbench [Mounted]
  Work      [Mounted]
Directories:
  SYS       Workbench:
  C         Workbench:C
  S         Workbench:S
  L         Workbench:L
  ...
If both of those look sane, you have a working setup. If Info
reports Read/Write on your Workbench volume you should also
verify write access:
1> Echo "hello" >T:test
1> Type T:test
hello
1> Delete T:test
T: is the temporary-file assign; if writing to it works you are
in business. T: is normally assigned to RAM:T so this
exercises RAM-disk creation as well.
Now the terminology chapter.
Chapter 7. Terminology and Mental Model
Almost every fight a returning engineer has with an Amiga is a vocabulary fight. The concepts are usually the same as on Linux; the words for them are different, and the words that look familiar have subtly different meanings. This chapter is the dictionary. Read it once, then keep [Appendix A: Command Cheatsheet] next to your keyboard for the rest of the book.
7.1. The concept map at a glance
| Linux / macOS | Amiga | Notes |
|---|---|---|
Kernel |
Exec |
Preemptive multitasker with message-passing IPC. Ships in the Kickstart ROM. |
Shared library ( |
Library ( |
Loaded on demand into shared memory. |
Device driver |
Device ( |
Same shape as a library, but organised around a message-passing I/O request queue rather than function calls. |
Kernel module |
Handler, Resource, BOOPSI class |
Handlers extend the filesystem ( |
Process |
Task or Process |
Tasks are Exec’s raw scheduling unit; Processes are Tasks plus DOS environment (CLI, CWD, stdin/stdout). |
|
No equivalent |
Tasks are created with |
Thread |
Task |
A task is a thread. There is no per-process address space to be shared, so the distinction collapses. |
POSIX signal |
Signal bit (0..31 per task) |
Exec signals are lightweight bit-flags used with |
Pipe |
PIPE: handler |
A named-pipe filesystem device. Real Unix-style pipes are also supported by the Shell. |
Mountpoint |
Volume |
Volumes have names ( |
Device node ( |
Device unit ( |
The colon is part of the name. |
Environment variable |
ENV: variable (global) or local variable (Shell scope) |
Global env vars are files in |
|
Path (Shell command) |
A per-shell searchpath, distinct from the command’s location. The |
|
S:Startup-Sequence, S:User-Startup, S:Shell-Startup |
Startup-Sequence runs at boot; User-Startup is the user hook inside it. Shell-Startup runs at each new Shell. |
X11 / Wayland compositor |
Intuition |
The windowing system, part of the OS ROM. |
Window manager |
Intuition + Workbench |
No separate WM; Intuition handles window frames, and Workbench is the file-manager desktop process. |
Widget toolkit (GTK/Qt/Cocoa) |
gadtools.library, MUI, ReAction, ClassAct |
See Section 7.6 below. |
DBus / XPC |
ARexx port (per application) |
Applications register named ports; any script can send commands. Native to the OS. |
systemd unit |
Commodity or WBStartup drawer |
Commodities are input-hook daemons; WBStartup runs Workbench-launched programs at boot. |
clipboard |
Clipboard ( |
256 numbered clipboards. Only unit 0 is used by most apps. |
MIME / file magic |
Datatypes |
System-wide registry of format handlers; any DT-aware app can open any registered format. |
The rest of this chapter unpacks the terms that are load-bearing for everything that follows.
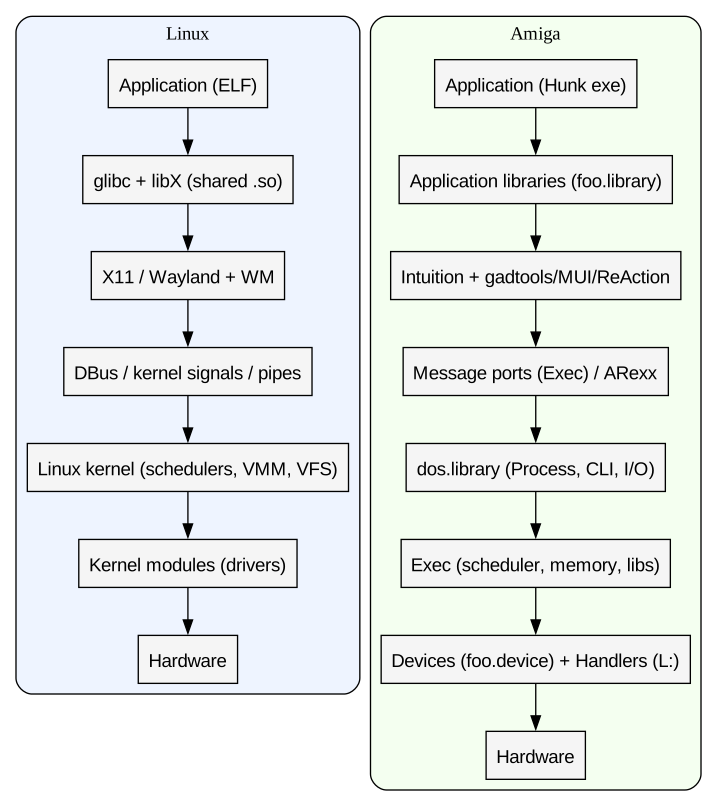
The whole OS stack, one picture, Linux on the left:
7.2. Kickstart vs Workbench
The single most common Amiga terminology confusion:
-
Kickstart is the ROM. It contains Exec,
dos.library,intuition.library,graphics.library, and the other core OS libraries. When you power on the machine, Kickstart is what runs. -
Workbench is the disk. It contains the Workbench desktop application, plus
C:(system commands),Libs:(disk-loadable libraries),Devs:,S:,L:, and preferences.
Kickstart 3.2 + Workbench 3.2 = "AmigaOS 3.2". You need both, and they are versioned together. When someone says "I’m on Kickstart 3.1 and Workbench 3.1.4" they are running a mix, which is legal but occasionally weird.
Analogy: Kickstart is your kernel, Workbench is your userland
/etc. The line between them is where "OS in ROM" ends and "OS on
disk" begins, and that line is drawn at a lower level than macOS’s or
Linux’s — a stock Amiga can boot Kickstart, get to the "insert
Workbench disk" hand-holding-a-disk animation, and not boot any
userland at all until you give it one.
7.3. Device : Volume : Assign
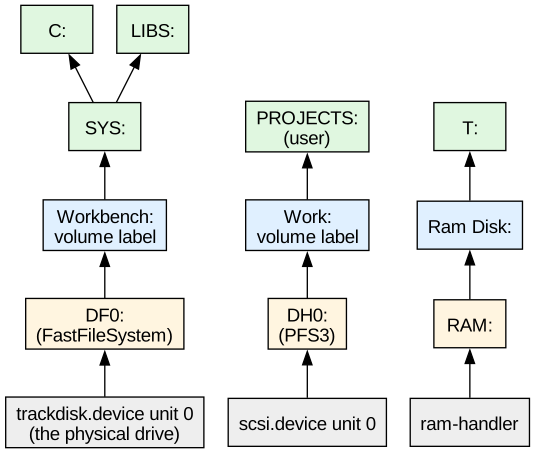
These three terms name three different things and are the most common source of bewilderment. Chapter 6 covers them in depth; the summary is:
-
A device is a physical or virtual storage endpoint. It is named with a trailing colon:
DF0:,DH0:,RAM:,CON:,PRT:,PIPE:. Devices are provided by handlers loaded inL:. -
A volume is what is mounted on a device. Every disk has a name given when it was formatted (
Workbench:,Work:,MyProject:); you address the disk by its volume name and the OS finds the device it lives on. -
An assign is a symlink from a name to a path. Assigns are first-class citizens of the filesystem;
LIBS:is an assign toSYS:Libs, which is an assign toWorkbench:Libs.
You will use assigns constantly. Every third-party package sets one
up (INSTALL:, NETWORK:, SDK:) so that its files can live
anywhere on any volume while its scripts refer to them by a stable
name.
| Path form | Reads as |
|---|---|
|
Absolute, on the floppy in drive 0 |
|
Absolute, on the volume named |
|
Absolute, via the |
|
Relative, from the current directory |
|
Path starting with |
That last one is a tripwire. On Unix / means root. On the Amiga
there is no root; each colon-terminated device or assign is its own
root, and / in a relative path means "go up." /../foo is
"grandparent’s foo."
7.4. Task vs Process
Exec provides tasks. A task has a stack, a priority (-128 to +127), a signal-bit mask, and a list of allocated resources. Tasks are what the scheduler schedules.
dos.library builds a process on top of a task by attaching a
DOS environment: current directory, command search path, standard
input/output/error, arguments, environment variables. Every Shell
window is one process; every program you run from Workbench is one
process; the Workbench desktop itself is one process.
You almost always want to write your programs as processes rather
than raw tasks: processes give you printf-style output, file I/O,
and the ability to open the OS by name. Raw tasks are for
Exec-internal work — device handlers, interrupt servers, the
scheduler-adjacent code.
7.5. Libraries, devices, and handlers
Everything the ROM exports is packaged as one of three shapes:
-
Library — a table of function pointers indexed by a fixed offset from a base pointer. You call
base→LVO_Function(args). The C compiler hides this with stub code; in assembler you see the offsets. Libraries are opened by name withOpenLibrary()and refcounted. -
Device — a library that exposes a single entry point (
DoIO(),SendIO()) taking an I/O request structure. Devices model things that can queue: serial ports, disks, the console. -
Handler — a filesystem-visible thing whose name ends in a colon.
CON:,PIPE:,PRT:,TCP:(added by TCP/IP stacks) are handlers.
A device driver is usually a device with a handler as its front end.
Example: the console handler CON: puts a user-facing filesystem
face on top of console.device, which puts a queued-I/O face on top
of the raw keyboard input.
7.6. The widget toolkits
You will meet at least three, so:
-
gadtools.library ships in the ROM. Original Commodore toolkit for menu bars, buttons, gadgets. Everything in stock Workbench uses it. Ugly by modern standards.
-
MUI (Magic User Interface, by Stefan Stuntz) is the community choice. Skinnable, retained-mode, object-oriented API in the BOOPSI style. Most serious 68k applications (YAM, IBrowse, DirOpus) target MUI. Free download; commercial-quality.
-
ReAction / ClassAct ships with AmigaOS 3.2 and 4. Similar scope to MUI, more Commodore-flavoured. AmigaOS 3.2 gives you both ReAction and gadtools; you can install MUI separately.
If you are writing a new application, MUI is the safest bet for compatibility across 68k Amiga installations from 1996 onwards; if you are on OS 4 or targeting only OS 3.2+, ReAction is the first-party option.
7.7. BOOPSI: the object system
Late-Commodore AmigaOS (from 2.0 onwards) added an object-oriented class system called BOOPSI — "Basic Object-Oriented Programming System for Intuition". This is not a full Smalltalk; it is a minimal class/instance/method system that runs in C, using tag lists for message dispatch and a simple root class from which everything inherits.
The primitives:
-
Class — a
struct IClasswith method dispatcher. Registered by name (gadgetclass,imageclass,windowclass,MUIC_Window,MUIC_Text, etc.). -
Object — an opaque instance of a class. Created with
NewObject(), disposed withDisposeObject(). -
Method — a message sent to an object. Common ones are
OM_NEW(constructor),OM_DISPOSE(destructor),OM_GET,OM_SET, and class-specific methods likeGM_HITTEST. -
Attribute — a tagged property. Get/set with
GetAttr()andSetAttrs().
You create an object by asking a class for one, passing tags:
Object *win = NewObject(NULL, "windowclass",
    WA_Title,       "Hello",
    WA_InnerWidth,  320,
    WA_InnerHeight, 100,
    TAG_END);
You send arbitrary methods through DoMethod:
struct opGet get = { OM_GET, GA_Text, &text };
DoMethodA(gadget, (Msg)&get);
Toolkits (MUI, ReAction, ClassAct) all build on BOOPSI. Each
adds its own class hierarchy but they use the same primitives.
The API’s shape lets you subclass system classes to add
behaviour: implement a new class that extends gadgetclass,
override GM_RENDER and GM_HITTEST, and every Intuition
gadget-consumer accepts your class as a normal gadget. This is
how the Aminet class/ directory grew to hundreds of
third-party BOOPSI classes.
If you write GUI code, you will meet BOOPSI. Chapter 10 has examples.
7.8. Datatypes: the format-handler system
datatypes.library is another late-Commodore idea. Applications
register themselves as handlers for specific data classes ("image",
"picture", "sound", "text", "animation"), each supporting one or
more MIME-like types. Any consumer that wants to display or play
arbitrary data asks the datatypes library:
Object *obj = NewDTObject("Work:pictures/foo.png",
    DTA_SourceType, DTST_FILE,
    DTA_GroupID,    GID_PICTURE,
    TAG_END);
if (obj) {
    struct BitMapHeader *bmhd;
    GetDTAttrs(obj, PDTA_BitMapHeader, &bmhd, TAG_END);
    /* draw obj->bitmap into your window */
    DisposeDTObject(obj);
}
Behind the scenes, datatypes.library scans SYS:Classes/DataTypes/
for a class that claims to handle PNG files, loads it, and passes
the file to it. Your program does not need to know PNG exists.
Install a new datatype (gfx/dtc/PNG.datatype from Aminet is the
canonical one) and every DT-aware application on the machine
suddenly gains PNG support. This is a decade before macOS’s
Uniform Type Identifiers reached the same level of
plug-and-play.
The pre-installed datatypes on OS 3.2 handle: IFF-ILBM (native picture), PNG, JPEG, GIF, WebP, IFF-8SVX (native sound), MP3, Ogg Vorbis, plain text, RTF, plus IFF-ANIM animation and MPEG video.
7.9. Aminet, OS4Depot, os4depot
These are the three main software archives:
-
Aminet — https://aminet.net/ — the classic 68k archive, mirrors everywhere, in continuous operation since 1992. Categorised by strict directory tree (
biz/,comm/,dev/,game/,mus/,util/, …). Files are.lhaarchives (see below). -
OS4Depot — https://os4depot.net/ — AmigaOS 4 (PowerPC) software.
-
AROS Archives — https://archives.aros-exec.org/ — AROS software.
The default archive format on the Amiga is LhA (.lha), not zip or
tar. The LhA command is on every Workbench install (or one Aminet
download away).
7.10. ADF, HDF, LHA
Three filename extensions you will see constantly:
-
.adf— Amiga Disk File. A raw dump of an 880 KB DD floppy or 1.76 MB HD floppy. All emulators mount ADFs directly. -
.hdf— Hard Disk File. A raw dump of a hard-drive image. Larger, structure-preserving, mounted by emulators. -
.lha— LhA archive. The community-standard package format. Also.lzxoccasionally for particularly space-conscious archives.
Now that you can pronounce everything, we can look at the desktop.
Part II: Part II: Using the Amiga
Day-to-day OS use — the desktop, the filesystem, the shell, the applications you would install. Everything here is common across classic 68k, AmigaOS 4, MorphOS, and AROS; the UI details differ slightly but the concepts are shared.
|
Platform coverage: classic 68k AmigaOS 3.1 through 3.2. MorphOS Ambient, AmigaOS 4 Workbench, and AROS Wanderer follow the same concepts with different visual styling. |
Chapter 8. Workbench: The Desktop
Workbench is the Amiga’s desktop environment, and it has been the same idea since 1985. Icons on a coloured background represent disks, drawers (folders) and tools (executables); double-click launches; drag-and-drop moves. If you have used any desktop OS in the last forty years the first ninety seconds are familiar. What makes it interesting is the vocabulary underneath.
Workbench 3.1, as seen by a returning user: title bar with memory counters, storage icons on the right, a Shell window, and the Workbench menu bar (only visible while the right mouse button is held):
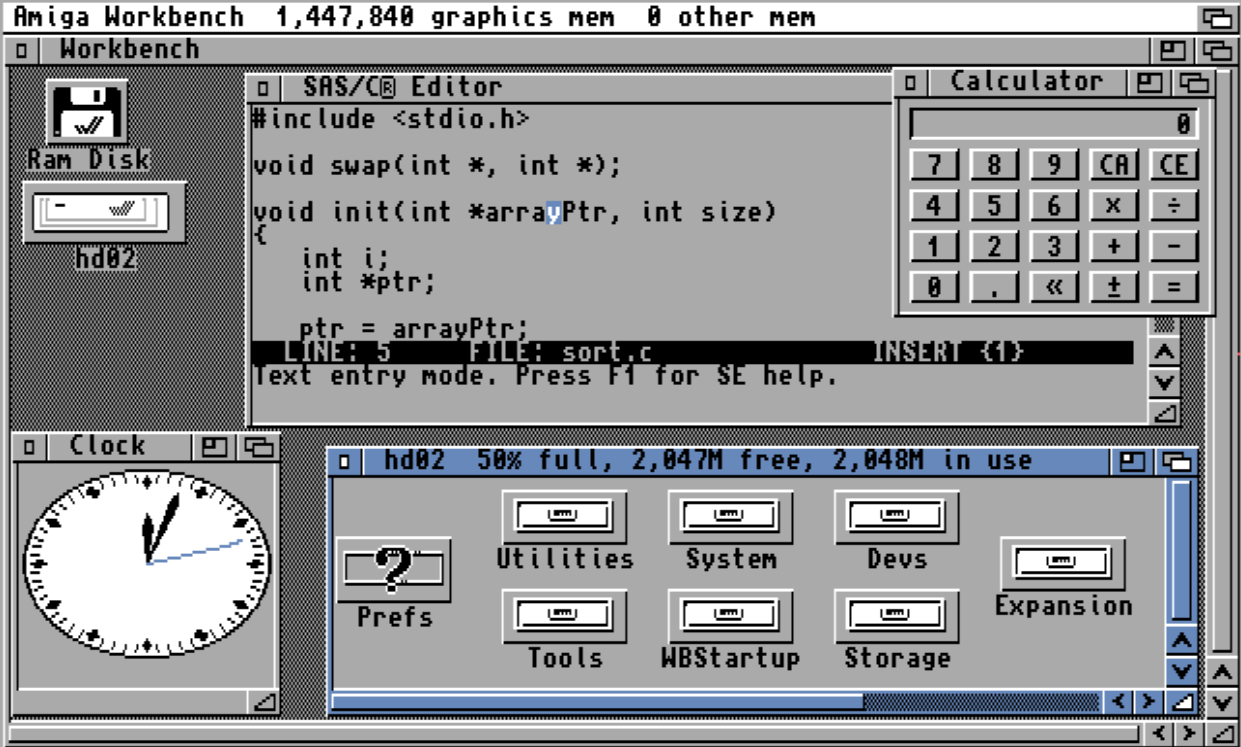
For historical perspective — this is Workbench 1.3 running from a real floppy install, four colours (blue background, orange foreground, white and black), no memory display, drawers rendered in the 8-colour palette of the day:
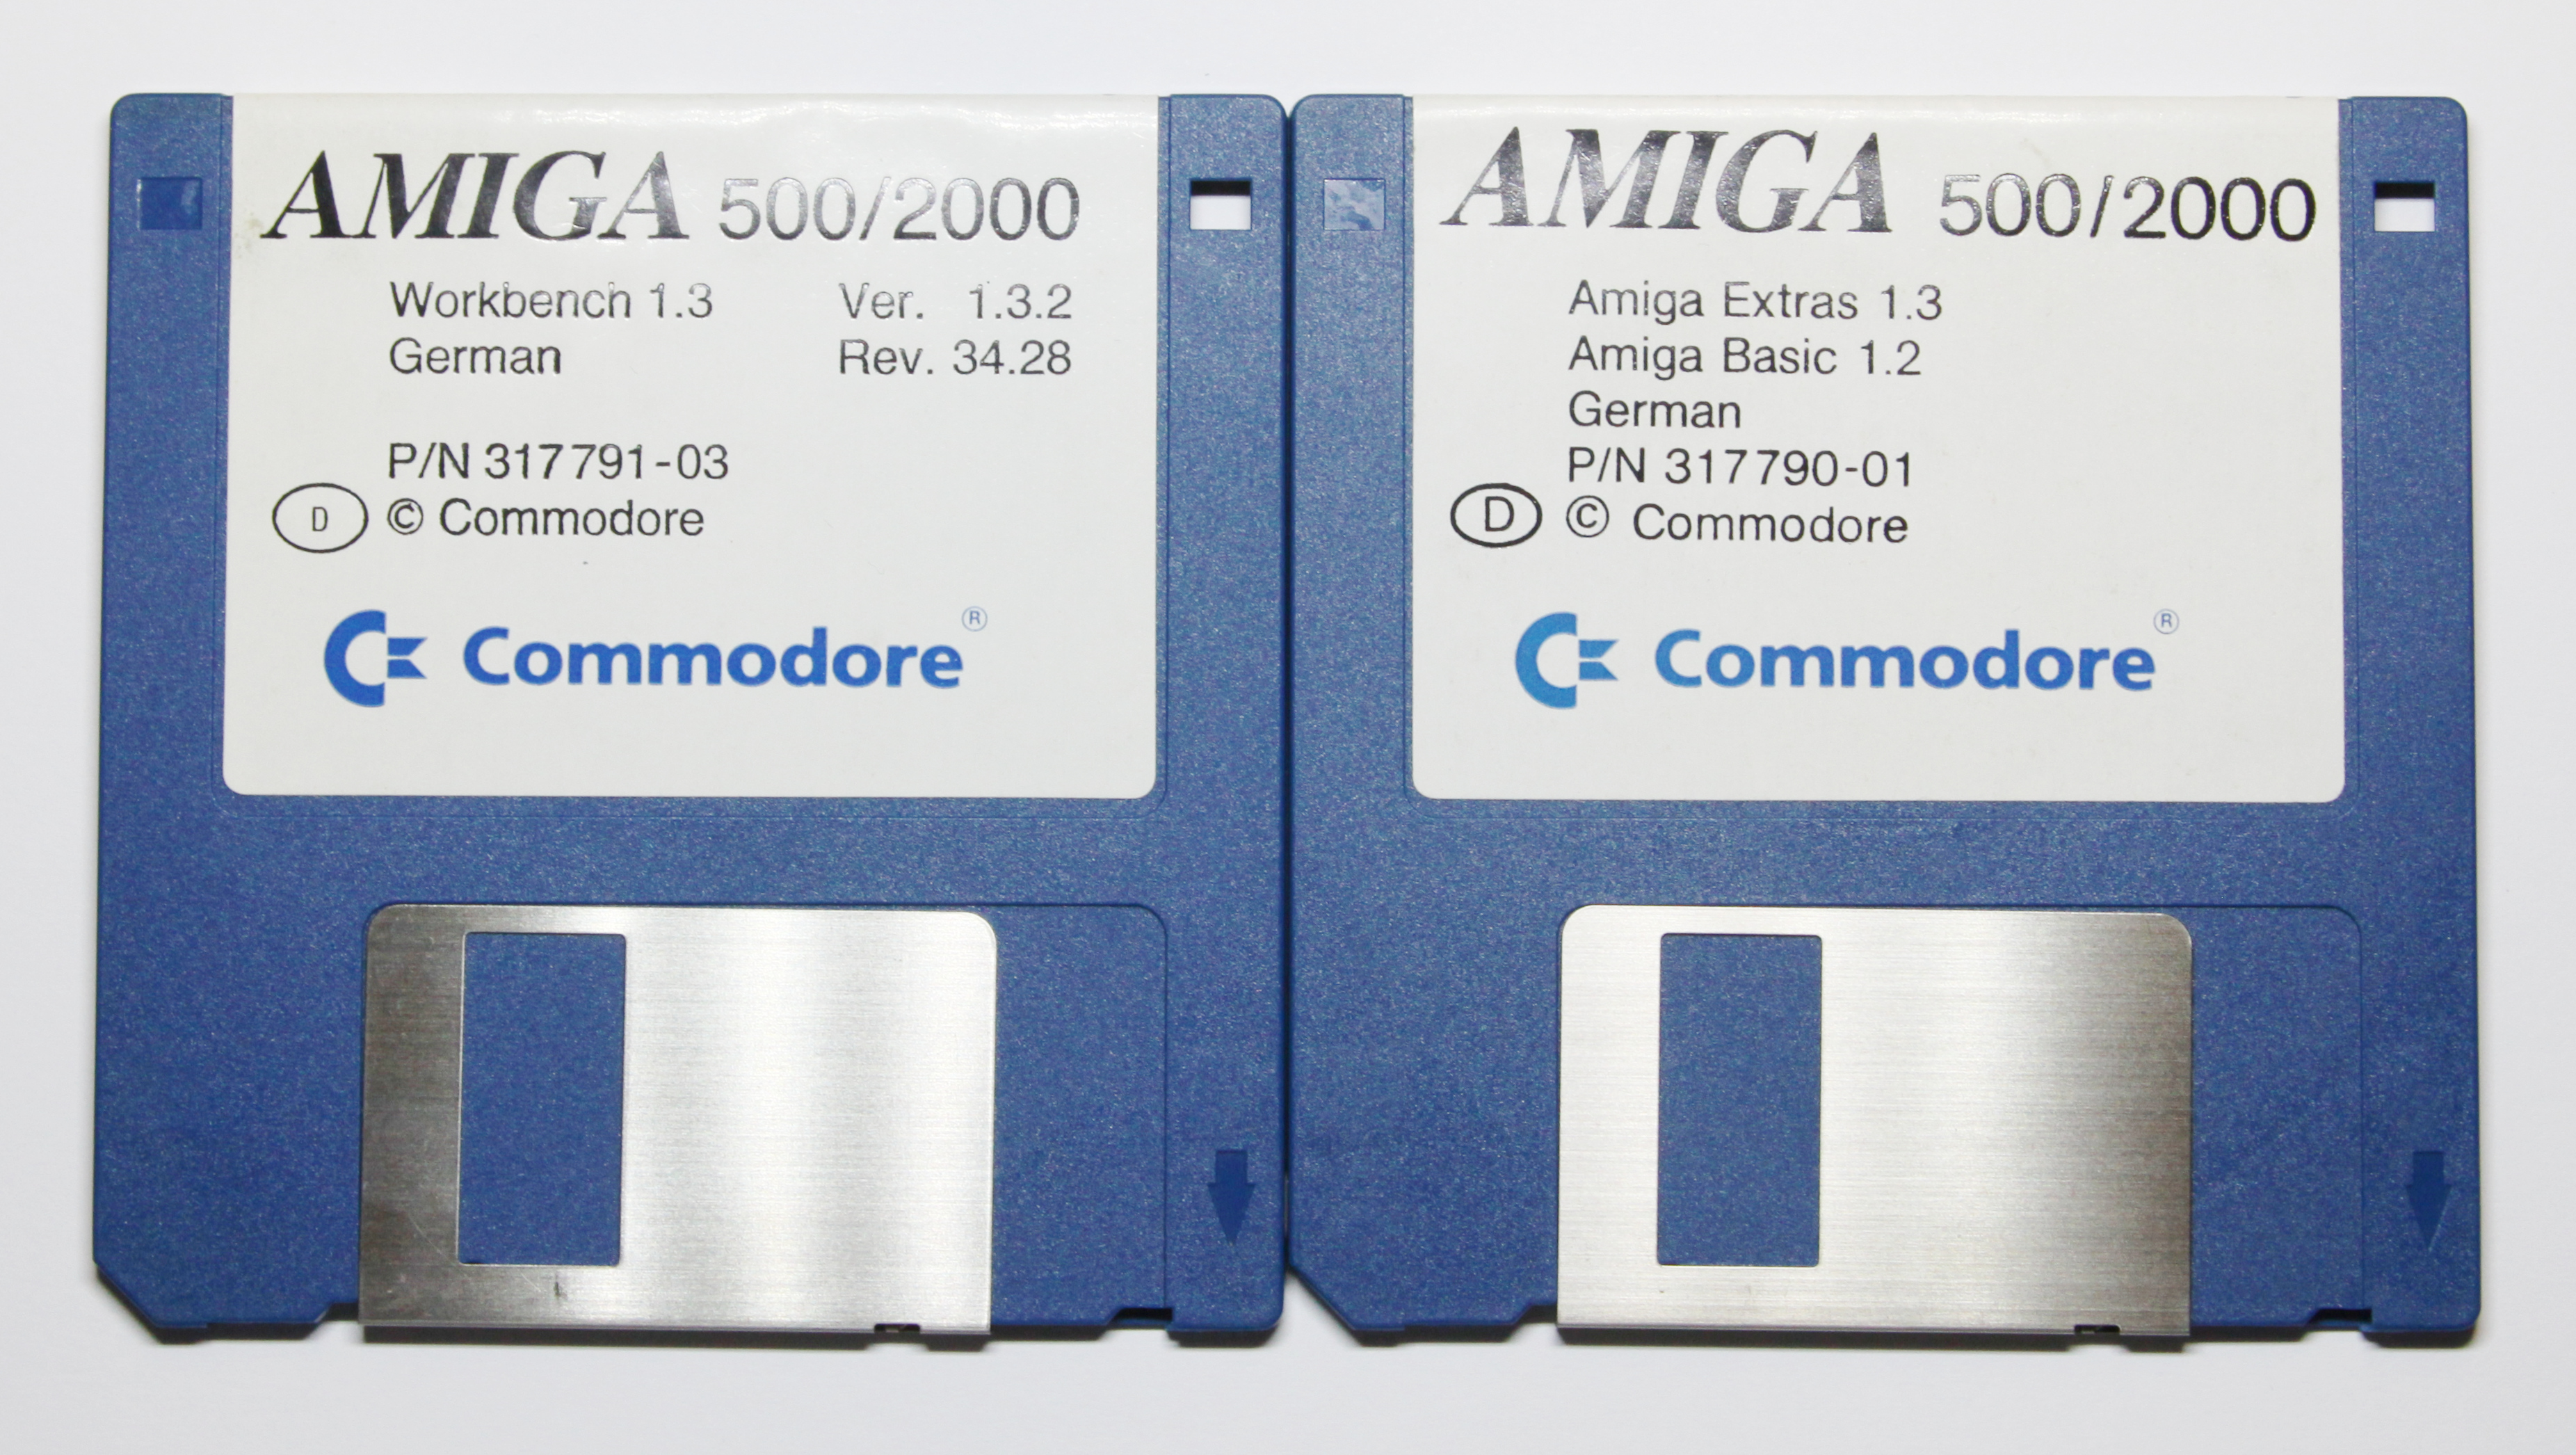
8.1. Screens vs windows
A "screen stack" is real — public and custom screens layered on top of each other, each dragged down by its title bar to reveal the one behind:
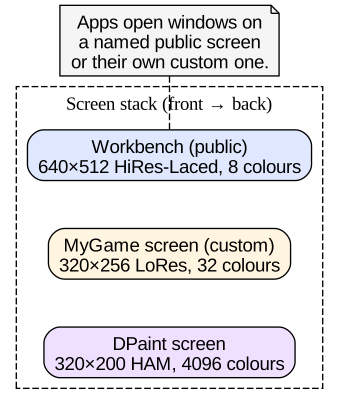
On macOS the "screen" is your monitor. On the Amiga, a screen is a display mode plus a colour palette plus a stack of windows. You can have many screens open at once, each in a different resolution, each with its own palette, and you switch between them by pressing Left Amiga+M (or by dragging the screen’s top bar down like a window shade to reveal the screen behind it).
This exists because the custom chipset natively supports multiple display modes and per-line palette reprogramming via the Copper. Applications can, and often do, open their own screens: a paint program in HAM-8 (24-bit rendered on-the-fly), a modeler in high-resolution interlaced, a game in 320×200 lowres — all simultaneously, all live, none of them dropped to bitmaps.
Most applications are polite and open on the Workbench screen,
which is the default public screen. A public screen is one that
other applications can open windows on; if you write your own screen
you can declare it public with OpenScreenTags(…, SA_PubName,
"MyScreen", TAG_END) and other well-behaved apps will be able to
target it.
Practical consequences:
-
Two apps on the same screen share its palette. If one opens as a 32-colour screen and another wants 256, the second app needs its own screen.
-
The Workbench screen can be reconfigured at any time — right-click the Workbench menu bar, Workbench > Backdrop, or use the ScreenMode preferences editor to change resolution and depth.
-
Screen depth (colour count) affects window drawing speed on real hardware. This still matters on stock 68030 machines; less so under UAE.
8.2. Windows, gadgets, requesters
-
Window — the usual thing. Has a title bar, drag bar, close gadget (top-left), depth gadgets (top-right, front/back), zoom gadget (top-right, "grow to fit contents"), sizing gadget (bottom-right).
-
Gadget — the Amiga word for widget. Buttons, sliders, string-input fields, checkboxes are all gadgets. Predates the Windows/Mac use of "widget" by five years.
-
Requester — a modal dialog. Anything asking you a question: "Are you sure?", "Which file?", "OK to continue?".
EasyRequest()andAslRequest()are the two APIs most programs use. -
Menu bar — pull-down menus that appear across the top of the active screen when you hold the right mouse button. This is the place many returning users have to unlearn: on the Amiga, menus are activated with the right mouse button, and they are attached to the screen, not the window. When the active app changes, the menu bar changes.
The gadgets on a standard window, moving clockwise from the top left:

Every gadget the OS provides is a struct Gadget on Intuition’s
gadget list; you can enumerate them from your own program with
FindGadget() on a window. Third-party toolkits (MUI, ReAction,
gadtools) build their own richer widgets by extending the same
struct with BOOPSI classes.
8.2.1. Menus, up close
Menus are attached to the window by the application, but drawn across the screen. The active window’s menu is what appears when you hold right-mouse. That is why the menu bar changes as you click between windows.
A well-behaved Amiga app follows the same menu conventions as Workbench itself:
-
Project menu at the far left. Contains New, Open…, Save, Save As…, Print, About…, and Quit in that order.
-
Edit menu next. Undo (Right Amiga+Z), Cut (Right Amiga+X), Copy (Right Amiga+C), Paste (Right Amiga+V), Clear.
-
App-specific menus after that.
-
Windows or Prefs at the right if the app has multiple documents or configurable preferences.
Menu shortcuts on the Amiga use the Right Amiga (also called Amiga Right or Right Cmd on modern USB keyboards) key, not Ctrl. Left Amiga is reserved for OS operations like Left Amiga+M to cycle screens and Left Amiga+N to bring Workbench to the front.
8.3. Icons and tooltypes
Every visible object on the desktop has an icon file — a
.info file that lives next to the object it describes.
Workbench.info is the icon for the Workbench volume;
Prefs.info is the icon for the Prefs drawer; Notepad.info is
the icon for the Notepad executable. The .info file contains:
-
The image (one or two frames — normal state and selected/inverted state).
-
Position of the icon in its parent drawer.
-
Default tool (for project icons — the executable that opens this file).
-
Tooltypes, a list of
KEY=valuestrings that the program can read at startup as its configuration.
Tooltypes are the Amiga’s answer to command-line arguments for
programs launched from the desktop. Click an icon once to select
it, then choose (or Right Amiga+I) and
you get a requester where you can edit them. Example — the
tooltypes on SYS:Tools/Calculator:
WINDOWTOP=100
WINDOWLEFT=80
FORMAT=DECIMAL
The launching program parses them with ArgArrayInit() /
ArgArrayDone() from icon.library. Chapter 9 has an example.
Icons come in three flavours by tradition:
-
Disk icon — represents the whole volume.
-
Drawer icon — a folder.
-
Tool icon — an executable.
-
Project icon — a data file with a default tool set, so double-clicking launches the tool with the file as its argument.
There is also a trashcan drawer per volume — really just a convention (a normal drawer with a special icon) that Workbench knows to route deletions through.
8.3.1. The Info requester in detail
Selecting an icon and choosing (Right
Amiga+I) opens the requester below. Every field is editable and
saved back to the .info file:
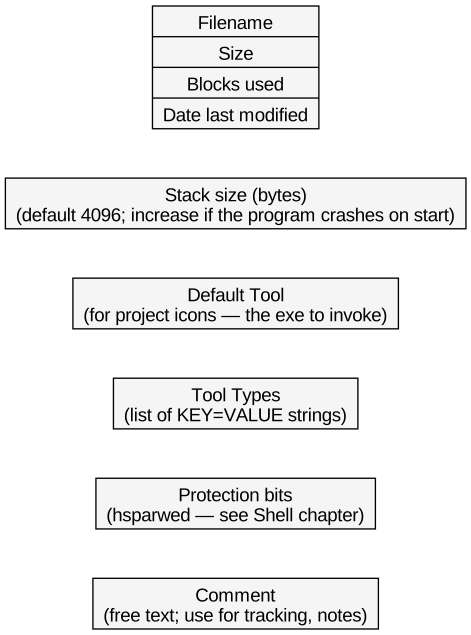
Stack size matters. When a program launched from Workbench crashes on start with a Guru, the first thing to try is doubling its stack from the Info requester. 4 KB is the default and it occasionally isn’t enough — 16 KB or 32 KB fixes many older Aminet applications.
8.3.2. Tooltypes as a config format
Since tooltypes are per-icon and editable in place, they double as
the classic Amiga’s .rc file:
; Tooltypes on YAM.info
CX_POPKEY=lcommand esc
CX_POPUP=NO
CHECKONLINE=YES
LOGDIR=Work:mail/logs
DEFAULTFROM=chris@example.com
A ; at the start of a line comments it out, so you can leave a
tool type visible-but-disabled without deleting it. Applications
that use tooltypes never need a preferences editor; the Workbench
info requester is the preferences editor. This shape is closer
to ini than to JSON — one flat key/value list — but it is
adequate for most apps and it survives being edited by anyone
with a mouse.
8.4. Commodities: the daemon layer
Commodities Exchange (added in OS 2.0) is the Amiga’s answer to system-tray applets and input-method daemons. A commodity is a program that:
-
Registers itself with
commodities.libraryas a system service. -
Optionally installs an input hook to see (and possibly filter) every keystroke and mouse click before Intuition sees it.
-
Can be enabled, disabled, activated (bring its main window to the front), or killed via the Exchange preferences panel or a hot-key.
Standard commodities that ship with Workbench:
| Commodity | Purpose |
|---|---|
AutoPoint |
Focus follows mouse — activate whichever window the mouse is over. |
Blanker |
Screen blanker after idle timeout. |
ClickToFront |
Bring a window to the front when you click on it (as opposed to needing the depth gadget). |
FKey |
Bind hot-keys to arbitrary Shell commands. |
IHelp |
Contextual help across programs (rarely useful today). |
NoCapsLock |
Disables the caps-lock key. |
Exchange |
The management program for the other commodities (icon at |
You can write your own. The commodities.library API is small —
CxObject *broker = CxBroker(&nb, NULL) creates a service, then
AttachCxObj() adds hot-key filters, CxSender objects, translators.
Under a hundred lines gives you a hot-key that runs a Shell
command.
The "commodities" name comes from Amiga’s marketing of the concept as "small useful things you drop into your desktop." Think of them as the Amiga’s equivalent of macOS launch daemons or of Windows tray-icon utilities.
8.5. Preferences
The preferences editors live in SYS:Prefs. On OS 3.2 you get
roughly this set:
-
Font — screen and system fonts. Bitmap fonts live in
FONTS:(assigned toSYS:Fonts). TrueType viabullet.library(colourfont hinting) was added in 3.1. -
Screen Mode / Palette — display size, depth, colours.
-
Pointer — mouse cursor bitmap.
-
Overscan — the visible area of the screen; Amiga display modes can be sized well past the "safe" area on a CRT.
-
Serial / Parallel / Printer — port setup.
-
Time / Locale — clock, date, keyboard layout, character set.
-
Input — mouse speed, keyboard repeat.
-
IControl — miscellaneous Intuition behaviour (menu button, window snap, screen-to-front hot-key).
-
Sound — beep customisation.
-
WBPattern — desktop background pattern or image.
-
DevInfo (OS 3.2+) — hard-drive partition management.
-
DOSDrivers — mount/unmount handlers.
Each editor saves two files: an active copy in ENV:Sys/ for the
current session, and a persistent copy in ENVARC:Sys/ that
survives reboot. Choosing writes both;
writes only the session copy. Chapter 6 explains ENV: and
ENVARC: in detail.
8.5.1. IPrefs: the glue
The mechanism is not magic. Every prefs file in ENV:Sys/ is
watched by a single system daemon called IPrefs
(SYS:System/IPrefs), started early in S:Startup-Sequence.
When a file changes, IPrefs re-reads it and applies the new
settings to the live OS — reprogramming the palette, reloading
the pointer bitmap, changing the system font, redrawing
Workbench’s background pattern. This is why prefs changes take
effect immediately without a reboot.
IPrefs uses notify handlers (part of dos.library) to watch the
files. You can use the same API: NotifyRequest triggers a
signal when a filesystem object changes. Handy for building
config-file-driven applications yourself.
8.5.2. Formats of the prefs files
Each preferences file is a small IFF ("Interchange File Format") container with named chunks. IFF is one of the Amiga’s most enduring standards — bitmap files, sound samples, ANIM movies, prefs, and countless other formats are all IFF. The structure is trivial:
FORM   type   size
    chunk1  name  size  data
    chunk2  name  size  data
    ...
Where a chunk is name (4 chars) size (32-bit big-endian) data.
You can read one with a hex editor. The iffparse.library
provides walking / writing helpers if you want to write a program
that reads or writes prefs; a couple dozen lines gets you a
"read one chunk by name" utility.
Because prefs are IFF, they are easy to inspect and easy to
rewrite from scripts. A configuration-management approach — keep
canonical prefs files in a git repo, Copy them into
ENVARC:Sys/ from a setup script — is entirely workable.
8.6. Multitasking, visibly
Workbench is genuinely preemptive. If you launch a slow rendering task, you can drag its window aside and start a Shell without waiting. The way you monitor the multitasking depends on how much you paid for your setup:
-
Stock Workbench has no visible task list. It relies on you knowing what you started.
-
SnoopDos (Aminet,
util/moni/) shows you every OS call every task makes — file opens, library opens, DOS packets. The Unix-straceof the Amiga; installed by every developer. -
Scout (Aminet,
util/moni/) istopandpsin one MUI window. Task list, priorities, port list, semaphore list, interrupt table. Install this on day one. -
TaskiX and X-Oper are older alternatives to Scout.

Because there is no memory protection, one buggy task can and will take down another. When it takes down the whole system you get a red Guru Meditation alert (rebranded to "Software Failure" in OS 2.0+ but still popularly called a Guru). The hex numbers on the alert are decoded in the ROM Kernel Reference Manual: Libraries appendix on alert codes; the first byte tells you which subsystem crashed and the second gives detail.[13]
8.7. Booting Workbench
The boot process, from power-on:
-
Kickstart POST completes; the "insert Workbench" hand appears if no bootable device was found.
-
If a bootable device is present, Kickstart loads and executes its boot block, which loads
dos.libraryand starts a shell runningS:Startup-Sequence. -
Startup-Sequencesets up assigns, mounts extra devices, loads drivers, sourcesS:User-Startupfor user additions, and finishes by executingLoadWB— which starts Workbench itself. -
LoadWBreadsSYS:WBStartupand launches every program (or script) placed there, as Workbench-launched processes.
You can hold both mouse buttons during boot to get an early boot menu (Kickstart 2.0 and later) where you can pick a different boot volume, disable startup-sequence, or run a Shell without Workbench. This is the closest thing the Amiga has to a "safe mode."
The boot sequence in full:
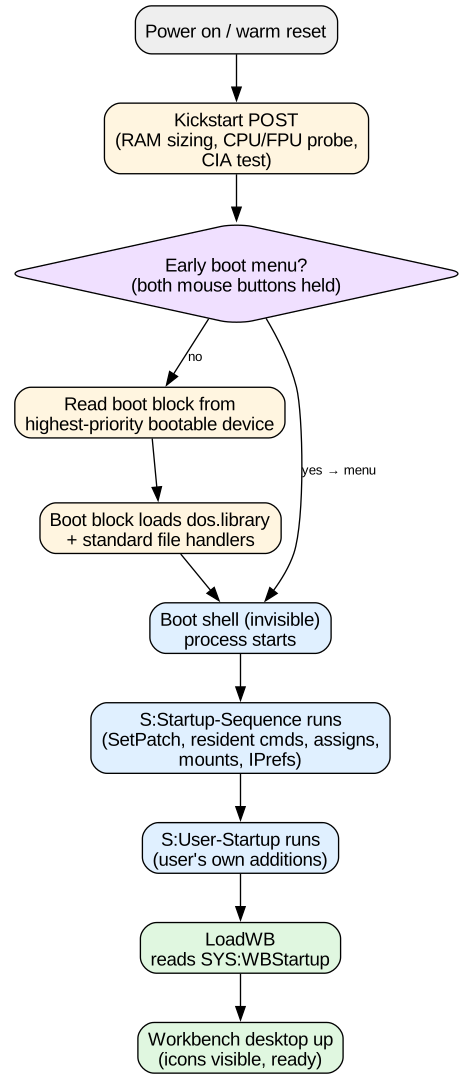
If your boot hangs, the failure point is almost always inside
S:Startup-Sequence — a Mount for a missing device, an Assign
to a non-existent path, or a startup program with a wild pointer.
Hold both mouse buttons at boot, pick Boot With No
Startup-Sequence from the early menu, and you drop into a bare
Shell where you can Type S:Startup-Sequence and fix it.
8.7.1. Practical: adding a program to Workbench startup
Every icon dragged into SYS:WBStartup runs on next boot as a
Workbench-launched process. That is how commodities (input hook
utilities), clock displays, and system monitors are made
persistent.
The tooltypes that matter for a WBStartup icon:
DONOTWAIT
STARTPRI=0
CX_POPUP=NO-
DONOTWAITtells LoadWB not to block waiting for the program to exit before starting the next one. -
STARTPRIsets ordering — higher numbers start first. Use this when one WBStartup entry depends on another (e.g., start the clipboard extender before the app that uses it).
Next: filesystem, which is where the terminology from chapter 4 gets made concrete.
Chapter 9. The Filesystem: Devices, Volumes, Assigns
The Amiga’s filesystem model is genuinely different from Unix’s. It is not worse. Once you have it in your head you may find yourself missing it on other systems. This chapter starts with the model, then covers paths, the standard assigns, filesystem types, and the RAM disk.
9.1. The model
There is no root directory.
Repeat that until it stops feeling wrong. In Unix, every path traces
back to /. On the Amiga, the top of the tree has many entries —
one per device, one per volume, one per assign — and none of them are
above any others. When you write a full path you always name which
top-level entry you are starting from, and you separate it from the
rest of the path with a colon.
Workbench:Utilities/Clock means: on the volume named Workbench,
in the drawer Utilities, the file Clock.
DH0:Utilities/Clock might mean the same file, if the volume
Workbench is currently on device DH0.
SYS:Utilities/Clock also might mean the same file, because SYS:
is an assign to the current boot volume.
All three paths are equally valid ways to name the file. Which you use depends on what you are trying to convey — "on this specific hardware," "on this specific disk," or "in the OS’s canonical place."
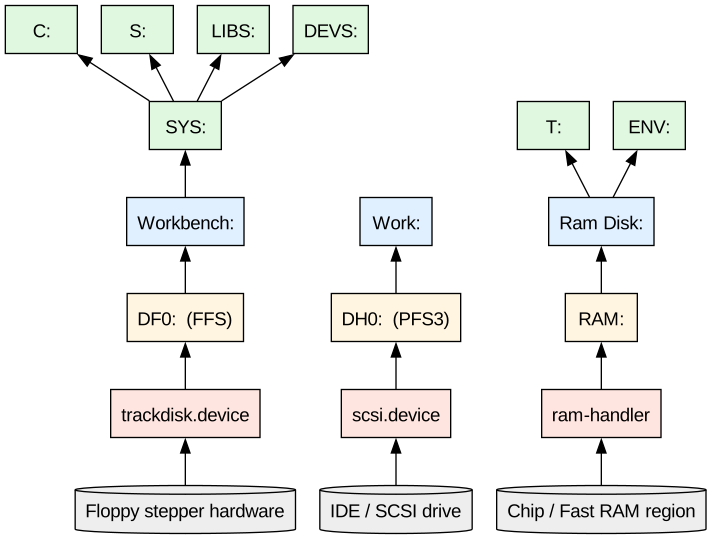
9.1.1. Devices
A device is a physical or virtual storage endpoint, named with a trailing colon. Standard ones:
| Device | Meaning |
|---|---|
|
Floppy drives 0–3. |
|
IDE / SCSI hard drives, in order of the mountlist. |
|
The recoverable RAM disk (see below). |
|
Console handler. Any file opened with a |
|
Like |
|
|
|
Named pipe. |
|
Printer via the preferences printer driver. |
|
Parallel and serial ports. |
|
Serial console for boot-time diagnostics. |
|
Temporary files (assigned to |
|
Any string of the form |
Devices ending in a colon like CON: are called handlers because
they are implemented by a program in L: (L:Port-Handler,
L:Ram-Handler, etc.). Devices ending in a number like DF0: are
mounted-device instances: they are provided by a filesystem
handler (e.g., L:FastFileSystem) reading from a physical driver
(e.g., trackdisk.device).
9.1.2. Volumes
A volume is a formatted disk. Every volume has a name assigned
at format time, and you can address the disk by that name from
anywhere. If you swap in a floppy called Games: into DF0: and
then swap in Utilities: into DF1:, both are addressable by
name, and the OS knows which physical drive holds which.
If you ask for a file on a volume that is not currently inserted, the OS pops up a requester asking you to insert it. This is the Amiga’s version of a "please insert disk X" dialog and it is a real part of the API — programs can accept a filename referring to an offline disk and rely on the OS to prompt the user.
9.1.3. Assigns
An assign is a symbolic name that resolves to a directory. It is the Amiga equivalent of a symlink combined with an environment variable — durable across programs, first-class in the filesystem, resolvable at any depth.
You create one with the Assign command:
1> Assign PROJECTS: Work:src/personal
1> Dir PROJECTS:
book               (dir)
amiga-hello        (dir)
notes              (dir)
You list current assigns with Assign on its own:
1> Assign
Volumes:
    Ram Disk                       [Mounted]
    Workbench                      [Mounted]
    Work                           [Mounted]
Directories:
    S                              Workbench:S
    L                              Workbench:L
    C                              Workbench:C
    FONTS                          Workbench:Fonts
    DEVS                           Workbench:Devs
    LIBS                           Workbench:Libs
    SYS                            Workbench:
    ...
You can assign one name to multiple directories, in which case a
lookup searches them in order — the Amiga’s answer to PATH for
non-command directories:
1> Assign LIBS: SDK:local/libs ADDNow OpenLibrary("foo.library", 0) searches Workbench:Libs first
and SDK:local/libs second.
The standard system assigns are:
| Assign | Points to |
|---|---|
|
The boot volume (aliased to whatever booted) |
|
Shell commands (aliased to |
|
Startup and script files ( |
|
Filesystem handlers ( |
|
Shared libraries ( |
|
Device drivers, mountlists, printers ( |
|
Bitmap and outline fonts ( |
|
Temporary files ( |
|
Environment variables ( |
|
Persistent copy of |
Applications add their own on install. Directory Opus adds DOpus5:;
the SDK adds SDK:; TCP/IP stacks add INET: or AmiTCP:.
9.2. Paths, absolute and relative
An absolute path names its device, volume or assign explicitly and ends the name with a colon:
Work:src/main.c
Workbench:Utilities/Clock
DH0:foo/bar
A relative path has no leading colon-terminated name:
src/main.c        # relative to CWD
main.c            # in the CWD itself
A path element of / at the start of a relative path (or in the
middle of any path) means parent directory. This is the tripwire:
/main.c           # main.c in the parent of the CWD
//main.c          # main.c in the grandparent
src/../main.c     # illegal — the Amiga doesn't have ..
There is no ... Where Unix uses .. to go up, the Amiga uses a
leading or extra /.
Foo: on its own means "the root of the volume Foo". Foo:/bar
is illegal — you cannot go up from a volume root.
Paths on the Amiga are case-insensitive but case-preserving, like HFS+ on macOS. Filenames are limited to 30 characters on the original Old File System (OFS) and to 107 characters on Fast File System (FFS) revisions from Kickstart 2.0 onwards. Modern PFS3 and SFS allow filenames up to 255 characters.
9.3. Mountlists and DOSDrivers
Every device on the system is mounted by giving the OS a description of it. On classic AmigaOS the descriptions live in two places:
-
DEVS:MountList— a single file with per-device sections, the older format. -
DEVS:DOSDrivers/— one file per device, the format from OS 2.0 onward. Each file is an icon-plus-config pair; double-clicking the icon mounts the device.
A typical DOSDriver — this is what a DEVS:DOSDrivers/PIPE
config file looks like:
/* PIPE handler mount file. */
Handler       = L:Port-Handler
Stacksize     = 6000
Priority      = 5
GlobVec       = -1
Mount         = 1
And a full mountlist entry for a hypothetical EXTRA: hard-drive
partition on the second SCSI unit:
EXTRA:
    Device     = scsi.device
    Unit       = 1
    Flags      = 0
    Surfaces   = 16
    BlocksPerTrack = 63
    Reserved   = 2
    Interleave = 0
    LowCyl     = 2  ;  HighCyl = 3600
    Buffers    = 30
    BufMemType = 1
    MaxTransfer = 0x1fe00
    Mask       = 0x7ffffffe
    DosType    = 0x50465303   ; PFS3
    Mount      = 1
#
The # on its own line ends the entry. This is the same syntax
HDToolBox writes when you partition a drive with it. Once mounted,
EXTRA: behaves like any other volume — you can Format it,
Info it, and use it in paths.
Most users never edit a mountlist by hand; HDToolBox,
MediaToolBox and the modern OS 3.2 DevInfo preferences editor
handle it graphically. But knowing where the config lives helps
enormously when things go wrong — a stubbornly unmountable
partition often boils down to a wrong DosType (0x444f5301 for FFS,
0x444f5303 for FFS-DirCache, 0x50465303 for PFS3, 0x53465303 for
SFS, and so on).
9.4. Filesystems
The Amiga has more filesystems than you would expect. The important ones:
-
OFS — Old File System. Ships in Kickstart 1.0–1.3, single linked list per file, notoriously slow. Only relevant if you handle 1980s-formatted floppies.
-
FFS — Fast File System. Standard on floppies and hard drives from Kickstart 1.3 onward. Directory cache in modern revisions.
-
DCFS — Directory Cache FS. FFS variant with a per-drawer cache for faster
Dir. -
PFS3 — Professional File System, third-party but widely used. Fast, robust, and the go-to for large partitions.[14]
-
SFS — Smart File System. Journalling filesystem originally for AmigaOS 4, backported to 3.x.
You choose the filesystem when you format a partition; you can mix freely across your drives. There is no "must reformat root" story.
9.4.1. FFS internals, briefly
The Fast File System stores every file as a chain of data blocks, each 512 bytes on a floppy or 512/1024/2048/4096 on a hard drive (per the format-time block-size setting). Every 72 data blocks (on a 512-byte-block volume) is preceded by an extension block that holds pointers to the next batch — this is how a large file’s block list is walked. The file header block at the start holds the file’s metadata (name, size, protection, dates, comment) and pointers to the first 72 data blocks.
A directory is another block type — a user-directory block — that holds a hash table of entries pointing at file headers and further sub-directory blocks. Empty slots in the hash chain are followed to find the actual entry. This is why very large directories on FFS are slow: the hash chain grows unbounded. DCFS (Directory-Cache FS) adds a per-directory cache of names and hashes to speed things up.
The root block at a fixed offset (~880 on a floppy) is the volume’s superblock: it names the volume, records the bitmap-block chain (which tracks free blocks), and gives you the first user-directory block. Everything else on the disk is reachable from the root.
You will not typically need this level of detail — the filesystem is transparent to your programs. But it explains, for example, why an unclean shutdown ("power off in the middle of a write") can corrupt files: FFS is not journalling, and losing a partial extension-block update loses the block chain from that point on. PFS3 and SFS are the community’s answer; both are journalling and both are drop-in replacements at format time.
9.5. The RAM disk
RAM: is not a file cache. It is a filesystem in main memory. It
grows and shrinks as files are written to and deleted from it,
without any per-user configuration.
T: (temporary files) is an assign to RAM:T. If you install a
package that writes temp files, they land in T:, which is RAM:T,
which is memory. This is fast. It is also volatile — a crash loses
RAM:, so do not put your only copy of your source code there.
The "Recoverable RAM Disk" (RAD:) is a related concept: a
separate handler that survives a warm reboot by preserving the
memory region. Used historically to keep a bootable copy of
Workbench on machines with slow floppy drives.
9.6. Standard directories under SYS:
Under the boot volume, an OS 3.2 install lays out roughly:
SYS:C/            System commands (List, Dir, Copy, Type, ...)
SYS:Classes/      BOOPSI classes for ReAction
SYS:Devs/         Device drivers, mountlists, printer drivers
SYS:Expansion/    Autoconfig-board support files
SYS:Fonts/        Bitmap and outline fonts
SYS:L/            Filesystem handlers, resident modules
SYS:Libs/         Shared libraries (dos.library is in ROM, but foo.library on disk)
SYS:Locale/       Language translations for OS strings
SYS:Prefs/        Preferences editors
SYS:Rexxc/        ARexx interpreter commands
SYS:S/            Startup-Sequence, User-Startup, other scripts
SYS:Storage/      Optional drivers not currently in use
SYS:System/       Format, HDToolBox, RexxMast, other admin tools
SYS:Tools/        Calculator, Notepad, ShowConfig, GraphicDump
SYS:Trashcan/     The wastebasket (a normal directory with a special icon)
SYS:Utilities/    Clock, MultiView, TextEdit
SYS:WBStartup/    Programs launched by Workbench at login
This is stable enough that a script can rely on it. It also gives
you the mental map of where things live: commands go in C:,
libraries in LIBS:, drivers in DEVS:, scripts in S:.
9.7. Environment variables
Two flavours, both file-backed:
Global environment variables are files in ENV: (which is
RAM:ENV after boot, populated at boot from ENVARC:, which is
SYS:Prefs/Env-Archive). Every process sees them. The Shell
commands SetEnv and GetEnv read and write them, and
GetVar/SetVar do the same from within scripts and programs.
Prefs editors use them: ENV:Sys/pointer.prefs is your current
pointer preferences.
Local variables are per-Shell. Set FOO=bar in one Shell does
not affect another. Local variables shadow global ones.
To make a global env var survive reboot, save it to both ENV:
and ENVARC::
1> SetEnv EDITOR "SYS:Utilities/TextEdit"
1> Copy ENV:EDITOR ENVARC:EDITOR
or in one step:
1> SetEnv SAVE EDITOR "SYS:Utilities/TextEdit"The SAVE flag was added in OS 2.0.
9.7.1. Assign options: ADD, DEFER, PATH
The Assign command accepts a few options that make it much more
powerful than a simple symlink:
1> Assign LIBS: SDK:local/libs ADDADD appends the second directory to LIBS:. Every subsequent
OpenLibrary call searches both SYS:Libs and SDK:local/libs
in order — a per-user path list without the OS globalness of
PATH.
1> Assign DATA: Work:src/mygame/data DEFERDEFER records the mapping but does not resolve it until the
first access. This is the trick for setting up assigns pointing
at removable media or at not-yet-mounted network drives at boot
time — the assign shows up in Assign output and applications
can be configured to use it, but the actual filesystem call
is postponed until someone actually opens DATA:something.
1> Assign LATE: Work:src/mygame/scripts PATHPATH acts like DEFER but re-resolves on every access — useful
when the target directory itself moves. Rare in practice.
You remove an assign with REMOVE:
1> Assign PROJECTS: REMOVE9.7.2. Where things go on a modern install
An OS 3.2 install with a few third-party packages accumulates
assigns fast. A typical Assign output on a working developer
machine looks like:
1> Assign
Volumes:
    Ram Disk              [Mounted]
    Workbench             [Mounted]
    Work                  [Mounted]
    Aminet                [Mounted]
Directories:
    ENV                   RAM:ENV
    T                     RAM:T
    SYS                   Workbench:
    C                     Workbench:C
    S                     Workbench:S
    L                     Workbench:L
    LIBS                  Workbench:Libs
    DEVS                  Workbench:Devs
    FONTS                 Workbench:Fonts
    LOCALE                Workbench:Locale
    REXX                  Workbench:S
    HELP                  Workbench:Help
    PRINTERS              Workbench:Devs/Printers
    INTERNET              Work:Internet
    MUI                   Work:MUI
    SDK                   Work:SDK
    NDK                   Work:SDK/NDK_3.9
    DOPUS5                Work:DirectoryOpus5
    YAM                   Work:Applications/YAM
Devices:
    RAM       RAD       DF0       DF1       DH0       DH1       CON
    RAW       PIPE      TCP       UDP       PRT       SER       PAR
Reading top to bottom: volumes physically mounted, then logical
assigns (many pointing at SYS: sub-directories, plus per-app
ones), then the flat list of devices with a handler. This is the
"disk" tab of the Amiga; get familiar with it.
Now that you can name files, we can talk to the Shell.
Chapter 10. AmigaShell: The Command Line
Every Amiga is really two operating systems glued at the hip. Workbench is the graphical one; the Shell is the textual one. This chapter is a tour of the Shell, roughly in the order you would need to use it, with side-by-side comparisons to bash and zsh where they help. The last section is a full Linux→AmigaShell command reference — the "cheatsheet" that used to be a separate appendix. Keep it open when you first sit down at the Amiga; you will spend a week reaching for it before the commands become instinctive.
The primary references for the AmigaShell are the AmigaDOS Manual (3rd edition, Bantam Books, 1991) and the Hyperion AmigaOS 3.2 documentation set. Both are cited throughout.[15]
10.1. Getting to a Shell
10.1.1. CLI and Shell — the historical distinction
The Amiga had two console layers historically:
-
CLI — the original command-line interface from AmigaOS 1.0. Blank prompt (
1>), minimal features. Started withNewCLI. -
Shell — the improved version from AmigaOS 1.3 onward. Command history, line editing, aliases, output redirection, script variables. Started with
NewShell.
You will occasionally see documentation that says "CLI" when it means "Shell"; they are the same window as far as the user is concerned on any post-1.3 system. This book says Shell throughout, because that is what you will actually use.
10.1.2. Opening a Shell
Open one from Workbench by double-clicking SYS:System/Shell
(there is a Shell icon in the Workbench menu bar too). You get
a window with a prompt:
1>The 1 is the Shell’s task number, useful mostly for EndCLI and
for identifying yourself when there are several open. You can
open more Shells by opening more icons, by running NewShell from
inside an existing Shell, or from a script.
From another shell:
1> NewShell CON:0/0/640/200/AnotherShell/CLOSE/AUTO/WAITThe CON:… string is the console-window spec — the same one
covered in Section 10.8 below.
10.1.3. The prompt
The default prompt is n> where n is the task number. You can
customise it with Prompt:
1> Prompt "%N.%S> "
1.SYS:> CD Work:
1.Work:> _
%N is the shell number, %S is the current directory, %R is
the return code of the previous command. Prompt ? prints the
full list of substitutions.
If you want colours in the prompt (OS 3.2+ or with a modern console handler like ViNCEd), you can embed ANSI escapes:
1> Prompt "*e[33m%N.*e[36m%S*e[0m> "*e is the AmigaShell escape for ESC (0x1B). The above is
"yellow shell number, cyan CWD, reset colour, prompt."
10.2. Command resolution
Command resolution, top to bottom, first match wins:
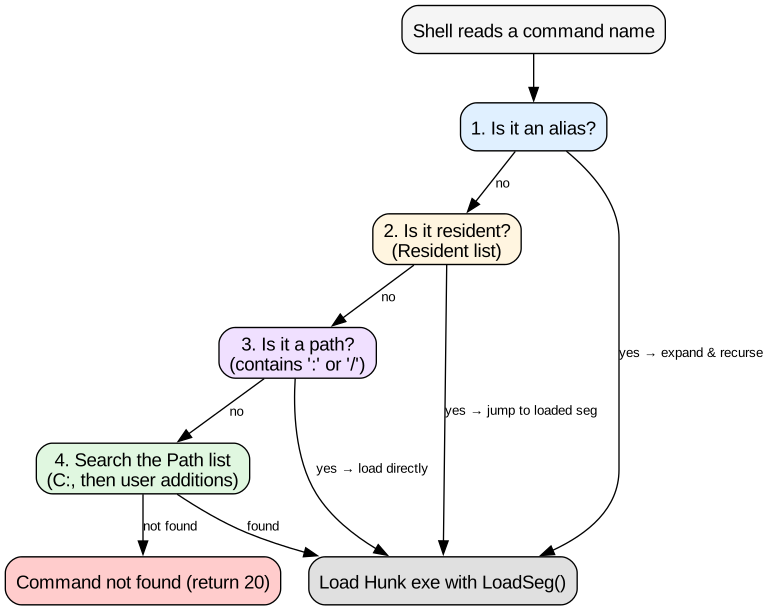
10.2.1. Aliases, residents, and the path list
Three sources are searched in order:
-
Aliases:
Alias newname oldname args…— expands textually before further parsing. -
Resident commands: modules pre-loaded into memory.
Residentlists them;Resident name path/nameadds one; the matching command runs directly from RAM. -
Path list: directories to search, in order. Defaults to
C:(the standard commands drawer).Pathshows the current list;Path dir1 dir2 ADDappends.
| bash | Shell |
|---|---|
|
|
|
|
|
|
|
|
|
|
10.2.2. Resident commands: RAM-cached executables
Resident commands are the Amiga’s answer to shell builtins plus
ldconfig. A command marked resident (Resident C:List) is
loaded into memory once; every subsequent invocation re-uses the
loaded copy, saving a disk load. The catch is that a resident
command must be pure — its code and data separate, no
self-modifying code — so it can be safely shared. Every standard
command from Kickstart 2.0 onwards is pure. Most Aminet utilities
are.
The default S:Startup-Sequence marks the most-used commands as
resident:
Resident C:Assign PURE
Resident C:Copy PURE
Resident C:List PURE
Resident C:Path PURE
...
This is why an OS 3.2 Shell feels instant compared to an OS 1.3 one: its commands live in memory. You can add more to the resident list yourself; anything you use routinely is a candidate.
10.3. Working with files
Compact reference. Every command has a ? help mode
(List ? prints its template).
10.3.1. The core commands
| Task | Command |
|---|---|
List files, brief |
|
List files, long |
|
List recursively |
|
List with wildcard |
|
Copy file |
|
Copy directory tree |
|
Move / rename |
|
Delete file |
|
Delete tree |
|
Make directory |
|
Show file |
|
Show file paged |
|
Print file |
|
Find file |
|
grep-in-files |
|
Compare files |
|
Change directory |
|
Print CWD |
|
Set permissions |
|
Show environment |
|
Set a Shell var |
|
Set a global var |
|
10.3.2. Wildcards and patterns
Wildcards are #? (zero or more of anything) rather than *:
1> Dir #?.c
main.c
tasks.c
util.c

1> Dir #?.(c|h)
main.c
main.h
tasks.c
util.c
Alternation uses (a|b|c). Character classes and ranges are
supported: [a-z]#? is "any lowercase letter followed by
anything." ? on its own is a single character. The full pattern
language is documented in the AmigaDOS Manual, chapter on
patterns, and in the dos.library autodoc for
MatchPatternNoCase.[16]
You can use * as a redirection character in some contexts, but
not as a wildcard. #? is universal. Get used to it.
Standard pattern-language building blocks:
| Pattern | Meaning |
|---|---|
|
Any single character. |
|
Any character, zero or more times. |
|
Zero or more occurrences of |
|
Any single character from the set. |
|
Any character in the range. |
|
Any string not matching |
|
Alternation. |
|
Grouping. |
Combine freely: #?.(c\|h)~(main\|util) is "anything ending in
.c or .h, except main. and `util.`".
10.3.3. Permissions and protection bits
Every file has a set of protection bits, similar in spirit to
Unix mode bits but with a different set of flags. Displayed by
List in the left column:
1> List
main.c                        482  ----rwed  Yesterday 14:33:12
build.script                   96  s---rwed  Yesterday 14:34:08
Bits, in order:
| Flag | Meaning |
|---|---|
|
Hidden (not shown by |
|
Script (Shell can execute directly with |
|
Pure (safe to make resident) |
|
Archive (set by write, cleared by backup tools) |
|
Read allowed |
|
Write allowed |
|
Execute allowed |
|
Delete allowed |
Unlike Unix, d is separate from w. You can have a writable
but undeletable file. Set with Protect:
1> Protect main.c +w SUB          ; remove write
1> Protect main.c s ADD           ; mark as script
1> Protect main.c srwed           ; set exact
There is no per-user or per-group ownership on classic AmigaOS (there is one user, you). Modern network-filesystem handlers approximate Unix ownership by tacking on their own metadata layer.
10.4. Redirection, pipes and substitution
10.4.1. Redirection
1> List >list.txt          ; stdout to file
1> List >>list.txt         ; append
1> Type <input.txt         ; stdin from file
1> Foo 2>err.txt           ; stderr to file (OS 2.0+)
1> List | Sort             ; pipe (OS 2.0+, needs Pipe: handler mounted)
The <> redirection syntax is identical to bash. Pipes require
the PIPE: handler in your L: directory (present on OS 2.0+).
Pipes on the Amiga are file-based rather than kernel-object-based
— each pipe is a named entry in PIPE: visible to any process
— but the Shell syntax matches Unix.
10.4.2. Substitution
Command substitution uses backticks:
1> Echo "Today is: `Date`"
Today is: Friday 24-Jul-26 14:33:12
The Amiga uses backticks the same way as Bourne shell. There is
no $(…) form.
Variable substitution uses $VAR:
1> Set COUNT=3
1> Echo "There are $COUNT items."
There are 3 items.
Environment variable substitution reads from ENV::
1> SetEnv EDITOR "SYS:Utilities/TextEdit"
1> Echo "Editor is $EDITOR"
Editor is SYS:Utilities/TextEdit
Local and global variables share the syntax; local shadows global.
10.5. Writing scripts
10.5.1. Aliases with parameters
Alias supports positional parameters using square brackets:
1> Alias mkcd [a] "MakeDir <a> AND CD <a>"
1> mkcd newdir
[a] is the parameter placeholder, <a> is the substitution.
This scales to several parameters: [from to] and <from>,
<to>.
For an alias with no parameters, the whole command line after the
alias name is passed as $*. But per-parameter substitution is
almost always cleaner.
10.5.2. Script files and the .KEY header
Any file marked with the script bit (s flag) and readable by
the Shell can be run as a script. The file is a sequence of
Shell commands.
Protect build.script +s.KEY project
.BRA {
.KET }
;
; Build one C project by name.
Echo "Building {project}..."
CD SDK:src/{project}
sc {project}.c
IF WARN
Echo "Build failed."
QUIT 10
ENDIF
Echo "OK."Salient features:
-
.KEYdeclares the arguments — the same argument-template syntax the DOS library uses everywhere..KEY projectmeans "one positional argument namedproject." More elaborate:.KEY input/A,output/K,quiet/Smeans "input required, output keyword-named, quiet is a switch." (See Section 10.5.4 below.) -
.BRAand.KETchange the substitution characters from the default<>(which clash with Shell redirection) to{}. -
IF WARN,IF ERROR,IF FAILtest the return code of the previous command in bands:WARN >= 5,ERROR >= 10,FAIL >= 20. This is the standard AmigaDOS return-code convention. -
Comments start with
;, not#. -
Blank lines are allowed.
-
QUIT nexits with return coden.
If a script does not have the s bit set, you can still run it
with Execute scriptname. Execute is the AmigaDOS equivalent
of bash script.sh.
Better than Execute for anything non-trivial is ARexx,
covered in Chapter 20. Shell scripts are fine for boot
sequences and one-liners; ARexx is what you reach for when you
need control flow and data structures.
10.5.3. Two longer script recipes
Rebuild every C file in the current directory and stop on the first error:
.KEY srcdir/A
.BRA {
.KET }
;
; Build every .c under {srcdir} in place. Uses sc (SAS/C).
;
Failat 6                       ; treat WARN as OK, ERROR as failure
Echo "Building in {srcdir}..."
List {srcdir}/#?.c LFORMAT="%s%s" >T:bl-files
Execute T:bl-files-build
Delete T:bl-files T:bl-files-build QUIET
IF ERROR
    Echo "*** Build failed."
    QUIT 20
ENDIF
Echo "OK."
The Failat builtin sets the threshold at which the script
aborts — by default any return code >= 10 stops execution; here
we widen that to 6 so warnings don’t stop us. IF ERROR matches
RC >= 10 && RC < 20; IF FAIL matches RC >= 20. This banded
return-code convention pervades the whole system.
Batch-rename .txt to .md with wildcard iteration — the classic
Shell version of the ARexx example in a later chapter:
Failat 20
Echo "Renaming .txt to .md..."
List #?.txt LFORMAT="Rename %s%s %s%.n.md" >T:renames
Execute T:renames
Delete T:renames QUIET
List with LFORMAT builds a series of Rename commands into a
temp file; Execute runs them. The %.n format prints the name
minus the last dotted extension. This idiom — "have List write
the commands, then Execute the result" — is the Amiga
equivalent of Unix find | xargs.
10.5.4. Argument templates
Every well-written Amiga command — including your own scripts — takes arguments in a uniform format. The template syntax:
-
NAME— required positional, or accepted by keyword. -
NAME/A— required, must be present. -
NAME/K— keyword-only, must be preceded by its name. -
NAME/S— switch (boolean). -
NAME/N— numeric. -
NAME/M— multi (list; consumes remaining positionals). -
NAME/F— final (consumes rest of line as one string).
For example, Copy’s template is:
`FROM/M/A,TO/A,ALL/S,QUIET/S,BUF=BUFFER/K/N,CLONE/S,DATES/S,NOPRO/S,COM/S,NOREQ/S
Which is why you can write Copy foo bar TO baz ALL CLONE and
it parses. The ReadArgs() library call — which your scripts and
C programs will use — is one of the more pleasant DOS
APIs.[17]
10.5.5. Subroutines via Execute
Execute foo runs a script; the parent script waits for foo to
finish, and foo’s return code becomes the parent’s `RC. This
gives you subroutine-like behaviour without needing functions:
Failat 20
Execute S:common-setup       ; common setup
IF ERROR
    Echo "common-setup failed"
    QUIT 20
ENDIF
Execute S:common-teardown
Execute also accepts arguments, which are passed to the
script’s .KEY template:
Execute S:build myproject
Execute S:deploy staging  {project-name}
For scripts you run frequently, add them to a directory on your
Path and mark them with the s protection bit. Then you can
invoke them by name directly, without Execute:
1> Protect S:mkproject +s
1> Path S: ADD
1> mkproject foo
Now mkproject behaves as if it were a built-in command.
10.6. Startup and interactive configuration
Boot-time shells run S:Shell-Startup before their first
prompt. This is where you set aliases, add to your path, and
configure your environment for interactive use. It is the
equivalent of .bashrc.
S:User-Startup is sourced by S:Startup-Sequence at boot time,
and is the equivalent of Linux /etc/rc.local. Every package
installer that needs to add an assign or mount a device appends
to User-Startup. Do not edit Startup-Sequence itself unless
you know what you are doing; put your changes in User-Startup.
A reasonable S:Shell-Startup:
; Aliases
Alias ll List LFORMAT="%s %b %d"
Alias ls Dir
Alias cp Copy
Alias mv Rename
Alias rm Delete
Alias cat Type
Alias less More
Alias find [pat] "List <pat> ALL"
Alias grep [pat file] "Search <file> <pat>"
Alias mkcd [d] "MakeDir <d> AND CD <d>"

; Path additions
Path SDK:local/bin ADD
Path Work:bin ADD

; Prompt: process number and CWD
Prompt "%N.%S> "
%N is the shell number, %S is the CWD, %R is the previous
command’s return code. See Prompt ? for the full list.
10.7. Job control and background
Run a program in the background by prefixing with Run:
1> Run TextEdit main.c
[CLI 2]
1>
Run starts the program as a new detached process and returns
immediately. The [CLI 2] line tells you it got shell number 2.
To close a background CLI when its program is finished, add
>NIL: <NIL: to detach its I/O too:
1> Run >NIL: <NIL: TextEdit main.c
1>
The EndCLI command terminates the current Shell. Break n
sends signal n to Shell number n (like kill, with Break n
C for Ctrl-C). List running shells with Status.
Modern OS 3.2 adds TaskPri and Break improvements; check the
manual page.
10.8. Console-window tricks
Because CON: is a handler, you can open a fresh window from a
script by writing to a CON: "file" whose name encodes the
window’s shape:
1> Echo "Hello, new window!" >CON:100/100/400/100/MyWindow/CLOSE/AUTO/WAITThe path components are left/top/width/height/title/flags. The
flags are:
-
CLOSE— include a close gadget. -
AUTO— open the window only when someone writes to it (used by the standardNewShellcommand). -
WAIT— after the file is closed, wait for the user to close the window before deleting it. -
NOSIZE,NODRAG,NODEPTH,NOCLOSE— remove standard gadgets. -
SCREEN name— open on the named public screen (rather than Workbench).
This is how programs launched from Workbench get a shell window
when they need one — they open
CON:0/0/640/200/Title/AUTO/WAIT as their stdout.
10.9. Making a script Workbench-launchable with IconX
A Shell script is text; a Workbench user wants a double-clickable
icon. The bridge is a small utility called IconX, which lives
in C:.
Give your script a .info icon with these tooltypes:
IconX_UseShell=YES
IconX_KeepIO=NO
IconX_DoConsole=YES
And set the icon’s Default Tool to C:IconX. Now double-
clicking the icon runs your script inside a Shell, complete with
a temporary console window. The script sees its Workbench
arguments in the standard .KEY fashion.
For a script that acts on a file dropped onto its icon — a
common pattern for "converter" scripts — set the Default Tool to
C:IconX and the script’s .KEY argument to expect a filename;
dragging a file onto the icon runs the script with the dropped
filename passed as the argument.
10.10. Amiga-specific commands worth memorising
Which, Assign, Path, Alias, Set, SetEnv, Cd,
Prompt and Version are the ones you already know. The
Amiga-specific ones worth having in your fingers:
| Command | Purpose |
|---|---|
|
Wraps a Shell script so it becomes runnable from Workbench with double-click; the |
|
Run a script that isn’t marked with the |
|
Delay for |
|
Yes/no prompt; sets |
|
Jump to a |
|
Filesystem-existence conditionals. |
|
Env-var conditionals; also |
|
Read the version string embedded in an executable or library. |
|
Free space per volume. |
|
List all Shell processes. |
|
Send signal to Shell |
10.11. Linux → AmigaShell command reference
The section previously kept as an appendix. Print it and pin it above your emulator; you will be reaching for it constantly for the first week.
10.11.1. Files and directories
| Linux / macOS | Amiga | Notes |
|---|---|---|
|
|
Paginated columns |
|
|
Long form with metadata |
|
|
Recursive; add |
|
|
|
|
|
Or |
|
|
|
|
|
|
|
|
|
|
|
Amiga |
|
|
|
|
|
ALL recurses |
|
|
|
|
|
|
|
|
Cannot cross volumes; use |
|
|
Assigns are the Amiga symlink |
|
|
|
|
|
|
|
|
No standard head/tail — install |
|
|
|
|
|
|
|
|
No stock wc; on Aminet as |
|
|
See Section 10.3.3 above |
|
|
10.11.2. Processes and jobs
| Linux | Amiga | Notes |
|---|---|---|
|
|
Shows shells only; use |
|
|
Aminet |
|
|
Break sends Ctrl-C to Shell n |
|
|
No hard kill; well-behaved apps handle break |
|
|
Backgrounded, IO detached |
|
— |
No job control in Shell; use windowed apps instead |
|
|
|
|
|
10.11.3. Environment and shell state
| Linux | Amiga | Notes |
|---|---|---|
|
|
Both use |
|
|
Global env var (in |
|
|
|
|
|
Only current Shell |
|
|
|
|
|
|
|
Up-arrow, or |
OS 3.2 keeps persistent history |
|
|
|
|
|
No builtin/external distinction |
|
|
|
|
|
|
|
|
Per-shell startup |
|
|
System boot user hook |
|
|
System boot proper — do not edit directly |
10.11.4. Networking
| Linux | Amiga | Notes |
|---|---|---|
|
|
|
|
|
|
|
|
|
|
|
Aminet |
|
|
Aminet |
|
|
Ships with Roadshow |
|
|
|
|
|
10.11.5. Archives
| Linux | Amiga | Notes |
|---|---|---|
|
|
LhA is the default |
|
|
|
|
|
|
|
|
No standalone gzip; use LhA |
|
|
Aminet |
|
|
|
10.11.6. Devices, disks, filesystems
| Linux | Amiga | Notes |
|---|---|---|
|
|
|
|
|
|
|
|
Free space per volume |
|
|
|
|
|
No stock du; ByteCount on Aminet |
|
|
|
|
|
|
|
|
10.11.7. Shell language: bash vs Shell vs ARexx
| bash | AmigaShell | ARexx |
|---|---|---|
|
|
|
|
|
|
|
|
|
|
``cmd`\` (backticks) |
|
|
Chained |
|
10.12. The Shell replacements you actually want
The stock Shell is fine. If you use the Shell heavily, install one of:
-
ViNCEd — a replacement console handler with tab completion, history search, and better colours. Drop-in replacement for
CON:.[18] -
KingCON — similar, older, also drop-in.
-
z-Shell — bash-flavoured Shell replacement; changes both the console and the command interpreter.
For OS 3.2 the stock Shell is meaningfully improved (persistent history, better line editing) and you may not need a replacement.
Next: what programs to actually run.
Chapter 11. Applications and Common Tasks
This chapter is a shopping list. For each thing you actually do at a computer — write text, browse the web, edit an image — it names the Amiga applications a working user would install in 2026, with a sentence on where each one sits versus its Linux or Mac equivalent. All installers referenced live on Aminet unless otherwise stated.
The default assumption: OS 3.2 on a 68030 or better (real or emulated), 8+ MB Fast RAM, TCP/IP configured. If a program needs more (a floating-point unit, a graphics card, OS 4), the entry says so.
A note on the state of Amiga software in 2026: it is broader and in better shape than a first-time returning user expects. Most of the commercially-important applications from the 1990s were released as freeware after their companies wound down, and much of it has been actively maintained by community developers. The answers below are the actual ones a working user would install today, not a museum tour.
11.1. Text editing
MicroEmacs (uEmacs/PK) ships with the SAS/C developer install
and is on Aminet. It is real Emacs, in miniature: buffers, kill ring,
regexps, keyboard macros. If you want Emacs fingers, this is it.
GoldED / CygnusEd Professional — the two long-standing commercial-quality editors. CygnusEd is now free; GoldED (also known as "Ed" in its later releases) has a mature Amiga-native UI. Either is closer to a modern GUI editor than a terminal one.
TextEdit ships in SYS:Utilities. Fine for editing scripts and
preferences files; not intended for programming.
MEmacs — the OS’s own EMACS-in-miniature in SYS:Tools/MEmacs.
Small, fast, no extensions. Good enough for Startup-Sequence edits.
If you must have modern vi or emacs: Vim has a stable 68k
Amiga port on Aminet (text/edit/vim…). Emacs 25 has been
ported by third parties for AmigaOS 4.
11.1.1. A short tour of the classic Amiga editors
-
ED — the OS’s own line editor, in
SYS:C/ED. Full-screen wraps and Amiga-key shortcuts for common commands. Not fun to use, but always present, so useful when nothing else is installed. -
EDIT — a line editor (like Unix
ed) shipping inSYS:C. Truly niche in 2026 unless you’re recreating a period Startup- Sequence. -
MEmacs — MicroEmacs-derived, ships in
SYS:Tools/MEmacs. Real Emacs keys (XC, XF), buffers, kill ring. Small enough to load fast on a stock A500. -
TextEdit — ships in
SYS:Utilities/TextEdit. A native GUI editor with menus, mouse support, and clipboard. Not intended for programming (no syntax highlighting), fine for editing config files. -
CygnusEd Professional — the classic commercial editor, freeware since the late 2000s. Split-window, macro-recording, ARexx port. Feels closer to a modern GUI editor than a terminal one.
-
GoldED — the other major commercial editor. Now free. Project management, syntax highlighting, and a rich ARexx interface make it the editor of choice for serious C or ARexx development on 68k Amiga.
-
MicroEmacs (uEmacs/PK) — Emacs-in-miniature; ships with SAS/C and on Aminet. Real regexps, keyboard macros. The correct choice if your fingers already know Emacs.
-
Vim — Aminet
text/edit/vim70-amigaos.lha(or newer). Works on 68020+, full-featured but a memory hog. Vim on OS 4 is more cheerful.
| You expect | You use |
|---|---|
|
Vim (68k, on Aminet) or CygnusEd |
|
MicroEmacs (uEmacs/PK) or Emacs (OS 4) |
Sublime / VS Code |
GoldED, CygnusEd Professional |
|
TextEdit or MEmacs |
11.2. Word processing and office
Final Writer is the classic Amiga word processor — WYSIWYG,
prints beautifully via PRT:, imports and exports RTF. Freely
available since the mid-2000s when the developer released it.
Ships in most modern OS 3.2 install bundles.
Wordworth — the other contender. Softwood released the last version (Wordworth 7) as freeware.
AbiWord was ported to AmigaOS 4 and MorphOS; it opens .docx
well enough for most purposes.
AmiSpread and PageStream cover spreadsheets and DTP respectively. PageStream 5 is still commercially maintained by its original developer.
There is no LibreOffice on classic Amiga. If you need to read
.docx or .xlsx on a stock 68k machine, convert on another
machine first, or use a network share.
11.3. Web browsing
The state of the web-on-Amiga is a real problem, because a modern browser is a hundred million lines of C++ and the Amiga does not have a working port of one.
-
IBrowse — commercial, actively developed. Version 2.5 works on OS 3.x and 4.x. Handles HTML 4 well, CSS 2 to a point, no JavaScript to speak of. Fine for reading Aminet, Wikipedia (mobile version), text-oriented sites.
-
AWeb — long dormant, still runs, similar coverage to IBrowse.
-
NetSurf — the modern option. Ports exist for both OS 3.x and OS 4.x. Handles CSS 2.1 including grid, no JavaScript, but a respectable pass on many current sites (especially anything that gracefully degrades).[19]
-
Odyssey Web Browser — a WebKit-based browser for MorphOS and AmigaOS 4 only. This is the one that renders modern JavaScript-heavy sites. Not available on 68k for CPU reasons.
If you want to actually use the web on a classic Amiga in 2026, the honest workflow is:
-
NetSurf for reference material and text sites.
-
A Frogfind or theoldnet.com proxy for stripping JS and images from anything more complex.[20]
-
A modern host and a shared folder for the pages you actually need to interact with.
11.4. Email
YAM (Yet Another Mailer) — the standard 68k mail client. IMAP, POP3, SMTP with STARTTLS. MUI-based, extensively documented, actively maintained through 2026.[21]
SimpleMail — a smaller alternative. Also cross-platform (68k, OS 4, MorphOS, AROS).
For a command-line mail workflow, Grn and muMail exist but are niche. In practice, YAM covers everything most users want.
11.5. Chat and IRC
AmIRC — the classic IRC client, commercial in the 1990s, freeware since. Still the reference.
WookieChat — active-development IRC client, MUI-based, still receiving updates.
Kwakk — Matrix client for AmigaOS 4.
XMPP support exists via AmiJabber. Discord and Slack do not have first-party Amiga clients; Matrix bridges via Kwakk are the usual answer.
11.6. File management
Directory Opus 5 Magellan II is one of the most beloved pieces of Amiga software ever written. Twin-pane file manager, scriptable in ARexx, extensible with modules, comes with a fully replaceable Workbench. Open-sourced by Jonathan Potter in the late 2010s and now actively maintained by the community as DOpus5.[22]
Filer and DiskMaster are the older / lighter alternatives.
If you spend serious time in files, install DOpus.
11.7. Graphics: paint, retouch, view
Personal Paint — Commodore’s own bitmap paint program, released as freeware. Supports palette animation, custom brushes, IFF and GIF. Nice for pixel art.
ImageFX — professional bitmap editor with rich colour handling, scripting via ARexx, and a plugin ecosystem. Now freeware.
Photogenics — layered non-destructive editor from the mid-1990s. Nova Design has released the final version as freeware. Good for photo work; still one of the nicer UIs on the platform.
MultiView ships in SYS:Utilities. It uses the Datatypes system
to display any registered format — IFF, GIF, JPEG (with a datatype
installed), PNG, animations, PostScript. Every graphics app worth
having installs its formats' datatypes so MultiView can preview them.
| You expect | You use |
|---|---|
GIMP |
Personal Paint (raster), ImageFX (heavier) |
Krita |
Photogenics |
Preview.app / feh |
MultiView |
For vector work, DrawStudio is the traditional Amiga vector package; HighlightPro and PageStream (which is DTP but includes vector drawing) are the alternatives.
For 3D, the classic is Lightwave 3D — the same package used to make Babylon 5 — but by 1998 it had migrated off the Amiga. Modern 3D work on AmigaOS is possible but niche; Cinema 4D was Amiga-native through 1997.
11.8. Sound and music
ProTracker — the four-channel MOD tracker that defined a generation of demoscene music. Now open-source and actively maintained; the current 68k version tracks the original ProTracker 2.3D.[23]
OctaMED SoundStudio — the big brother: eight+ channels, MIDI support, richer editing.
HippoPlayer and DeliTracker are the music players — both handle almost every known Amiga music format.
AHI (Audio Hardware Interface) is the standardised audio API, present on any modern install; higher-quality sound cards route through it.[24]
For MIDI, Bars & Pipes Professional was the flagship sequencer; it is still workable on modern configurations and there is an active user community.
For DAW-style work with samples, look at Symphonie Pro or — for anything serious in 2026 — accept that the workflow is "tracker on the Amiga, mix on the host."
11.9. Video
MainActor and Fiasco/Wildfire were the video editors of the 1990s Amiga. The state of the art has moved on. Modern practical approaches:
-
Capture and preview on the Amiga using MultiView (which handles ANIM, IFF-16SV audio, and via datatypes many other formats).
-
Real editing on a host machine.
The Video Toaster is a chapter of history rather than a current tool.
11.10. Development
The full C toolchain lives in Chapter 14. In brief:
-
SAS/C 6.58 — the historical commercial C compiler. Freeware since 2007; still one of the smoothest 68k development experiences.[25]
-
vbcc — modern retargetable C compiler with excellent 68k and PPC backends. Cross-compiles from macOS and Linux. Preferred for new work.[26]
-
GCC — bebbo’s GCC 6.5.0 for 68k works well as a cross-compiler; native GCC on Amiga is possible but slow.
-
AmiBlitz — the modern descendant of Blitz Basic. A more ergonomic option for game development than raw C.
-
Hollywood — a proprietary Lua-flavoured multimedia scripting language that runs on every current Amiga OS (and macOS, Linux, Windows). Popular for cross-platform prototyping.
11.11. Compression, archives, and encoding
-
LhA — the default archiver (
.lha). -
LZX — a compression algorithm popular in the mid-1990s for demanding ratios; still one command away.
-
xadmaster — a system-wide unarchive library, with modules for every archive format the Amiga has ever seen —
.zip,.rar,.arj,.tar,.tgz,.7z,.dms(disk images), and dozens more.[27] -
XPK — a similar plug-in system for stream compressors. Older, still used by databases and archivers.
For encoded audio and video, install the CyberSound and akMPEG datatypes on OS 3.x, or use MPlayer on OS 4.
11.12. System monitoring and admin
-
Scout — task list, port list, semaphore inspector. See Chapter 8.
-
SnoopDos — trace OS calls per task.
-
SysInfo — the classic all-in-one system information window.
-
ReportPlus — a modern SysInfo alternative with more useful detail.
For hard drive management, HDToolBox (in SYS:Tools) is
Commodore’s original; MediaToolBox is a more capable modern
replacement.
11.13. Backup
Amiback and Quarterback were the commercial backup tools. Freely available now. For modern workflows, the common answer is:
-
Compress key directories with
LhAon a schedule. -
Copy the archive to the host filesystem via a shared directory (in FS-UAE, a "directory hard drive"; on a real Amiga with a network, via SMB or FTP).
-
Version-control anything textual on the host machine; Git and Fossil have Amiga ports if you want to run them locally.
11.14. Three concrete workflow recipes
Getting from the shopping list above to actual working workflows.
11.14.1. Recipe 1: A modern developer setup
On a Workbench 3.2 install with a working TCP/IP stack, add these packages in order and you have a productive dev machine:
-
AmigaSSH — for pulling and pushing to GitHub over SSH.
-
Git for AmigaOS — a native 68k port lives on Aminet under
dev/misc/git-…; it’s compiled from the same upstream you know and does 95 % of what you need (clone, add, commit, push, pull, branch, log). For anything git-daemon-flavoured,sshto your host machine. -
CygnusEd Professional or GoldED — as your editor. Both handle multi-file projects, syntax colouring, and hooks to external commands (build, grep-in-files).
-
vbcc + vasm + vlink — the modern C toolchain. Install to
SDK:vbccand addAssign VBCC: SDK:vbcctoS:User-Startup. AddSDK:vbcc/binto your Path. -
Directory Opus 5 (Magellan II) — as the file manager and the shell you invoke from. It has an ARexx port for automating builds; hook up a lister button that runs
SDK:vbcc/bin/vc {SelectedFiles}and you have one-click builds.
That’s an under-500 MB install that gives you a full workstation.
11.14.2. Recipe 2: A retro-mail setup
Configure YAM to send and receive mail through a modern provider:
-
Install YAM (from Aminet or https://yam.ch/).
-
In
YAM > Config > TCP/IP, enter your SMTP host withSSMTP(SMTP over TLS on port 465) orSTARTTLS(submission on port 587). Modern Gmail/Fastmail SSL works, provided you configured Roadshow with the AmiSSL package (Aminetcomm/tcp/AmiSSL-…). -
For IMAP, similarly — port 993 with SSL. YAM’s IMAP is read-only by default; enable "IMAP4 R/W" in the config to actually sync flags.
-
Use an application-specific password on Google or Fastmail; neither supports OAuth from clients like YAM.
The whole thing works — mail arrives, replies go out, threading is respected — but expect no client-side spam filtering. Let your server-side spam layer earn its keep.
11.14.3. Recipe 3: A "modernised classic" browsing experience
There is no way to run Chrome on a 68030. There is, however, a way to use the modern web from an Amiga:
-
Install NetSurf for AmigaOS from https://www.netsurf-browser.org/.
-
Use it for anything that gracefully degrades — Wikipedia’s mobile view, static blogs, plain-HTML news sites, RSS feeds via Feed Reader (Aminet).
-
For any site that needs JS, run Frogfind (a text-mode HTTP proxy) or Skewer (a rendering proxy that ships you an image + link map) on a modern host machine and hit that from NetSurf.
-
Set NetSurf’s homepage to your own Aminet mirror of Aminet’s RECENT.tab file. That way "open the browser" gives you a live view of what’s new in the Amiga world.
Under MorphOS or OS 4 you can add Odyssey Web Browser for sites where WebKit-with-partial-JS is enough. On classic 68k, this workflow is honest about what the platform can and can’t do.
11.15. Where to find everything
Aminet, in this order of frequency:
-
util/— utilities.util/moni/for monitors,util/shell/for shells,util/wb/for Workbench addons. -
dev/— developer tools.dev/c/for C,dev/gcc/for GCC,dev/lang/for other languages. -
comm/— communications.comm/net/for TCP/IP,comm/mail/for mail,comm/irc/for IRC. -
disk/— filesystems, disk utilities.disk/misc/for interesting oddities. -
text/— text handling.text/edit/for editors,text/dtp/for DTP. -
gfx/— graphics.gfx/edit/,gfx/show/. -
mus/— music.mus/edit/for trackers,mus/play/for players.
For OS 4-specific packages use https://os4depot.net/; for AROS use https://archives.aros-exec.org/.
Next: writing your own.
Part III: Part III: Machine Architecture
The hardware layer. Custom chips, memory maps, expansion buses, autoconfig. What Kickstart is doing under your programs.
|
Platform coverage: classic 68k Amiga hardware (OCS / ECS / AGA chipsets, 68000–68060 CPUs, Zorro I/II/III buses). The FPGA recreations (Vampire, MiSTer) are functionally equivalent. PowerPC AmigaOne hardware differs at the bus level; those differences are noted per section. |
Chapter 12. Machine Architecture: Chips, Buses, and Memory
|
Platform: Classic 68k Amiga hardware. Not applicable to modern PPC AmigaOne.
This entire chapter is about the classic 68k Amiga chipset —
Agnus, Denise, Paula, CIA, and the memory layout Kickstart uses
around them. AmigaOS 4 PowerPC hardware (AmigaOne X5000, Tabor,
Sam4xx) has none of this. Those machines are conventional
PowerPC boards with PCIe expansion, Radeon GPUs, and modern
peripheral chipsets. AmigaOS 4 still uses the OS APIs
( If your interest is only AmigaOS 4 PowerPC hardware, you can skip this chapter and read the equivalent hardware documentation from A-Eon and Hyperion Entertainment. If your interest is any classic 68k Amiga — real or emulated or FPGA — this chapter is the essential background. |
Almost every chapter so far has assumed you know roughly what "Chip RAM" and "AGA" mean and has moved on. This chapter fills that in properly. It is a tour of the Amiga’s hardware from the CPU outwards, deep enough that you can read the Amiga Hardware Reference Manual and understand what it is telling you.
The primary source is the Amiga Hardware Reference Manual (3rd edition, Addison-Wesley, 1991, ISBN 0-201-56776-8). Every chip register, timing diagram, and DMA-slot chart lives there. The full text is on archive.org at https://archive.org/details/amiga_ham3. Where a paragraph below needs a citation for a specific value it points you at the RKM, the HRM or one of a small number of well-known community references.
12.1. The overall picture
An OCS or ECS Amiga is a Motorola 68000 CPU wired to two shared memory regions (chip and — if fitted — fast) and three custom DMA-capable chips (Agnus, Denise, Paula), plus two general-purpose I/O chips (Complex Interface Adapters, CIA-A and CIA-B). AGA machines replace Denise with Lisa and Agnus with Alice, boosting the custom-chipset capabilities, but preserve the same overall topology.
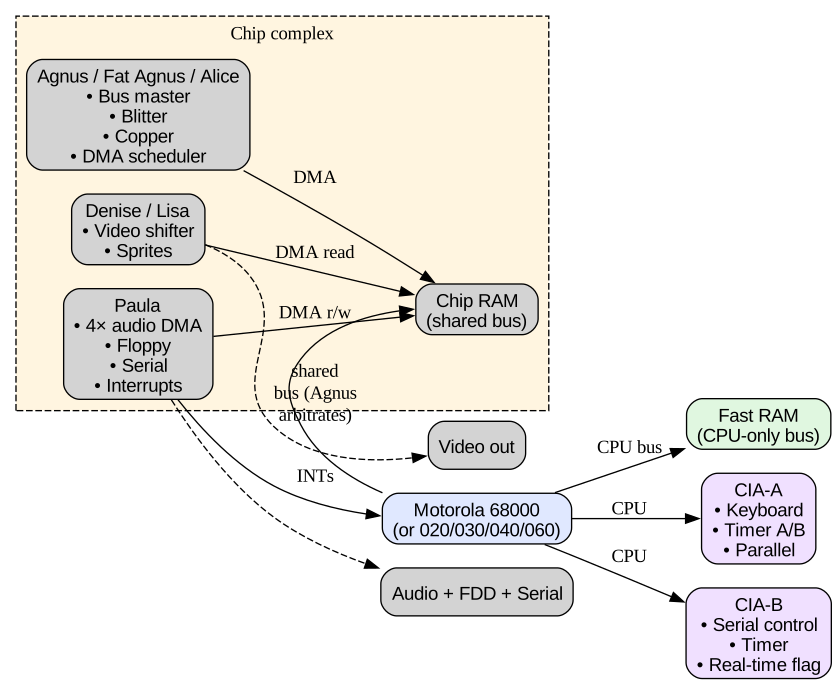
The trick is that the CPU and the custom chips share the chip- memory bus by time-slicing. Every "cycle" (280 ns on a 7 MHz NTSC Amiga) is divided into two halves. Odd cycles are handed to Agnus’s DMA engines by default; even cycles are handed to the CPU. When DMA doesn’t need the bus, the CPU gets those cycles too. This is why a stock 68000 in an Amiga executes at approximately the same speed as a stock 68000 not in an Amiga: DMA and CPU access are interleaved.
The custom-chip DMA slots per horizontal scan line are budgeted strictly. In a 320×256 low-res 4-plane display the Copper takes some slots, the bitplane-DMA takes 4 out of 8, the sprites take 16 slots at the start of each line, and so on. Detailed slot diagrams are in the HRM, chapter 7.[28]
12.2. The 68000 and its cousins
The Motorola 68000 in a stock Amiga runs at:
-
7.15909 MHz on NTSC machines (exactly 4× the NTSC colour subcarrier frequency of 3.579545 MHz).
-
7.09379 MHz on PAL machines (exactly 4× the PAL colour subcarrier of 1.773447 MHz, times 2 for the horizontal freq).
Nothing about the CPU is Amiga-specific — it is the same CPU Apple put in the Mac 128K, Atari put in the ST, and Sun put in early workstations. The 68000 has:
-
Eight 32-bit data registers (
D0–D7). -
Seven 32-bit address registers (
A0–A6). -
A stack pointer (
A7, banked toUSPin user mode andSSPin supervisor mode). -
A 16-bit status register with condition codes, interrupt mask, and supervisor-mode flag.
-
A 24-bit external address bus (16 MB addressable).
-
A 16-bit external data bus.
-
A big-endian byte order.
The 68000 has no MMU, no cache, no floating-point unit, no memory-protection. Chapter 2 covered what those absences imply for the OS design; the physical consequence is that any address in the 24-bit space is legal to read or write from anywhere in the machine.
Successors — the 68010, 68020, 68030, 68040, 68060 — all fit
into the same socket electrically (with some caveats) and are
mostly upward binary-compatible. The 68020 introduced a 32-bit
external data bus and a full 32-bit address bus (4 GB
addressable), the 68030 added a paged MMU and instruction /
data caches, the 68040 and 68060 added floating-point on-die and
much higher clock rates. All of them are supported by the
Amiga OS through the same exec.library.
12.3. The memory map
The 68000’s 24-bit address space (16 MB) is divided into fixed regions:
| Range | Size | Contents |
|---|---|---|
|
512 KB |
Chip RAM (A500 stock; up to 512 KB extra "slow RAM" here on the trapdoor) |
|
1.5 MB |
Chip RAM extension for 1 MB+ machines (ECS Fatter Agnus) |
|
8 MB |
Zorro II fast RAM (autoconfig) |
|
~2 MB |
Reserved / motherboard I/O |
|
4 KB |
CIA-B registers |
|
4 KB |
CIA-A registers |
|
1.5 MB |
"Slow RAM" / Ranger RAM (some A500/A2000 configurations) |
|
512 KB |
Reserved |
|
512 bytes |
Custom chip registers (Agnus, Denise, Paula) |
|
512 KB |
Reserved |
|
64 KB |
Zorro II AutoConfig window |
|
~500 KB |
Zorro II autoconfig’d cards |
|
512 KB |
Extended ROM (A500+/A600 sometimes) |
|
512 KB |
Kickstart ROM (mirrored also to |
The custom-chip registers at $DFF000 are the heart of Amiga
programming when you go below the OS. Every register is 16 bits.
Most are write-only from the CPU; reading them gives back
different data (the Copper or hardware state, not what you last
wrote). A few are read-only.
On AGA the map extends into the 32-bit address space and Zorro
III cards autoconfig into the range from $40000000 upwards.
The 24-bit chip-register aperture at $DFF000 is preserved for
backward compatibility.
12.4. The custom chip register wall
The Amiga has approximately 250 chip registers, each with a
symbolic name and a fixed offset from $DFF000. A small
sampling:
| Offset | Symbol | Chip | Purpose |
|---|---|---|---|
|
|
Agnus |
DMA control (read: current state) |
|
|
Agnus |
DMA control (write: enable / disable) |
|
|
Paula |
Interrupt enable |
|
|
Paula |
Interrupt request (r/w) |
|
|
Paula |
Audio channel 0 location, high word |
|
|
Agnus |
Bitplane control 0 (depth, HAM, etc.) |
|
|
Agnus |
Horizontal scroll bits per playfield |
|
|
Alice |
(AGA) Bitplane control 3 |
|
|
Denise |
Palette entry 0 |
|
|
Denise |
Palette entry 1 |
|
|
- |
Reserved |
You write to a register with a MOVE.W #value, $dff100 in
68k assembly, or a *(volatile UWORD *)0xdff100 = value; in C.
Except you almost never do — the OS wraps everything you would
want in graphics.library, intuition.library and
hardware/custom.h.
The exceptions are the demo/game side of Amiga programming, and they are worth understanding at least in outline. If you ever see code like:
custom.color[0] = 0x0f00;   /* red border */
custom.color[1] = 0x0fff;   /* white text */
what is happening is a direct write to $DFF180 and $DFF182
via the struct Custom overlay declared in
hardware/custom.h. The declaration:
struct Custom {
    UWORD bltddat;        /* $000 read: blitter dest data */
    UWORD dmaconr;        /* $002 */
    ...
    UWORD color[32];      /* $180-$1BE palette */
    ...
};
extern volatile struct Custom custom;   /* mapped at $DFF000 */
Full list is in hardware/custom.h.
12.5. Agnus, in more detail
Agnus (Address GeNerator UnitS) is the bus master. Its responsibilities:
-
Arbitrate the chip-memory bus between the CPU, the Blitter, the Copper, sprite DMA, bitplane DMA, audio DMA, floppy DMA and refresh cycles.
-
Contain the Copper.
-
Contain the Blitter.
-
Generate horizontal and vertical sync pulses and beam-position counters.
-
Provide the vertical-blanking interrupt.
Revisions of Agnus:
| Name | Chip name | Notes |
|---|---|---|
Agnus (OCS) |
MOS 8361/8367 |
A1000, early A500/A2000. Max 512 KB chip RAM addressable. |
Fatter Agnus (OCS) |
MOS 8372A |
Late A500/A2000. Max 1 MB chip RAM. |
Super Agnus (ECS) |
MOS 8372B |
A500+, A600. Max 2 MB chip RAM. Extra Copper features. |
Alice (AGA) |
MOS 8374 |
A1200, A4000. Max 2 MB chip RAM. New 32-bit-wide DMA modes, hardware bitplane scroll. |
The Copper’s instruction set has just two opcodes (WAIT and
MOVE) plus a SKIP. Programs are stored in chip memory,
called a "Copper list." A Copper list is executed once per
frame, starting at the beginning of vertical retrace. When it
hits WAIT $FFFF, $FFFE (wait for beam position that never
happens) it stops until the next frame.
A minimal Copper list to force a red background:
COPPER LIST:
    MOVE.W  #$0F00, COLOR00      ; colour 0 = red
    WAIT    $FFFF, $FFFE          ; end
Encoded as three 16-bit words. graphics.library’s Copper
allocation functions (`AllocCopperListTags, AddInterrupt
with INTB_COPER) let you install this without touching the
hardware directly.
The Copper is what makes Amiga demos look like Amiga demos.
Sixteen-colour palette but 4096 apparent colours in the scene?
Copper list re-writes COLOR00–COLOR15 between every scan
line. Impossible-looking sprites bigger than the sprite hardware
allows? Copper re-uses each hardware sprite three or four times
per frame at different vertical positions.
12.6. The Blitter
Also in Agnus. The Blitter is a hardware DMA engine that performs rectangular memory operations on chip RAM. Its capabilities:
-
Copy a rectangular region from up to three source addresses to a destination address.
-
Combine the three sources with any Boolean minterm (256 possible functions of three inputs) before writing.
-
Optionally shift each source horizontally by 0–15 bits before combining (this is the "bit-alignment" trick that makes arbitrary-position bitmap blits fast).
-
Optionally clip the operation against a mask address (for arbitrary-shape fills and line drawing).
The Blitter is what draws Amiga sprites, scrolls playfields,
fills polygons, and draws the entire Workbench window system.
Every RectFill(), Move/Draw, or BltBitMap() call in
graphics.library maps to a Blitter operation under the hood.
You control the Blitter through registers BLTCON0 and
BLTCON1 (source configuration and modes), BLTAxxx,
BLTBxxx, BLTCxxx (source addresses, per-source modulos),
BLTDxxx (destination), BLTSIZE (kicks off the operation).
Full API in the HRM, chapter 6, and — for the OS-level wrapper —
the RKM Libraries volume on graphics.library.
12.7. Denise / Lisa
Denise (OCS/ECS) and Lisa (AGA) are the video output chips. Responsibilities:
-
Fetch bitplane data via Agnus’s DMA.
-
Convert bit-plane values to colour indices, look up in the palette (
COLOR00–COLOR31on OCS;COLOR00–COLOR255on AGA), and emit RGB values. -
Manage the eight hardware sprites.
-
Support special display modes (HAM, dual-playfield, halfbrite, interlaced).
Revisions:
-
Denise (MOS 8362) — OCS, 12-bit RGB (4096 colour master palette), 32 palette entries, HAM6 with a 4-bit blue-red-green delta.
-
Enhanced Denise (MOS 8373) — ECS, adds VGA-compatible modes and productivity 1280×512 monochrome.
-
Lisa (MOS 8374) — AGA, 24-bit RGB (16 million colour master palette), 256 palette entries, HAM8 with 6-bit delta, chunky-pixel mode on some display modes, wider bitplane DMA.
12.8. Paula
Paula is the "everything else" chip — Peripherals / Audio / UART / Logic Array. Not a great acronym; it is named after the wife of one of the designers.
Responsibilities:
-
Four independent 8-bit stereo audio DMA channels, each with its own volume and period register. Channels 0 and 3 are on the left; 1 and 2 on the right.
-
Floppy-disk read/write (bit-serial via MFM encoding on OCS Amigas; the MFM decoder is in Paula).
-
Serial UART.
-
Interrupt controller — routes hardware IRQs to the 68000 through
INTENAandINTREQ. -
Digital joystick input (via CIA also).
Paula’s audio is one of the reasons the Amiga was significant. Four independent 8-bit DMA channels sound very modest by modern standards, but in 1985 no other home computer had DMA audio at all — samples had to be polled from the CPU. The Amiga could play back a four-part sample-based track (a MOD file) in the background at CD-quality bit depth while the CPU did other work. The entire tracker scene of the late 1980s grew out of exactly this capability.
Paula has not changed across chipset revisions — the same chip is in an A1000 and a stock A4000. The Amiga’s four-channel audio is a floor that never rose.
12.9. The CIA chips
Two general-purpose peripheral chips, MOS 8520. Each has:
-
Two 8-bit parallel ports (PA, PB).
-
Two 16-bit timers (Timer A, Timer B) with programmable operation modes.
-
A 24-bit time-of-day counter (with alarm).
-
A serial-shift-register port.
-
Two interrupt sources.
They are Amiga versions of the classic 6526 CIA from the Commodore 64, with Motorola bus interface changes.
CIA-A is at $BFE001; CIA-B is at $BFD000. On the Amiga:
-
CIA-A PA — parallel port, printer strobe, control lines.
-
CIA-A PB — joystick fire buttons, disk-drive READY, CHNG.
-
CIA-A SP — keyboard clock, keyboard data (serial-shift register receives scan codes).
-
CIA-A TA — Timer A used by the OS as the interval timer.
-
CIA-B PA — parallel port control (STROBE, ACK, BUSY, SEL, POUT), serial modem-control lines.
-
CIA-B PB — Chinon drive-motor / drive-select outputs.
-
CIA-B TA — Timer used by
timer.devicefor micro-second resolution. -
CIA-B TB — used by some drivers, occasionally free.
If you have ever wondered how the Amiga can be a floppy drive one moment and a serial modem the next moment with no special hardware, the answer is "the CIAs are general-purpose enough that Commodore’s engineers wired every peripheral through them."
12.10. Chipset generations
The three chipset generations of classic AmigaOS-era hardware:
| Feature | OCS (1985) | ECS (1990) | AGA (1992) |
|---|---|---|---|
Machines |
A1000, A500, A2000, A500+ (early) |
A500+ (late), A600, A3000 |
A1200, A4000, CD32 |
Chip RAM max |
512 KB |
2 MB |
2 MB |
Palette size (master) |
4096 (12-bit) |
4096 (12-bit) |
16.7M (24-bit) |
Palette registers |
32 |
32 |
256 |
Max playfield colours |
32 (or 64 in EHB) |
32 (or 64 in EHB) |
256 |
HAM |
HAM6 → 4096 apparent colours |
HAM6 → 4096 |
HAM8 → 262 144 apparent colours |
Max resolution |
640×512 interlaced |
1280×512 mono (productivity) |
1280×512 with full colour |
Sprites |
8× 16-pixel-wide |
8× 16-pixel-wide |
8× 16- or 32- or 64-pixel-wide |
Bitplane DMA width |
16-bit |
16-bit |
32-bit or 64-bit |
EHB is "extra half brite" — a hardware mode on OCS/ECS that doubles the palette to 64 by adding the same colours at 50% intensity. Very common on early games.
HAM (Hold-And-Modify) — see chapter 10.
The reason the OCS-to-AGA jump is not larger is that Commodore was competing with successor products they never shipped. The AAA chipset (Advanced Amiga Architecture) was in development from 1990 and would have offered true 24-bit graphics, hardware-accelerated 3D, and much higher DMA bandwidth; the Hombre chipset (a PA-RISC-based Amiga-successor) was in earlier development. Neither was finished before Commodore ran out of money in 1994.
12.11. ROM: what is Kickstart, actually?
Kickstart is the operating system’s kernel plus a set of essential libraries, in ROM. A 512 KB Kickstart 3.2 ROM contains:
-
exec.library— the kernel. -
dos.library— the DOS layer plus the essential DOS command interpreter. -
graphics.library— bitmap drawing, Blitter primitives. -
intuition.library— windowing and events. -
layers.library— window-clipping algorithms used by intuition. -
mathieeesingbas.library,mathffp.library— floating-point. -
utility.library— tag-list handling. -
expansion.library— Zorro AutoConfig support. -
keymap.library— keyboard translation. -
iffparse.library— IFF chunk parsing. -
commodities.library— the daemon layer. -
datatypes.library— the format-handler dispatcher. -
battclock.resource,cia.resource,disk.resource,misc.resource,potgo.resource— hardware arbitration. -
Reset vectors, POST code, autoconfig table walker, the boot loader that hands off to
dos.library.
Everything else — Workbench itself, most C: commands, most
libraries in LIBS:, prefs, fonts — lives on disk.
The physical ROM chip:
-
256 KB in Kickstart 1.x (a single mask ROM).
-
512 KB in Kickstart 2.x and 3.x (single mask ROM or a pair of U6A and U6B chips depending on machine).
At power-on, the CPU begins fetching from $000000. Kickstart
maps itself into the low 4 KB at reset time — the reset code
lives there — then remaps chip RAM into $000000 and executes
from ROM at $F80000 for the rest of the boot process.
For a bare-metal programmer this matters because it means the
exception vector table — the 68000’s list of where to jump
on interrupts, traps and exceptions — lives at the bottom of
chip RAM after boot and is patched by Kickstart. Exec provides
SetIntVector() and SetExcept() for user-code access.
12.12. Where to read further
-
Amiga Hardware Reference Manual, 3rd edition (Addison-Wesley, 1991). ISBN 0-201-56776-8. The canonical hardware reference. Full text on https://archive.org/details/amiga_ham3.
-
Amiga Intern by Ralph Babel and Gerhard Franke (Data Becker, 1988). German-language deep dive on OS internals including chip register layouts.
-
Mapping the Amiga by Randy Thompson and Cindy Trickel (COMPUTE! Books, 1992). ISBN 0-87455-231-3. Register-by- register reference; every register cross-referenced to every routine that touches it.
-
The Amiga System Programmer’s Guide by Ruediger Franzen (Abacus, 1988). ISBN 1-55755-034-4. Especially good on chip-level timing.
-
Big Book of Amiga Hardware at https://amiga.resource.cx/ — the exhaustive online database of expansion cards, custom chips, and peripheral hardware.
-
The Amiga Guru Book by Ralph Babel (Ralph Babel, 1993). Definitive OS-programming reference; harder to find than the RKMs but arguably better on the subtle traps.
-
The current OS 4.x AmigaOS Hardware Manual from Hyperion documents the modern PowerPC-plus-legacy-chipset system.
Next: the expansion side — Zorro, PCMCIA, IDE, SCSI, accelerator cards, and the AutoConfig protocol that makes the whole thing plug-and-play a full decade before PCI managed the same.
Chapter 13. Zorro and Expansion Hardware
|
Platform: Classic 68k Amiga bus. AmigaOne uses PCIe instead.
Zorro I/II/III are the classic 68k Amiga expansion buses. The
modern PowerPC AmigaOne series (X1000, X5000, Tabor, Sam4xx) uses
PCIe — the standard PC expansion bus. AmigaOS 4 exposes PCIe
cards through a The trapdoor slot, PCMCIA slot, and CPU-slot accelerators discussed later in this chapter are 68k Amiga only — they do not exist on any AmigaOne. This chapter is primarily for anyone working with classic 68k hardware (original or FPGA), or on "OS 4 Classic" — Hyperion’s OS 4 build for 68k Amigas with a PowerPC accelerator card. |
The Amiga was the first commercial personal computer with a real plug-and-play expansion bus. IBM’s PC needed you to set DIP switches for IRQs and memory addresses; the Atari ST had a proprietary DMA connector; the Mac had nothing until NuBus. The Amiga’s Zorro bus was self-configuring from the start — insert a card, boot, and the card negotiated its address range and IRQ with the machine automatically. This chapter covers Zorro (all three revisions), the AutoConfig protocol that makes it work, the other expansion mechanisms (trapdoor, PCMCIA, CPU-slot, IDE, SCSI), and the categories of card you would actually plug in.
The primary sources are the Amiga Hardware Reference Manual (3rd edition, chapter 11, "Autoconfig"), the Zorro III Bus Specification (Commodore-Amiga, 1990), and the extensive community-maintained Big Book of Amiga Hardware at https://amiga.resource.cx/.
13.1. Zorro I, II, and III
The Amiga had three generations of expansion bus, all called "Zorro" but differing in physical form and electrical capability.
| Generation | Machines | Width | Address space | Notes |
|---|---|---|---|---|
Zorro I |
A1000 |
16-bit |
24-bit (16 MB) |
Side edge connector, not a slot. Never had a large ecosystem; Zorro II supersedes. |
Zorro II |
A2000, A2500, A500 (via A501-2 or B2000), A1500 |
16-bit |
24-bit |
The classic slot bus. 5 slots in an A2000. Backward-compatible with Zorro I signals. |
Zorro III |
A3000, A4000, A4000T |
32-bit |
32-bit (4 GB) |
A2000-slot-compatible connector (100 pins vs 100). Bus-master DMA support. Backward-compatible with Zorro II cards physically and electrically. |
Physically, Zorro II slots and Zorro III slots are the same 100-pin edge-card connector, so a Zorro II card fits fine in a Zorro III slot (the machine autoconfigures it as Zorro II). This is one of Commodore’s better engineering decisions — software written for Zorro II runs unmodified on Zorro III hardware; only when the card wants Zorro III’s extended capabilities (32-bit addressing, bus mastering, faster clock) does it need to be Zorro-III-aware.
13.1.1. Zorro II electrical detail
Each Zorro II slot provides:
-
16-bit data bus, 24-bit address bus, wire-OR interrupt lines, direct connection to the 68000’s bus signals.
-
8 MB of address space available for autoconfig — cards are mapped anywhere in the range
$200000–$9FFFFF. -
64 KB of I/O space at
$E90000–$E9FFFFand$EA0000–$EFFFFF. -
Bus clock at 7 MHz on OCS/ECS machines, sync’d to the CPU.
-
Bus-master capability for select DMA-capable cards.
The 8 MB fast-RAM ceiling for Zorro II is why classic-era Amiga machines top out at 9 MB total (1 MB chip + 8 MB Zorro II fast). To go beyond that you need Zorro III or a CPU-slot expansion.
13.1.2. Zorro III electrical detail
Zorro III kept the same connector as Zorro II but multiplexed
the extra address lines onto the bus. A Zorro III card is
autoconfigured into the range from $40000000 upwards, with a
per-card configurable size (typically 4 MB to 128 MB per card).
The bus supports:
-
32-bit data, 32-bit address.
-
Bus mastering — cards can DMA to and from any memory in the system, including other cards' memory.
-
Higher clock rates — up to 33 MHz on the A3000 and A4000/40.
-
Cache line burst modes for streaming DMA.
-
Backward compatibility — Zorro II cards autoconfigure as Zorro II (in the 24-bit space), Zorro III cards autoconfigure as Zorro III.
Zorro III is a proper 32-bit expansion bus. Contemporary PC-market equivalents include ISA (never had DMA that worked well), EISA (a slow expensive attempt), MCA (proprietary), NuBus (Mac-only), VLB (early '90s), and eventually PCI (1993). Zorro III shipped in 1990 with the A3000 and did most of the things PCI would do three years later.
13.2. AutoConfig — the protocol
Every well-designed Zorro card has a small AutoConfig ROM
mapped into a fixed window at $E80000. At boot, the Kickstart
ROM runs an autoconfig walker that:
-
Reads the first 128 bytes of the AutoConfig window. These bytes tell it: card type, manufacturer ID (a 16-bit number assigned by Commodore’s registrar), product number, requested size (in 64 KB granular chunks), preferred address, and a set of flags (bus-master, cache-inhibit, ROM-vector, etc.).
-
Allocates address space of the requested size in the Zorro II region (24-bit) or Zorro III region (32-bit).
-
Writes the assigned base address back into the card’s AutoConfig register at offset
$48. The card decodes its own address range from that point on. -
If the card requested a driver-load, Kickstart looks for a matching
.devicefile inLIBS:and mounts it. -
Kickstart moves to the next AutoConfig-window occupant and repeats.
The process takes a fraction of a second. After it completes, every card in the machine has a unique address range and is addressable from software.
The manufacturer IDs are unique small integers. Commodore maintained a registry through 1994; the assignments are preserved on https://amiga.resource.cx/manuf.pl. Notable IDs:
| ID | Manufacturer |
|---|---|
1006 |
Advanced Systems & Software Solutions (A2091 SCSI, A2065 Ethernet) |
1024 |
Commodore-Amiga |
4626 |
phase 5 digital products (CyberStorm, Blizzard, CyberVision) |
8512 |
Village Tronic (Picasso II/IV RTG cards) |
2011 |
Great Valley Products (GVP series accelerators) |
1017 |
Hydra Systems (Ethernet cards) |
A card’s manufacturer_id + product_id pair uniquely identifies
its type; a driver looks for its own pair via
expansion.library’s `FindConfigDev().
Where PCI achieved plug-and-play via the PCI Configuration Space read via config-cycles, Zorro achieved it via a memory-mapped ROM at a known aperture. The elegance is that software above the driver level sees exactly the same "structure of ConfigDev nodes" regardless of Zorro version, so a 1990-vintage driver still works in a 2026-vintage system.
13.3. The AutoConfig data structures
From your programs (usually a driver’s boot code):
#include <proto/expansion.h>
#include <libraries/configvars.h>

struct Library *ExpansionBase = OpenLibrary("expansion.library", 39);

struct ConfigDev *cd = NULL;
while ((cd = FindConfigDev(cd, MANUF_MYCO, PRODUCT_MYCARD))) {
    Printf("Found MYCARD at $%08lx, size $%08lx\n",
           cd->cd_BoardAddr, cd->cd_BoardSize);
    /* cd->cd_Rom.er_Manufacturer, .er_Product, .er_SerialNumber */
    /* are available for finer distinctions between revisions */
}

CloseLibrary(ExpansionBase);
FindConfigDev walks the OS’s internal list of AutoConfig’d
boards. Any driver that wants to enumerate its own hardware
starts here.
The struct ConfigDev gives you everything you need to talk
to the card: its base address, its size, a pointer to its
optional driver-init ROM (if any), and the struct ExpansionRom
that was read at boot time. If the card exposed a driver ROM,
Kickstart may have already loaded and initialised it —
otherwise your driver has to LoadSeg() its own binary from
LIBS: or wherever.
13.4. Trapdoor expansion
Not every expansion needs a full Zorro slot. Every A500, A500+, A600 and A1200 has a trapdoor slot on the underside of the case, providing:
-
On A500/A500+: 512 KB or 1 MB extra chip RAM, or a clock-and-RAM combination, or a small autoconfig’d fast-RAM card.
-
On A600: a PCMCIA-compatible expansion, or a small IDE bus extension, or the classic Amiga 601 clock/RAM board.
-
On A1200: a 32-bit CPU slot exposing the 68020 bus and a full Zorro-II-compatible autoconfig space. This is where every 1200-era accelerator (Blizzard 1230, 1260, Vampire A1200, etc.) plugs in.
Trapdoor expansion is a real advantage of the Amiga’s home- computer heritage. You do not need to open the case with a screwdriver; you flip the machine over, pop a panel, slide the card in. Twenty-year-old A500s in retro shops still have functioning trapdoor slots.
13.5. The CPU slot
The A1200, A3000, A4000 and larger machines have a dedicated CPU expansion slot (a 200-pin connector on the A3000 side, a 150-pin trapdoor slot on the A1200). This slot exposes the raw 68000/020/030 bus and is used for:
-
Accelerator cards (a faster CPU + more Fast RAM + optional SCSI + optional FPU).
-
PiStorm and PiStorm32-lite (see chapter 3).
-
Real-time video capture cards.
-
Hardware debug pods for developers.
CPU-slot cards can be very high-bandwidth — they have direct access to the CPU bus with no arbitration. This is why the Vampire V4 accelerator can achieve genuinely modern performance out of a stock A600 chassis.
13.6. PCMCIA on A600 and A1200
The A600 and A1200 have a PCMCIA Type II slot on the left side. This is the standard IBM/JEIDA PC Card slot, so any PCMCIA device with an Amiga-compatible driver works: Ethernet cards, modems, compact-flash-to-PCMCIA adapters (a common way to give these small Amigas storage), SCSI hosts, sound cards.
Popular PCMCIA cards on Amiga:
-
PCMCIA Ethernet — the standard NE2000-compatible cards (any brand) with the community-supplied
plipbox.deviceorpcmcia.devicedriver. Instant Ethernet on a small Amiga. -
PCMCIA CF adapter — a compact flash card in a PCMCIA frame gives an A600/A1200 several GB of storage in an otherwise-storage-constrained machine.
-
PCMCIA GPS — Rockwell / Trimble modules; niche but useful.
13.7. IDE and SCSI
Storage expansion on the Amiga:
13.7.1. IDE
-
A600 and A1200 have a 44-pin IDE header for a 2.5" laptop-form-factor drive on the motherboard.
-
A4000 has a 40-pin IDE header for a full-size drive.
-
Other Amigas require a Zorro IDE controller (Elbox Fastata, DKB Cobra) or a CPU-slot equivalent.
IDE is handled by scsi.device — despite the name, Amiga’s
scsi.device implementation on IDE controllers exposes the
IDE bus through the same generic-block-device interface that
SCSI uses. Your driver code doesn’t need to know.
For modern storage, a CF-to-IDE adapter turns a compact flash card into an IDE drive. Cheap, silent, robust, cloneable from a modern PC via a card reader.
13.7.2. SCSI
-
A3000 and A3000T have built-in SCSI-2 controllers on the motherboard.
-
A4000T ships with SCSI-2 built in.
-
A2000/A2500 used a Commodore A2091 or third-party (GVP A2000-HC series, IVS Trumpcard) Zorro SCSI host adapter.
-
Third-party SCSI-3 controllers exist for later machines (Elbox, Blizzard, phase 5).
The community-preferred SCSI answer on 2026-era hardware is the SCSI2SD or BlueSCSI — small adapter boards that present an SD card as a SCSI drive. Ideal for A3000/A4000T users because they let you keep the original SCSI subsystem running while replacing the mechanical drive.
13.8. The classes of expansion card
The catalogue you would encounter in a well-equipped 1994 Amiga tower:
13.8.1. Memory
-
Zorro II RAM cards — up to 8 MB per card, autoconfig’d, no drivers required.
-
Trapdoor 32-bit fast RAM (A1200) — 4 MB or 8 MB SIMM daughterboards.
-
Zorro III RAM cards — up to 128 MB per card.
-
Chip RAM upgrades — replace the Fatter Agnus with a Super Agnus and add extra chip-memory chips (A500+, A600, A2000, A3000).
13.8.2. Graphics (RTG)
RTG = Re-Targetable Graphics, the Amiga’s answer to
"we want more than 32 colours at 1024×768 and the AGA
chipset can’t deliver it." An RTG card is a Zorro-based
graphics accelerator with its own VRAM, its own RAMDAC, and
a small driver (.card file plus a .chip driver).
Applications draw into a normal Amiga struct BitMap on the
RTG board’s memory and the card’s hardware displays it.
Common RTG cards:
-
Picasso II / Picasso IV (Village Tronic) — Zorro II and III, up to 8 MB VRAM, hardware zooming and colour-key overlays.
-
CyberVision 64/3D (phase 5) — Zorro III, S3 ViRGE-based, hardware 3D acceleration.
-
BVision (phase 5) — CyberStorm-daughter (CPU-slot) card, Permedia 2 chipset.
-
Voodoo 3 and Radeon 9200 boards — modern additions to certain accelerators.
RTG driver stacks: CyberGraphX (phase 5) and Picasso96
(Village Tronic) are the two competing implementations. Both
provide the same API (cybergraphics.library), so applications
written for one work on the other.
13.8.3. Sound
-
Toccata — 16-bit audio DAC on Zorro II.
-
Delfina — 16-bit DSP + DAC on Zorro II.
-
Prelude — Zorro II 16-bit stereo, direct-to-disk recording.
Sound cards route through AHI (Audio Hardware Interface), the Amiga’s system-wide audio abstraction. Apps write to AHI; the AHI driver for your card delivers audio.
13.8.4. Networking
-
Ariadne — Zorro II Ethernet, NE2000-compatible.
-
A2065 (Commodore) — the original Zorro II Ethernet.
-
X-Surf (Individual Computers) — Zorro II 10 Mbps Ethernet with modern chipset.
-
X-Surf 100 — Zorro II 100 Mbps Ethernet, uncommon but extraordinary in a real Amiga.
-
Deneb — Zorro II USB 1.1 host, brought USB to the classic Amiga.
Each ships with a SANA-II driver (.device file) that
plugs into any TCP/IP stack (chapter 12 covers the stacks).
13.8.5. Accelerators
The "make your Amiga fast" category. Every 1990s A2000 or A1200 that saw serious use had one.
Notable families:
-
GVP G-Force 030 / 040 — Zorro-slot accelerators with built-in SCSI-2 and RAM.
-
CyberStorm 040 / 060 (phase 5) — CPU-slot upgrades for A3000 and A4000, up to 128 MB Fast RAM.
-
Blizzard 1230 / 1260 (phase 5) — the A1200 answer. 68030-50 or 68060-50 with 32 MB SIMM.
-
Vampire V4 (Apollo Team) — modern FPGA accelerator with Apollo Core (68080-compatible superscalar), 512 MB RAM, HDMI, USB, Ethernet.
-
PiStorm and PiStorm32-lite — Raspberry Pi acting as a CPU + peripheral bus over the CPU socket.
An accelerator turns a stock A1200 or A2000 into a machine that competes with contemporary PCs from a decade later. The Vampire V4 and PiStorm are the current answer.
13.8.6. Video capture / genlock / broadcast
The Amiga was the standard 1990s tool for broadcast video work, and the hardware still exists:
-
Video Toaster — NewTek’s Zorro card for broadcast video switching, effects, character generation. A whole industry sat on top of this from 1990 through 1995.
-
Genlock — hardware that syncs the Amiga’s video output to an external video source, allowing video overlay. Standard genlocks include the Commodore A2300, Newtek Digi-View, and various third-party units.
-
VLab and VLab Motion — video capture cards for digitising VHS or S-Video.
-
IV24 — video output board with 24-bit RGB from a Zorro slot.
13.8.7. Miscellaneous
-
DKB Wildfire — Ethernet + serial + audio on one card.
-
Elbox Mediator — a Zorro-II-to-PCI bridge, letting you put modern PCI cards (sound, network, graphics) in an A1200 tower. Not fully speed-optimised but functionally amazing.
13.9. Working with expansion from software
If you want to write a driver:
-
Register your manufacturer ID with… well, the registrar no longer exists, but the community treats large unused IDs (>65000) as free for hobbyist use.
-
Design your card’s AutoConfig header (128 bytes at the base of your card’s ROM aperture).
-
Write your driver as a
.devicefile inLIBS:. Standard library-vector layout, exposing the expected commands (READ,WRITEfor storage devices; SANA-II commands for network cards). -
Kickstart’s AutoConfig walker calls your driver’s
Init()entry point at boot; from there you attach toConfigDevnodes and expose your functionality.
For most modern users this is not relevant — you use pre-built cards with pre-built drivers. But knowing the shape of the system explains why an Amiga you bought in 1994 with a card someone made in 1990 still boots and works in 2026 without a driver update.
13.10. References
-
Commodore-Amiga, Zorro III Bus Specification, 1990. Original Commodore engineering document; PDFs freely available online via the archive at https://archive.org/details/commodore-zorro3.
-
Amiga Hardware Reference Manual, 3rd edition (Addison-Wesley, 1991), chapter 11: AutoConfig.
-
Amiga ROM Kernel Reference Manual: Libraries, chapter on
expansion.library. -
Big Book of Amiga Hardware — https://amiga.resource.cx/. Exhaustive per-card documentation with photos, manufacturer IDs, and driver-availability notes for the entire history of the platform.
-
English Amiga Board (EAB) hardware sub-forum — https://eab.abime.net/. Current discussion of restoration, compatibility, and modern expansion products.
-
Amiga.org hardware forum — companion community with overlapping but distinct membership.
-
Apollo Team, Vampire product pages — https://www.apollo-accelerators.com/.
-
PiStorm project — https://github.com/captain-amygdala/pistorm.
Next: the early-software-development story, including the tools Commodore used to build Kickstart itself and the cross-develop- ment workflow that ran on Sun workstations in 1985.
Part IV: Part IV: Programming the Amiga
The programmer’s core. C on the Amiga, graphics + Intuition (the widow system), modern widget toolkits, IFF format, custom datatypes, device drivers, ARexx, networking, debugging, and the historical assembler / compiler / ROM-programming toolchain.
|
Platform coverage: examples target classic 68k (bebbo GCC or vbcc). Every chapter calls out where AmigaOS 4 (PowerPC), MorphOS, or AROS require an alternate API. In particular, OS 4’s interface-based ABI (chapter 13) affects most library calls; the pattern is one macro layer, not a rewrite. |
Chapter 14. Programming the Amiga in C
This chapter takes you from an empty file to a working native executable, then covers the two subsystems you cannot avoid: dynamic library loading and cooperative multitasking with signals. The graphics and windowing side is in Chapter 15.
The examples target classic AmigaOS 3.1+ and 68020+ CPUs, and compile under three toolchains:
-
SAS/C 6.58 — native, on the Amiga.
-
vbcc 0.9h+ — native or cross, produces 68k and PPC.
-
bebbo’s gcc 6.5 — cross-compiler, gcc-flavour warnings and errors.
The build lines assume SC for SAS/C, vc for vbcc, m68k-amigaos-gcc
for bebbo’s gcc. Any of them work for the examples.
14.1. The executable format
Amiga executables are in Hunk format. A hunk is a chunk with a
type: code hunk, data hunk, BSS hunk, reloc32 hunk, symbol hunk, and
a couple of others. LoadSeg() — the DOS function that loads an
executable — walks the hunk list, allocates memory for each code
and data hunk, applies relocations, and returns a segment list you
can jump into with CreateNewProc() (or that dos.library will jump
into for you).
Practical consequence: there is no fixed base address. Every code
and data address in your program is relocated at load time. Position
independence would be a fine feature to have, but the classic
compiler toolchains do not produce it; they produce relocations, and
LoadSeg() applies them.
You do not have to know this to write programs. You do have to know
it when you look at List output and see a 4 KB executable that
does far more than 4 KB should — one of its hunks is a 64 KB BSS
that costs nothing on disk.
14.2. Toolchain: cross-compiling from macOS or Linux
The easiest modern developer experience is cross-compiling. Bebbo’s GCC packages install cleanly on macOS via Homebrew and on Linux via the project’s own installer script.
$ brew install --HEAD bebbo/amiga-dev/m68k-amigaos-gcc
$ m68k-amigaos-gcc --version
m68k-amigaos-gcc (GCC) 6.5.0b
Once installed, you can compile a native Amiga executable on your Mac and run it under FS-UAE:
CC := m68k-amigaos-gcc
CFLAGS := -Wall -Wextra -O2 -noixemul -m68020

hello: hello.c
	$(CC) $(CFLAGS) -o $@ $<
-noixemul says "do not link the ixemul POSIX layer" — the
resulting binary uses only native AmigaOS calls and is small and
portable. If you compile with ixemul, you get a main(int argc,
char **argv) and can call open/read/printf unchanged from
Unix — very convenient, but pulls in a 200 KB shared library.
14.3. Hello, Amiga
The smallest useful program.
#include <stdio.h>

int main(int argc, char **argv)
{
    (void)argc;
    (void)argv;
    printf("Hello, Amiga!\n");
    return 0;
}
Build:
$ m68k-amigaos-gcc -Wall -O2 -noixemul -o hello hello.cCopy hello to your Amiga (drag onto the FS-UAE window, or into the
shared directory that appears as Host: in a directory-HDF setup)
and run it:
1> hello
Hello, Amiga!
Under the hood, -noixemul uses libnix (or clib2, depending on the
toolchain version), which provides POSIX-shaped stdio wrappers over
dos.library. printf becomes a series of Write() calls to
Output(), which is the DOS BPTR to the process’s standard
output.
If you want to skip stdio and go native:
#include <proto/dos.h>

int main(void)
{
    Printf("Hello, Amiga!\n");
    return 0;
}
Printf() (capital P) is dos.library’s own printf. This program
does not link against libnix at all; it is a few hundred bytes.
`Write(Output(), "Hello\n", 6) gets you even smaller.
14.4. Opening libraries
Every OS function you call belongs to a library. On classic OS, most of them are accessed via a per-library base pointer that has to be open. The convention is:
-
exec.libraryis open for you (its base is at absolute address4;(struct ExecBase*)4isSysBase). -
dos.libraryis opened for you if you use the standard startup — its base is atDOSBase. -
Everything else you open yourself.
#include <proto/exec.h>
#include <proto/intuition.h>
#include <proto/dos.h>

struct Library *IntuitionBase = NULL;

int main(void)
{
    IntuitionBase = OpenLibrary("intuition.library", 39);
    if (!IntuitionBase) {
        PutStr("Need intuition.library v39+ (Kickstart 3.0+)\n");
        return 20;
    }

    DisplayBeep(NULL);              /* flash all screens */

    CloseLibrary(IntuitionBase);
    return 0;
}
Two things to notice:
-
The version number (
39) is a floor, not an exact match. You get back the version you asked for or newer. Kickstart 3.0 is v39, 3.1 is v40, 3.2 is v47. -
You must call
CloseLibrary()for every successfulOpenLibrary(). The refcount matters — if you leak an open,intuition.librarycannot be flushed from memory even if the system is low.
In C code you will often see #include <proto/intuition.h> used
instead of #include <intuition/intuition.h> — the proto/ headers
pull in the function prototypes with the right inline glue, so
calls look like normal C function calls (DisplayBeep(NULL)) rather
than manual base-plus-offset. Use them.
14.4.1. The OS4 register-based ABI
If you also want your code to build on AmigaOS 4, wrap library
calls with the IExec/IDOS/IIntuition interface pointers. The
SDI_compiler.h header from the AmigaOS SDK provides macros
(OpenLibrary vs IExec→OpenLibrary) that expand differently on
each target. On classic, this is a no-op; on OS 4, it dispatches
via the interface. The full pattern is out of scope here; see the
Hyperion OS 4 SDK documentation.
14.5. Memory
The classic Amiga has two kinds of memory:
-
Chip RAM — accessible to the custom chips (Agnus, Denise, Paula). Bitmaps, sprites, sample data, Copper lists live here. Constrained: 512 KB on an A500, 1 MB on an A500+, 2 MB on an A1200. Slow, because Agnus arbitrates.
-
Fast RAM — CPU-only. Everything else. Fast. Any RAM beyond chip is fast.
You ask for one or the other with AllocMem flags:
UBYTE *pixels = AllocMem(320 * 256, MEMF_CHIP | MEMF_CLEAR);
if (!pixels) { ... }
FreeMem(pixels, 320 * 256);
Common flag combinations:
| Flag(s) | Meaning |
|---|---|
|
Any available memory, prefer fast |
|
Accessible from other tasks (all |
|
Must be reachable from the custom chips |
|
Must not be chip |
|
Zero on allocation |
|
Must survive a |
|
Reachable from a 24-bit-DMA Zorro II board (rare) |
You must pass the exact allocation size back to FreeMem — there is
no automatic bookkeeping. In practice, use AllocVec() instead,
which stashes the size in front of the returned pointer and lets you
FreeVec() without remembering it:
UBYTE *buf = AllocVec(1024, MEMF_ANY | MEMF_CLEAR);
...
FreeVec(buf);
AllocVec() has been present since Exec v36 (Kickstart 2.0) and
should be your default unless you are hot-path allocating with
known sizes.
Standard C malloc()/free() work through libnix or clib2 and
wrap AllocVec. They are fine, they are just less specific — you
cannot ask for chip memory through malloc.
There is no memory protection. A wild pointer will happily scribble on another task’s structures. The most common source of crashes is a leaked or double-freed resource, not a raw pointer dereference — but the latter can and does happen. Defensive initialisation and rigorous free-on-error is the culture.
14.6. The paranoid-cleanup pattern
The allocation-and-cleanup order for a typical Amiga program:

Amiga code has a distinctive style: allocate resources in dependency order, check every allocation, and free in reverse order at a labelled exit block. It scales from "open one library" to "open a window, screen, message port, message, timer device, custom sprite":
#include <proto/exec.h>
#include <proto/intuition.h>
#include <proto/dos.h>

int main(void)
{
    struct Library *IntBase = NULL;
    struct MsgPort *port = NULL;
    struct Message *msg = NULL;
    int rc = 20;

    IntBase = OpenLibrary("intuition.library", 39);
    if (!IntBase) goto out;

    port = CreateMsgPort();
    if (!port) goto out;

    msg = AllocVec(sizeof(*msg), MEMF_PUBLIC | MEMF_CLEAR);
    if (!msg) goto out;

    /* ... use them ... */
    rc = 0;

out:
    if (msg) FreeVec(msg);
    if (port) DeleteMsgPort(port);
    if (IntBase) CloseLibrary(IntBase);
    return rc;
}
You will write this shape hundreds of times. It is worth internalising.
14.7. Tasks, processes and signals
Exec’s scheduler is preemptive with priorities. Every task has a
priority from -128 to +127; higher runs first. The scheduler runs
the highest-priority runnable task, preempting anything lower at any
time except during Forbid()/Permit() critical sections.
You wait on signals. Each task has a 32-bit signal mask. When
another task (or an interrupt) calls Signal(you, mask), the bits
in mask get OR’d into your signal state. When you call Wait(mask),
Exec blocks you until any of those bits are set, then returns the
set bits and clears them.
The pattern for waiting on multiple event sources:
ULONG timerSig = 1UL << timerPort->mp_SigBit;
ULONG msgSig   = 1UL << appPort->mp_SigBit;
ULONG breakSig = SIGBREAKF_CTRL_C;

for (;;) {
    ULONG got = Wait(timerSig | msgSig | breakSig);

    if (got & breakSig) break;

    if (got & timerSig) {
        /* handle timer expiry */
    }

    if (got & msgSig) {
        struct Message *m;
        while ((m = GetMsg(appPort))) {
            /* handle message */
            ReplyMsg(m);
        }
    }
}SIGBREAKF_CTRL_C, _D, _E, _F are the four Shell break
signals. Ctrl-C (SIGBREAKF_CTRL_C) is your standard "clean up and
quit" convention. Break command from another shell sets these on
your task.
A task has no DOS environment. A process has: current
directory, stdin/stdout/stderr, command-line arguments, a home
volume. If your program needs any of those, it must run as a process.
The standard C startup makes you a process; AddTask() gives you a
raw task, useful only for internal work like driver back-ends.
To spawn a new process from within your program:
#include <proto/dos.h>

struct Process *child = CreateNewProcTags(
    NP_Entry, (ULONG)my_entry_function,
    NP_Name,  (ULONG)"MyChild",
    NP_StackSize, 8192,
    NP_Priority, 0,
    TAG_END);
The child runs my_entry_function (as a C function taking void,
returning void). It shares the parent’s address space. Wait — of
course it does; there is only one address space.
14.8. Message ports and messages
Message passing between two tasks, top to bottom in time:
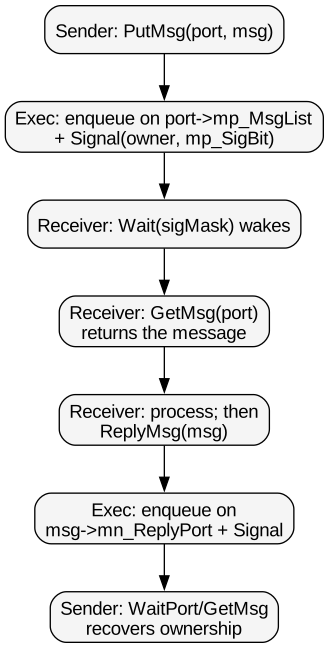
Two tasks communicate via message ports. A port is a linked list of messages plus a signal to wake a waiting task. To send:
PutMsg(destinationPort, myMessage);PutMsg links your message onto the port’s list and signals the
owning task. The receiver drains its port with GetMsg (non-blocking
— returns NULL if empty), calls Wait on the port’s signal to
sleep, and calls ReplyMsg when it is done with the message and
you can take it back:
PutMsg(port, msg);
WaitPort(replyPort);           /* wait for the reply */
GetMsg(replyPort);
Ports have string names and can be looked up with FindPort. This
is what ARexx uses to talk to applications: every ARexx-aware
program creates a named port, and the ARexx interpreter looks it
up by name to deliver script commands as messages. Same primitive,
one layer down.
14.9. Device I/O
Read() and Write() from dos.library cover file and console I/O
in a read/write shape. For anything else — serial, parallel,
timer, network — you talk to a device via I/O requests.
The shape is always:
-
CreateMsgPort()— where the device replies to. -
CreateIORequest(port, sizeof(struct IOFoo))— the request structure. -
OpenDevice("foo.device", unit, ioreq, flags)— attach the request to a driver instance. -
Fill
ioreq→io_Commandand any command-specific fields. -
DoIO(ioreq)for synchronous, orSendIO(ioreq)
WaitIO(ioreq)for async. -
CloseDevice(ioreq),DeleteIORequest(ioreq),DeleteMsgPort(port).
Concrete example — sleep for one second using timer.device:
#include <proto/exec.h>
#include <devices/timer.h>

int main(void)
{
    struct MsgPort *port = CreateMsgPort();
    struct timerequest *tr = (struct timerequest *)
        CreateIORequest(port, sizeof(*tr));

    OpenDevice(TIMERNAME, UNIT_VBLANK, (struct IORequest *)tr, 0);

    tr->tr_node.io_Command = TR_ADDREQUEST;
    tr->tr_time.tv_secs = 1;
    tr->tr_time.tv_micro = 0;

    DoIO((struct IORequest *)tr);

    CloseDevice((struct IORequest *)tr);
    DeleteIORequest((struct IORequest *)tr);
    DeleteMsgPort(port);
    return 0;
}
UNIT_VBLANK uses the vertical-blank interrupt as its tick source
(50 Hz PAL, 60 Hz NTSC — plenty for one-second sleeps).
UNIT_MICROHZ gives microsecond resolution at higher CPU cost.
This is the standard shape for every device: serial (change
timer.device to serial.device, unit 0), parallel, SCSI, audio.
Learn it once.
14.10. Startup and exit codes
Return values from main():
| Value | AmigaDOS convention |
|---|---|
|
OK |
|
|
|
|
|
|
Scripts check with IF WARN, IF ERROR, IF FAIL (each is
"greater than or equal to that band"). Getting this right is a
courtesy to whoever pipes your program into a script.
14.11. Reading arguments the right way
ReadArgs() in dos.library parses the template style described
in Chapter 10:
#include <proto/dos.h>

const char TEMPLATE[] = "NAME/A,COUNT/N,LOUD/S";

struct Args {
    STRPTR name;
    LONG *count;
    LONG loud;
};

int main(void)
{
    struct Args a = {0};
    struct RDArgs *rda = ReadArgs(TEMPLATE, (LONG *)&a, NULL);
    if (!rda) {
        PrintFault(IoErr(), "greet");
        return 10;
    }

    LONG n = a.count ? *a.count : 1;
    for (LONG i = 0; i < n; i++) {
        if (a.loud) Printf("HELLO, %s!\n", a.name);
        else        Printf("Hello, %s.\n", a.name);
    }

    FreeArgs(rda);
    return 0;
}
Run it:
1> greet Chris COUNT 3 LOUD
HELLO, Chris!
HELLO, Chris!
HELLO, Chris!
ReadArgs also handles ? for help (prints the template), quoting,
line continuation, and .KEY-style overrides from the Shell. It is
the same parser the OS commands use. Use it, and your programs feel
native.
14.12. Tag lists in detail
Almost every modern Amiga API function that takes more than a few
arguments uses a tag list — a variable-length list of
(tag, value) pairs terminated by TAG_END (or TAG_DONE).
This is the OS’s idiom for keyword arguments.
The C shape:
struct TagItem {
    ULONG ti_Tag;
    ULONG ti_Data;
};
You pass a pointer to an array of these, or (more commonly) build one inline via a variadic wrapper. The two forms are equivalent:
/* Explicit array form. */
struct TagItem tags[] = {
    { WA_Title,     (ULONG)"Hello" },
    { WA_Width,     320             },
    { WA_Height,    100             },
    { TAG_END,      0               }
};
struct Window *w = OpenWindowTagList(NULL, tags);

/* Convenience varargs form (this is what you write day-to-day). */
struct Window *w = OpenWindowTags(NULL,
    WA_Title,  (ULONG)"Hello",
    WA_Width,  320,
    WA_Height, 100,
    TAG_END);
Special tag values that appear all over the API:
| Tag | Meaning |
|---|---|
|
Terminate the list. |
|
Ignore this tag; skip its data word. Useful for conditional inclusion. |
|
The tag’s data points to another |
|
Same as |
Because the API is tag-based, an old program that opens a window with only the tags it knew about in 1993 gets the newer OS’s default behaviour for every tag it didn’t set. This is how the Amiga stays backwards-compatible across ROM revisions.
14.13. A second worked example: a background timer daemon
Combining tasks, message ports, timer device, and signal handling
into a working stand-alone program. Writes the current time to
RAM:tick.log every five seconds until you send it Ctrl-C.
#include <proto/exec.h>
#include <proto/dos.h>
#include <devices/timer.h>
#include <dos/dosextens.h>
#include <string.h>

int main(void)
{
    struct MsgPort    *port = NULL;
    struct timerequest *tr  = NULL;
    BPTR                log = 0;
    int                 rc  = 20;

    port = CreateMsgPort();
    if (!port) goto out;

    tr = (struct timerequest *)CreateIORequest(port, sizeof(*tr));
    if (!tr) goto out;

    if (OpenDevice(TIMERNAME, UNIT_VBLANK,
                   (struct IORequest *)tr, 0) != 0) {
        Printf("Cannot open timer.device\n");
        goto out;
    }

    log = Open("RAM:tick.log", MODE_NEWFILE);
    if (!log) {
        Printf("Cannot open RAM:tick.log\n");
        goto out;
    }

    Printf("Ticking. Press Ctrl-C in this shell to stop.\n");

    ULONG timerSig = 1UL << port->mp_SigBit;
    ULONG breakSig = SIGBREAKF_CTRL_C;

    for (;;) {
        tr->tr_node.io_Command = TR_ADDREQUEST;
        tr->tr_time.tv_secs    = 5;
        tr->tr_time.tv_micro   = 0;
        SendIO((struct IORequest *)tr);

        ULONG got = Wait(timerSig | breakSig);

        if (got & breakSig) {
            /* Abort the pending timer request cleanly. */
            AbortIO((struct IORequest *)tr);
            WaitIO((struct IORequest *)tr);
            break;
        }

        WaitIO((struct IORequest *)tr);  /* consume the reply */

        char line[128];
        struct DateStamp ds;
        DateStamp(&ds);
        LONG n = Printf("Tick at days=%ld min=%ld tick=%ld\n",
                        ds.ds_Days, ds.ds_Minute, ds.ds_Tick);
        (void)n;
        FPuts(log, "tick\n");
        Flush(log);
    }

    Printf("Stopped.\n");
    rc = 0;

out:
    if (log) Close(log);
    if (tr) {
        if (tr->tr_node.io_Device) CloseDevice((struct IORequest *)tr);
        DeleteIORequest((struct IORequest *)tr);
    }
    if (port) DeleteMsgPort(port);
    return rc;
}
Points worth studying line-by-line:
-
SendIO+Wait+WaitIOis the async pattern.SendIOposts the request, returns immediately, and the timer signals our port when the interval expires.Waitlets us also listen forSIGBREAKF_CTRL_C— the Shell’s Ctrl-C signal. -
AbortIO+WaitIOon shutdown is mandatory. A pending timer request has ourtrstruct linked into the timer.device’s internal list; if we freetrwhile it is still queued, the timer will happily write to freed memory when the interval expires and Guru your machine.AbortIOasks the device to cancel, andWaitIOwaits for the abort to complete. -
DateStampreturns the classic Amiga time triple: days since 1978-01-01, minutes since midnight, ticks (50 Hz PAL or 60 Hz NTSC) since the start of the minute.dos/datetime.hhas helpers to convert to a struct with named fields. -
Openreturns aBPTR. This is a BCPL pointer — a historical relic. It behaves like avoid *to the DOS library; do not dereference it directly.Close(bptr)is the correct free. -
The cleanup block shows the paranoid-order pattern in practice.
tr→tr_node.io_Deviceis set by a successfulOpenDevice, so the guard "close only if we successfully opened" is one field check away.
Build and run:
$ m68k-amigaos-gcc -Wall -O2 -noixemul -o ticker ticker.c
$ (copy ticker to Amiga)

1> ticker
Ticking. Press Ctrl-C in this shell to stop.
Tick at days=17572 min=871 tick=15
Tick at days=17572 min=871 tick=265
...
^C
Stopped.
1>
14.14. Semaphores and Forbid()/Permit()
Two tasks sharing a data structure need to serialise access. The Amiga has three tools for this:
-
Forbid()/Permit()— the crudest.Forbid()disables the scheduler entirely (no other task runs) until the matchingPermit(). Fast, brutal, and correct only if the critical section is very short — a few hundred cycles.Disable()goes further and disables interrupts too; even more constrained. -
Signal semaphores — the standard cooperative synchronisation primitive.
ObtainSemaphore(sem)blocks until the caller has exclusive access;ReleaseSemaphore(sem)gives it back. There is alsoObtainSemaphoreShared/ReleaseSemaphoreSharedfor reader-lock patterns. -
Message ports — the highest-level. Send a message to the owner of the data; owner is single-threaded on its port and serialises for free.
Sketch of the semaphore pattern:
struct SignalSemaphore sem;

InitSemaphore(&sem);

/* Later, from any task: */
ObtainSemaphore(&sem);
/* ... critical section ... */
ReleaseSemaphore(&sem);
The whole SignalSemaphore struct is a few tens of bytes; you can
embed one in any shared data structure. Semaphores are the
right choice for shared caches, refcounted objects, and anything
touched by more than one task on any real timescale.
14.15. Hooks: how the OS calls your code back
Many AmigaOS APIs need a way to call back into your program —
BOOPSI class dispatchers, WindowLimits sizing callbacks,
ListBrowser renderers, AslRequestTags custom filters. The
standard mechanism is the Hook structure.
struct Hook {
    struct MinNode h_MinNode;
    ULONG  (*h_Entry)(struct Hook *, APTR obj, APTR msg);
    ULONG  (*h_SubEntry)(void);
    APTR   h_Data;
};
You fill it in and pass it into whatever API wanted it. The API
calls your h_Entry function with three arguments: the hook
itself (so you can find h_Data), an object pointer (context-
specific: the BOOPSI object, the window, the requester), and a
message pointer (context-specific: the OM_* method message, the
resize command, the filter query).
Because 68k C compilers used to have variable register-parameter
conventions, the standard trick is to declare hooks with a
SAVEDS macro (which reloads A4 to your data segment) and a
saveds asm calling convention. The vbcc and modern gcc
headers hide this behind:
HOOKPROTO(my_hook_entry, ULONG, APTR obj, APTR msg)
{
    struct Hook *hook = h;   /* h is auto-declared by macro */
    struct MyData *data = hook->h_Data;
    ...
    return 0;
}

MakeHook(&myHook, my_hook_entry);
Or, on SAS/C, __saveds ULONG my_hook_entry(struct Hook *hook,
APTR obj, APTR msg).
You set up the hook once, keep it alive as long as the API caller needs it, and remove it when done. Hooks are lightweight and extremely idiomatic; look for them anywhere the API needs to "filter" or "customise" behaviour.
14.16. Doubly-linked lists
Exec exposes a doubly-linked list abstraction called
struct List (with node type struct Node). This is the primary
system-wide collection primitive: task lists, memory-region
lists, port lists, resident-module lists, library lists,
process-child lists, semaphore-waiter lists — everything Exec
tracks is a struct List.
The layout:
struct Node {
    struct Node *ln_Succ;      /* next node */
    struct Node *ln_Pred;      /* previous node */
    UBYTE        ln_Type;
    BYTE         ln_Pri;       /* priority for sorted lists */
    STRPTR       ln_Name;
};

struct List {
    struct Node *lh_Head;
    struct Node *lh_Tail;      /* always NULL; sentinel */
    struct Node *lh_TailPred;
    UBYTE        lh_Type;
    UBYTE        lh_pad;
};
The API:
NewList(list);                        /* initialise */
AddHead(list, node);                  /* prepend */
AddTail(list, node);                  /* append */
Enqueue(list, node);                  /* insert sorted by ln_Pri */
Remove(node);                         /* unlink from its list */
FindName(list, "target");             /* search by ln_Name */
struct Node *first = list->lh_Head;
if (first->ln_Succ) { ... }           /* NULL-sentinel iteration */
Iteration idiom:
struct Node *n, *next;
for (n = list->lh_Head; (next = n->ln_Succ); n = next) {
    /* process n */
}
The ln_Succ of the last real node is list→lh_Tail, which is
always NULL. So the loop terminates when next is NULL. This
also lets you Remove(n) inside the loop and still walk safely
via next.
You embed a struct Node as the first member of any of your
own structures that need to go on an Exec list; from your
pointer you get the Node * by direct cast, and from a
Node * you get your struct back the same way.
For code that adds items to system lists, this pattern is mandatory: Exec walks these lists and expects them well-formed. If your struct is not laid out with the Node at offset 0 and lists are corrupted, you Guru.
14.17. Interrupt handlers
For hardware-level programming, Exec provides an interrupt-server
model. Each hardware interrupt has a list of servers; you install
one with AddIntServer(), remove with RemIntServer().
Servers run in supervisor mode with everything disabled; keep
them short. The signal-a-task-and-get-out pattern is idiomatic:
static struct Interrupt myInt;

ULONG my_isr(APTR data, APTR is)
{
    struct Task *t = (struct Task *)data;
    Signal(t, mySignal);
    return 0;                       /* let other servers run */
}

InitStruct(&myInt, ...);
myInt.is_Data = FindTask(NULL);
myInt.is_Code = (APTR)my_isr;
AddIntServer(INTB_VERTB, &myInt);   /* vertical-blank */
INTB_VERTB is the vertical-blank interrupt (50/60 Hz).
INTB_COPER is the Copper interrupt (raised by a Copper MOVE
into the INTREQ register). INTB_AUD0 etc. are the audio-DMA
interrupts. Full list in <hardware/intbits.h>.
For userspace timing you almost always want timer.device
(chapter 9’s earlier example) instead of a direct VBlank
interrupt server. The interrupt path is for drivers.
14.18. Debugging: the tools you need
You cannot use gdb on classic AmigaOS the way you would on
Linux — there is no memory protection, no process abstraction for
ptrace to attach to, and no ELF to walk. What you have instead:
-
SnoopDos— traces every OS call every task makes. Watch a program open every library, every device, every file, and everyAllocMem. This is yourstraceand often yourltrace. -
Enforcer— installs an MMU trap on illegal memory accesses. On a 68030+ Amiga with a real MMU, Enforcer catches wild pointer dereferences (reads or writes to page 0, to system memory, or beyond the top of allocated blocks) and dumps a hit report with PC, task name, and register state. -
MuForceandWipeOut— modern Enforcer replacements for MMU-equipped 68k systems. -
Sushi— routesKPrintf/kprintfdebug output over the serial port so a host machine (or UAE’s serial capture) can log from crashed tasks. -
ADebug/SegTracker— decode PC addresses in Enforcer hits back toFunction+offsetwhen you have symbols.
The workflow: crash under Enforcer, get a PC in the log, feed
that PC to SegTracker to find your function, look at the
disassembly, fix the pointer. Fifteen years old this technique
and still the best 68k had.
For OS 4, MorphOS and AROS, the modern shape is a Grim Reaper
requester (see chapter 13) plus symbolic backtraces from gdb
across a serial or IP debugger link.
14.19. Where to go from here
-
Amiga ROM Kernel Reference Manual: Libraries — the primary C reference. Covers
exec.library,dos.library,graphics.libraryand about twenty others. All available on archive.org.[29] -
RKM: Devices — same series, covers timer, serial, audio, clipboard, etc.
-
RKM: Includes and Autodocs — the reference-only version: every function’s autodoc in one book.
The next chapter — Chapter 15 — uses everything above to open a window and put a triangle in it.
Chapter 15. Intuition and Graphics
Intuition is the Amiga’s windowing system. Graphics.library is the bitmap drawing layer beneath it. Together they cover from "please open a titled window on the Workbench screen" down to "please blit a masked sprite over a scrolling playfield." This chapter goes top-down: a window, then drawing into it, then a note on where the custom chips enter the picture.
A rendered Intuition window, from the corners inwards:
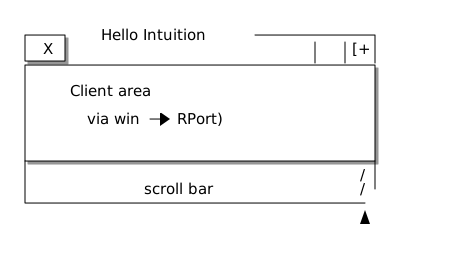
15.1. A window on the Workbench screen
The minimum viable Intuition program: open a window, wait for the close-gadget message, tidy up.
#include <proto/exec.h>
#include <proto/intuition.h>
#include <proto/dos.h>

int main(void)
{
    struct Library *IntuitionBase = OpenLibrary("intuition.library", 39);
    if (!IntuitionBase) return 20;

    struct Window *win = OpenWindowTags(NULL,
        WA_Title,        (ULONG)"Hello Intuition",
        WA_InnerWidth,   320,
        WA_InnerHeight,  100,
        WA_Left,         50,
        WA_Top,          30,
        WA_DragBar,      TRUE,
        WA_CloseGadget,  TRUE,
        WA_DepthGadget,  TRUE,
        WA_SizeGadget,   TRUE,
        WA_Activate,     TRUE,
        WA_SmartRefresh, TRUE,
        WA_IDCMP,        IDCMP_CLOSEWINDOW,
        TAG_END);

    if (!win) {
        CloseLibrary(IntuitionBase);
        return 20;
    }

    /* Wait for the close message. */
    for (;;) {
        WaitPort(win->UserPort);
        struct IntuiMessage *im;
        BOOL done = FALSE;
        while ((im = (struct IntuiMessage *)GetMsg(win->UserPort))) {
            if (im->Class == IDCMP_CLOSEWINDOW) done = TRUE;
            ReplyMsg((struct Message *)im);
        }
        if (done) break;
    }

    CloseWindow(win);
    CloseLibrary(IntuitionBase);
    return 0;
}
The main things worth pointing out:
-
OpenWindowTagstakes a tag list — pairs ofWA_Something, value— rather than a fat struct. This is Amiga’s version of keyword arguments; the API has used tag lists since Kickstart 2.0. -
WA_IDCMPdeclares which event classes you want. IDCMP — Intuition Direct Communications Message Port — is Intuition’s event stream. Every window has anIDCMPFlagsmask, and any event whose class is in that mask arrives on the window’sUserPort(which is a normal Exec message port). -
The event loop is the standard Amiga message-port loop from the last chapter, dressed up:
WaitPortsleeps until something arrives,GetMsg/ReplyMsgdrains and returns the events. -
WA_SmartRefreshopts your window into Intuition’s automatic refresh handling — if a covered part becomes visible, Intuition will repaint it from a stashed backing store.WA_SimpleRefreshis the alternative: you handleIDCMP_REFRESHWINDOWyourself, which is more work but uses less RAM.
Building with bebbo’s gcc:
$ m68k-amigaos-gcc -Wall -O2 -noixemul \
      -o window-hello window-hello.c
The IDCMP event path from hardware to your program’s Wait():

15.2. IDCMP classes worth knowing
IDCMP_CLOSEWINDOW and IDCMP_REFRESHWINDOW are the two you
almost always want. The full list is in <intuition/intuition.h>;
the common others:
| Class | You get it when |
|---|---|
|
The user resized the window; time to relayout. |
|
Mouse click; |
|
Mouse moved with reporting on (needs |
|
Key pressed or released (hardware code). |
|
Key pressed (cooked, ASCII/localised). |
|
Menu item chosen. |
|
Gadget released (button, slider, string). |
|
A slow tick (~10 per second) for animation and idle work. |
You OR the flags into WA_IDCMP at open time, or reset them later
with ModifyIDCMP(win, newFlags).
15.3. Drawing into the window
The window has a RastPort — a "raster port," a drawing state
struct. To draw a filled triangle:
#include <proto/graphics.h>

struct Library *GfxBase = OpenLibrary("graphics.library", 39);
...

SetAPen(win->RPort, 3);           /* pen 3 in the current palette */

WORD pts[] = {
    50, 50,
    150, 50,
    100, 120,
    50, 50                        /* close */
};

Move(win->RPort, pts[0], pts[1]);
Draw(win->RPort, pts[2], pts[3]);
Draw(win->RPort, pts[4], pts[5]);
Draw(win->RPort, pts[6], pts[7]);

/* Or, filled: */
AreaMove(win->RPort, pts[0], pts[1]);
AreaDraw(win->RPort, pts[2], pts[3]);
AreaDraw(win->RPort, pts[4], pts[5]);
AreaEnd(win->RPort);AreaMove/AreaDraw/AreaEnd accumulate a polygon and flood-fill
it in one blitter operation. You have to supply a TmpRas and
AreaInfo to the rastport first; the RKM’s Graphics volume has the
setup boilerplate.
The colour numbers refer to the current screen’s palette. A
Workbench-screen window on OS 3.x usually has 4 or 8 pens available
to you (RectFill RectFill shares pens with the desktop). If you
need more colours or a specific palette, open your own screen with
OpenScreenTags and put your window on that.
15.4. Text in a window
Text() writes at the rastport’s current pen position:
Move(win->RPort, 20, 20);
Text(win->RPort, "Hello, Intuition!", 17);
The rastport’s font comes from the screen; you change it per
window with SetFont(win→RPort, myFont) after obtaining a font
from OpenDiskFont() (from diskfont.library) or OpenFont()
(RAM cache).
For localised strings, use locale.library on OS 2.1+:
#include <proto/locale.h>

struct Catalog *cat = OpenCatalogA(NULL, "myapp.catalog", NULL);
STRPTR s = GetCatalogStr(cat, MSG_HELLO, "Hello");
CloseCatalog(cat);
.catalog files are separately-translated resources per language;
the OS chooses the right one based on the user’s Locale prefs.
15.5. Menus
Menu construction is verbose in raw form; gadtools.library has
been the standard convenience layer since OS 2.0.
#include <proto/gadtools.h>

struct NewMenu newmenu[] = {
    { NM_TITLE, "Project",   0, 0, 0, 0 },
    {  NM_ITEM,  "About...", "A", 0, 0, 0 },
    {  NM_ITEM,  NM_BARLABEL, 0, 0, 0, 0 },
    {  NM_ITEM,  "Quit",     "Q", 0, 0, 0 },

    { NM_TITLE, "Edit",      0, 0, 0, 0 },
    {  NM_ITEM,  "Copy",     "C", 0, 0, 0 },
    {  NM_ITEM,  "Paste",    "V", 0, 0, 0 },

    { NM_END, NULL, 0, 0, 0, 0 }
};

struct Menu *menu = CreateMenus(newmenu, TAG_END);
LayoutMenus(menu, visualInfo, TAG_END);
SetMenuStrip(win, menu);
...
ClearMenuStrip(win);
FreeMenus(menu);
You also need visualInfo = GetVisualInfo(screen, TAG_END) and its
paired FreeVisualInfo. When the user picks a menu item, Intuition
sends IDCMP_MENUPICK, and im→Code is a MENUNUM you decode
with ItemAddress(menu, code).
15.6. The screen behind the window
If you want to open your own screen — for a game, a paint program,
anything that wants specific colours or resolution — you use
OpenScreenTags:
struct Screen *scr = OpenScreenTags(NULL,
    SA_DisplayID, (ULONG)PAL_MONITOR_ID | LORES_KEY,
    SA_Depth,     5,                    /* 32 colours */
    SA_Title,     (ULONG)"My Game",
    SA_ShowTitle, FALSE,
    TAG_END);

struct Window *win = OpenWindowTags(NULL,
    WA_CustomScreen, (ULONG)scr,
    WA_Backdrop,     TRUE,
    WA_Borderless,   TRUE,
    WA_Activate,     TRUE,
    WA_IDCMP,        IDCMP_RAWKEY | IDCMP_MOUSEBUTTONS,
    TAG_END);
The window sits on top of your screen with no borders, taking the whole display. This is the shape a game uses; the window still gets you the standard event-loop plumbing.
Display IDs are the Amiga’s way of naming monitor modes. LORES_KEY
is 320×256 PAL; HIRES_KEY is 640×256; HIRESLACE_KEY is 640×512
interlaced. AGA adds LORES_DPF_KEY (dual-playfield),
HAM8_KEY (256-colour "hold-and-modify" mode giving 262 144 apparent
colours), and so on. The <graphics/displayinfo.h> header lists
them; picking programmatically is done with BestModeIDA().
15.7. The custom chips
The three custom chips do the following things on your behalf:
-
Agnus contains the Blitter (fast rectangle-shaped memory operations) and the Copper (a display-list coprocessor that reprograms video registers in sync with the beam). Agnus arbitrates the chip-memory bus.
-
Denise contains the video shifter and sprite hardware.
-
Paula contains the four DMA-driven audio channels, the floppy controller, and the serial port.
You do not talk to them directly from application code. graphics.library
mediates the Blitter through calls like BltBitMap(), BltBitMapRastPort()
and (for polygon fill) AreaEnd(). intuition.library sets up the
Copper list for the Workbench display; changing the screen mode
triggers Intuition to reprogram the Copper. Audio through Paula goes
via audio.device for direct control or through AHI for
higher-level, driver-abstracted output.
If you do want to write to the hardware registers directly — for
a demo or a scroller — you Forbid() multitasking, Disable()
interrupts, save the current Copper list from custom.cop1lc, write
your own, and reverse it all on exit. It works. It is also the
fastest way to crash the machine. Traditional demo code lives in the
Hardware Reference Manual.[30]
For actual application programming, stay in graphics.library.
BltBitMapRastPort() will use the Blitter under you where it can.
15.8. Bitmap layout: planar, not chunky
|
Platform: Classic 68k. On modern PPC machines the underlying storage is a flat framebuffer.
Bitplane storage is a chipset artefact — Agnus/Denise fetch pixels
one plane at a time via DMA. On AmigaOS 4, MorphOS, and AROS
running on modern hardware (no custom chipset) |
The Amiga’s screen memory is bitplane-organised, not chunky-pixel-organised. A 320×256 8-colour screen (3 bitplanes) uses three parallel 40×256-byte bitmaps, one per bit of the pixel value. To find the colour of a given pixel you read the corresponding bit from each of the three planes and concatenate them into a 3-bit index into the colour palette.
Comparison — chunky (like VGA in 256-colour mode):
pixels[y * width + x] = colour_index_bytePlanar (like the Amiga):
plane0[y * bytes_per_row + x / 8] & (0x80 >> (x % 8))   /* bit 0 */
plane1[y * bytes_per_row + x / 8] & (0x80 >> (x % 8))   /* bit 1 */
plane2[y * bytes_per_row + x / 8] & (0x80 >> (x % 8))   /* bit 2 */
                                                        /* concatenate */
Why? Because the Blitter operates on planes independently and in parallel with the CPU. Copying a 3-plane image is three Blitter operations (one per plane) that run concurrently with whatever the CPU is doing. In chunky-pixel land, moving image data requires actual CPU cycles.
Consequences for programmers:
-
Bitmap allocation with
AllocBitMap()gives you astruct BitMapwithPlanes[0..depth-1]— one pointer per bitplane. All planes must be in chip memory (Blitter can only DMA from chip). -
Drawing colour
nmeans "set the bits in the planes whose bit-position corresponds to a1inn." -
Loading a raw bitmap file into memory requires that the file be in the planar layout (which it will be if it’s an IFF-ILBM, the native Amiga image format).
-
On AGA in "chunky mode" (LORES_KEY | LORES_KEY_CHUNKY, on some displays), you can get chunky-pixel access. Otherwise it is planar.
For pixel-perfect drawing outside of SetAPen/WritePixel, use
ReadPixel and WritePixel from graphics.library — they
transparently handle the planar-to-chunky conversion. Slow but
correct.
15.9. The Blitter, briefly
|
Platform: Classic 68k Amiga chipset. Emulated on OS 4/MorphOS.
The Blitter is a DMA engine inside Agnus, so only exists on
classic 68k hardware and FPGA replicas. |
The blitter is a hardware DMA engine that copies rectangular regions of chip memory. It can do this while the CPU is doing something else, which is a large part of why an A500 can run smoothly-scrolling games with a 7 MHz CPU. From C:
BltBitMapRastPort(sourceBitmap, sx, sy,
                  win->RPort, dx, dy,
                  width, height,
                  0xC0);         /* minterm: dest = source */
The minterm argument is a Boolean function of source and
destination — the four bytes are the truth table for the two-input
operation. 0xC0 is "copy source"; 0x30 is "invert destination";
0x60 is "XOR." You will occasionally see hand-written minterm
constants in Amiga code. The RKM Graphics volume has the table.
15.10. Sprites and BOBs
|
Platform: Hardware sprites are 68k chipset only. BOBs are portable.
The eight hardware sprites live in Denise/Lisa registers — 68k
classic Amiga only. Not present on AmigaOS 4 PowerPC machines,
MorphOS on PowerMac, or AROS on modern hardware. The mouse
pointer on those systems is a Layer-drawn image, not a hardware
sprite. Classic 68k code that calls BOBs (Blitter Objects) are software-composited and portable, but
rely on the Blitter (see above). Modern Amiga-family games either
use |
The Amiga has hardware sprites: eight small (16-pixel-wide, up to 256-pixel-tall), 3-colour, hardware-composited objects that overlay the playfield without touching bitmap memory. The mouse pointer is sprite 0. Games use them for player characters and projectiles.
Programming sprites is done directly through custom-chip
registers or via graphics.library helpers (GetSprite,
ChangeSprite, MoveSprite, FreeSprite). The SPRxDATA and
SPRxCTL registers store the current sprite bitmap and its
position.
A BOB (Blitter Object) is a software-composited moving object drawn by the Blitter. Unlike sprites, BOBs can be arbitrarily sized and coloured but require a save-under (background restoration) step whenever they move. Historically games used sprites for small fast-moving elements and BOBs for large detailed elements.
The graphics library AnimObs / AnimComps system provided
animation-frame scheduling on top of BOBs, but is rarely used
in modern code — animation is usually done directly with
BltBitMapRastPort in the application’s event loop.
For simple use, sprites are pleasant; for anything animation-
heavy, most modern Amiga games use direct Blitter access via
graphics.library calls.
15.11. Dual playfield
|
Platform: Classic 68k chipset only.
Dual playfield is a Denise/Alice hardware mode. Not available on AmigaOS 4 PowerPC hardware or any modern-hardware Amiga OS. Games that rely on it for parallax scrolling run only under emulation on PowerPC systems. Portable parallax on modern Amigas uses double-buffered offscreen bitmaps blitted back with different offsets per layer. |
The chipset can display two independent bitmaps simultaneously — a "front" playfield with colour 0 transparent, drawn over a "back" playfield. This is how sidescroller games achieve smooth parallax scrolling: the front playfield holds the foreground sprites and terrain, the back playfield holds slower-scrolling mountains, and each has its own scroll offset.
To open a dual-playfield screen:
struct Screen *scr = OpenScreenTags(NULL,
    SA_DisplayID, (ULONG)PAL_MONITOR_ID | LORES_KEY | LORES_DPF_KEY,
    SA_Depth,     3 + 3,      /* 8 colours front + 8 colours back */
    ...
    TAG_END);
The LORES_DPF_KEY bit flags the mode as dual-playfield. The
SA_Depth sums the two planes.
Manipulating the two playfields independently is done through the
screen’s ViewPort — vp→RasInfo→BitMap is the front,
vp→RasInfo→Next→BitMap is the back. Set the scroll offsets
by writing to RasInfo→RxOffset and RyOffset and calling
ScrollVPort().
Dual playfield is what makes Shadow of the Beast's twelve parallax layers possible on a 7 MHz 68000: eleven of them are Copper-list background stripes and one is a real dual-playfield back plane.
15.12. HAM and HAM8
|
Platform: Classic 68k chipset only (HAM6 on OCS/ECS, HAM8 on AGA).
HAM modes are a Denise/Lisa hardware feature. Not present on
AmigaOS 4 PowerPC or any modern non-chipset Amiga hardware.
Under emulation (Petunia on OS 4, Trance on MorphOS) HAM display
still works but is rendered software-first into an RTG framebuffer.
For modern Amiga applications wanting 24-bit colour, the answer is
to open a 24-bit RTG screen via |
Hold-And-Modify is the Amiga’s mode for showing many more colours than the bitplane depth would allow. In HAM6 (OCS/ECS), a 6-bit pixel value is interpreted as:
-
Bits 5–4 = 00: index into 16-colour palette (register 0–15).
-
Bits 5–4 = 01: hold red and green from previous pixel, change blue to bits 3–0.
-
Bits 5–4 = 10: hold blue and green from previous pixel, change red to bits 3–0.
-
Bits 5–4 = 11: hold blue and red, change green.
Effect: you get 4096 apparent colours from a 6-bit-per-pixel bitmap, at the cost of horizontal "smearing" when adjacent pixels differ significantly. HAM6 is used for still images and slow-changing displays (paint programs, still-life demos).
HAM8 on AGA is the same idea with 8-bit-per-pixel bitmaps (6 index bits and 2 mode bits become 6 index bits and 2 hold- modify bits, giving 262 144 apparent colours from 8-bit-planar storage). Modern Amiga picture datatypes render 24-bit images into HAM8 for display on AGA machines that lack an RTG card.
Both modes are set via the display-ID flags
HAM_KEY and HAM8_KEY respectively.
15.13. A complete gadtools window
Everything above stitched together into one runnable program: a
Workbench-screen window with a menu, two buttons, and a string
gadget, using gadtools.library. About a hundred lines.
#include <proto/exec.h>
#include <proto/intuition.h>
#include <proto/gadtools.h>
#include <proto/dos.h>
#include <libraries/gadtools.h>
#include <intuition/gadgetclass.h>

enum { GID_STRING = 1, GID_OK, GID_CANCEL };

static struct NewMenu newmenu[] = {
    { NM_TITLE, "Project",   0, 0, 0, 0 },
    {  NM_ITEM, "About...", "A", 0, 0, 0 },
    {  NM_ITEM, NM_BARLABEL, 0, 0, 0, 0 },
    {  NM_ITEM, "Quit",     "Q", 0, 0, 0 },
    { NM_END,   NULL,        0, 0, 0, 0 }
};

int main(void)
{
    struct Library    *IntBase  = OpenLibrary("intuition.library", 39);
    struct Library    *GtBase   = OpenLibrary("gadtools.library",  39);
    if (!IntBase || !GtBase) goto out;

    struct Screen *scr = LockPubScreen(NULL);          /* Workbench */
    if (!scr) goto out;

    APTR vi = GetVisualInfo(scr, TAG_END);
    if (!vi) goto out;

    /* Build the gadget list. */
    struct NewGadget ng = {0};
    struct Gadget   *glist = NULL;
    struct Gadget   *g = CreateContext(&glist);

    ng.ng_LeftEdge   = 10;  ng.ng_TopEdge    = 20;
    ng.ng_Width      = 220; ng.ng_Height     = 14;
    ng.ng_GadgetText = "_Name:";
    ng.ng_TextAttr   = scr->Font;
    ng.ng_VisualInfo = vi;
    ng.ng_GadgetID   = GID_STRING;
    g = CreateGadget(STRING_KIND, g, &ng,
        GTST_MaxChars, 40,
        GTST_String,   (ULONG)"Amiga",
        TAG_END);

    ng.ng_LeftEdge = 10;  ng.ng_TopEdge = 50;
    ng.ng_Width    = 80;  ng.ng_Height  = 20;
    ng.ng_GadgetText = "_OK";
    ng.ng_GadgetID = GID_OK;
    g = CreateGadget(BUTTON_KIND, g, &ng, TAG_END);

    ng.ng_LeftEdge = 100;
    ng.ng_GadgetText = "_Cancel";
    ng.ng_GadgetID = GID_CANCEL;
    g = CreateGadget(BUTTON_KIND, g, &ng, TAG_END);

    if (!g) goto cleanup;

    /* Open the window. */
    struct Window *win = OpenWindowTags(NULL,
        WA_Title,        (ULONG)"Gadtools Demo",
        WA_InnerWidth,   240,
        WA_InnerHeight,  90,
        WA_DragBar,      TRUE,
        WA_CloseGadget,  TRUE,
        WA_DepthGadget,  TRUE,
        WA_Activate,     TRUE,
        WA_SmartRefresh, TRUE,
        WA_Gadgets,      (ULONG)glist,
        WA_PubScreen,    (ULONG)scr,
        WA_IDCMP,        IDCMP_CLOSEWINDOW | IDCMP_GADGETUP |
                         IDCMP_MENUPICK | IDCMP_REFRESHWINDOW |
                         IDCMP_VANILLAKEY,
        TAG_END);
    if (!win) goto cleanup;

    /* Attach a menu. */
    struct Menu *menu = CreateMenus(newmenu, TAG_END);
    LayoutMenus(menu, vi, TAG_END);
    SetMenuStrip(win, menu);

    GT_RefreshWindow(win, NULL);

    /* Event loop. */
    BOOL done = FALSE;
    while (!done) {
        WaitPort(win->UserPort);
        struct IntuiMessage *im;
        while ((im = GT_GetIMsg(win->UserPort))) {
            ULONG cls  = im->Class;
            UWORD code = im->Code;
            struct Gadget *g = (struct Gadget *)im->IAddress;
            GT_ReplyIMsg(im);

            switch (cls) {
            case IDCMP_CLOSEWINDOW:
                done = TRUE;
                break;
            case IDCMP_GADGETUP:
                if (g->GadgetID == GID_OK) {
                    Printf("OK pressed. String is: %s\n",
                           GT_GetStringFromGadget(g, glist, win));
                } else if (g->GadgetID == GID_CANCEL) {
                    done = TRUE;
                }
                break;
            case IDCMP_MENUPICK: {
                struct MenuItem *item = ItemAddress(menu, code);
                if (GTMENUITEM_USERDATA(item) == NULL) {
                    /* No user data — fall through by ID */
                }
                if (MENUNUM(code) == 0 && ITEMNUM(code) == 2) {
                    done = TRUE;   /* Project > Quit */
                }
                break;
            }
            case IDCMP_REFRESHWINDOW:
                GT_BeginRefresh(win);
                GT_EndRefresh(win, TRUE);
                break;
            case IDCMP_VANILLAKEY:
                if (code == 27) done = TRUE;   /* Esc */
                break;
            }
        }
    }

    ClearMenuStrip(win);
    FreeMenus(menu);
    CloseWindow(win);

cleanup:
    if (glist) FreeGadgets(glist);
    FreeVisualInfo(vi);
    UnlockPubScreen(NULL, scr);

out:
    if (GtBase)  CloseLibrary(GtBase);
    if (IntBase) CloseLibrary(IntBase);
    return 0;
}
Not shown but implied: GT_GetStringFromGadget is a tiny helper you
would write to extract the string via GetAttr(STRINGA_TextVal, …).
The full version is in the gadtools examples in the NDK.
Compile:
$ m68k-amigaos-gcc -Wall -O2 -noixemul \
    -o gadtools-demo gadtools-demo.c
15.14. The Copper, briefly
|
Platform: Classic 68k Amiga chipset only.
The Copper is a hardware coprocessor inside Agnus. AmigaOS 4 PowerPC, MorphOS on PowerMac, and AROS on modern hardware have no Copper. Classic 68k applications that build Copper lists run only under emulation on modern systems. Effects the Copper does — per-scanline palette changes, hardware split-screen — are done in software on modern Amiga hardware (a compositor pass or a shader). |
The Copper is a display-list coprocessor. It runs a program of its own — a stream of two-word instructions — synchronised to the video beam position. Two instructions matter:
-
MOVE— write a value to a chip-register. -
WAIT— pause until the beam reaches a given(x, y)position.
Which is enough to reprogram the palette (or the display mode) part-way down the screen. Some Copper tricks are visible everywhere in Amiga software:
-
Colour bars behind the title text — a Copper list that changes colour 0 every scanline.
-
Split-screen (upper half in one mode, lower half in another) — a Copper
WAITat mid-screen followed by `MOVE`s to reprogramme the display registers. -
Hardware "sky and ground" effects in racing games — smooth colour gradients drawn at zero CPU cost.
You compose a Copper list yourself with graphics/copper.h structures
or (more comfortably) with library helpers like CINIT(), CMOVE(),
CWAIT(), CBUMP(), CEND(). Installing your Copper list normally
means overriding Intuition’s — take the current
vp→ViewPort→UCopIns pointer, save it, patch in yours with
CBump(cp, CBump_ChgList), and restore on exit.
For 90% of applications you do not touch the Copper. For games,
demos, and anything that wants "more than 32 colours per scan line"
you do. The full API is in the RKM: Libraries volume, chapter on
graphics.library.
15.15. Retained-mode alternative: MUI
Everything above is immediate-mode Intuition + graphics.library. For most applications you actually want a widget toolkit that does layout for you, so a window with a menu bar, a listview, three buttons and a status area is a hundred lines instead of a thousand. MUI is the community standard. Sketch:
Object *app = MUI_NewObject(MUIC_Application,
    MUIA_Application_Title, (ULONG)"Hello MUI",
    MUIA_Application_Base,  (ULONG)"HELLOMUI",
    SubWindow,
        MUI_NewObject(MUIC_Window,
            MUIA_Window_Title, (ULONG)"Hello",
            WindowContents,
                MUI_NewObject(MUIC_Group,
                    Child, MUI_NewObject(MUIC_Text,
                        MUIA_Text_Contents, (ULONG)"Hello, MUI!",
                        TAG_END),
                    Child, MUI_NewObject(MUIC_Text,
                        MUIA_Text_Contents, (ULONG)"OK",
                        MUIA_InputMode, MUIV_InputMode_RelVerify,
                        TAG_END),
                    TAG_END),
            TAG_END),
    TAG_END);

set(app, MUIA_Application_Iconified, FALSE);
MUI_MainLoop(app);
MUI_DisposeObject(app);
MUI is object-oriented (BOOPSI), tag-driven, and has a real event-notification system where you register that "when button X is clicked, set attribute Y on object Z" — declarative UI in 1995. The full MUI programming reference is in the MUI SDK, and modern tutorials are at https://muidev.de/.
15.16. ReAction and OS 4
On AmigaOS 3.2 and later, ReAction is the first-party toolkit.
It uses the same BOOPSI class model but comes from Commodore’s own
lineage rather than the MUI one. If you write in one, you can write
in the other — the vocabulary is nearly the same; the class names
change (window.class versus MUIC_Window).
For OS 4 code, ReAction is the default choice because it ships in the ROM. For 68k targeting a broad installed base, MUI is more widely installed.
Next: automating those applications from the outside.
15.17. Graphics.library: A Full Tutorial
Chapter 10 opened a window and drew a triangle. This chapter is
the systematic tour of graphics.library — every primitive, in
the order you would want to learn them, with runnable companion
code for each.
The examples live under code/c-examples/graphics/; each
demonstrates one concept in the smallest complete program that
shows it, and there is one Makefile that builds them all. All
of them target OS 3.x and above.
For companion code that goes beyond what fits in the book, the sister project at https://github.com/chrism/amiga_mcp/tree/main/examples has substantial working demos — Boing Ball with a per-scanline Copper sky, a full plasma effect, a HAM8 rasterizer, a Star Wars-style flight simulator. Where a technique benefits from a larger example than fits in a book, the text points at the corresponding subdirectory there.
15.18. The RastPort: state for drawing
Every drawing operation on the Amiga is performed against a
struct RastPort — a small structure that carries the
current drawing state:
struct RastPort {
    struct Layer   *Layer;      /* Layer if any (windows have one) */
    struct BitMap  *BitMap;     /* Target bitmap */
    UWORD          *AreaPtrn;   /* Fill pattern for AreaFill */
    struct TmpRas  *TmpRas;     /* Scratch memory for AreaFill */
    struct AreaInfo *AreaInfo;  /* State for AreaFill */
    struct GelsInfo *GelsInfo;  /* State for BOBs and animation */
    UBYTE           Mask;
    BYTE            FgPen;      /* Foreground pen (colour index) */
    BYTE            BgPen;      /* Background pen */
    BYTE            AOlPen;     /* Area outline pen */
    BYTE            DrawMode;   /* JAM1 / JAM2 / COMPLEMENT / INVERSVID */
    UBYTE           AreaPtSz;   /* Pattern size (bits per axis) */
    BYTE            linpatcnt;  /* Line pattern counter */
    BYTE            dummy;
    UWORD           Flags;
    UWORD           LinePtrn;   /* Line-drawing bit pattern */
    WORD            cp_x, cp_y; /* Current pen position */
    UBYTE           minterms[8];/* Blitter minterms */
    WORD            PenWidth;   /* Line thickness */
    WORD            PenHeight;
    struct TextFont *Font;      /* Current font */
    UBYTE           AlgoStyle;  /* Software font-style modifier */
    UBYTE           TxFlags;    /* Font attribute flags */
    UWORD           TxHeight;   /* Cached font height */
    UWORD           TxWidth;    /* Cached font width */
    UWORD           TxBaseline; /* Cached font baseline */
    WORD            TxSpacing;  /* Extra space between chars */
    ...
};
You mostly don’t touch these fields directly. You call setter
functions (SetAPen, SetBPen, SetDrMd, SetFont, Move)
that update the state, then drawing operations read from it.
The state is per-RastPort, so if you draw into multiple
windows you have independent state per window.
Every window has a RastPort at win→RPort. Every screen
has one at scr→RastPort. You can allocate your own for
off-screen drawing with InitRastPort().
15.19. Lines: Move and Draw
The simplest drawing operation. Move(rp, x, y) positions the
pen (updates cp_x and cp_y), and Draw(rp, x, y) draws a
line from the current position to (x, y) in the current
foreground pen. The pen then sits at the new position, so
consecutive `Draw`s build a polyline.
SetAPen(win->RPort, 1);
Move(win->RPort, 20, 20);
Draw(win->RPort, 200, 20);   /* horizontal top */
Draw(win->RPort, 200, 100);  /* vertical right */
Draw(win->RPort, 20, 100);   /* horizontal bottom */
Draw(win->RPort, 20, 20);    /* vertical left, back to start */

/* Diagonal */
Move(win->RPort, 20, 20);
Draw(win->RPort, 200, 100);
The line-drawing algorithm is Bresenham, implemented in ROM. It uses the Blitter under the hood, so line drawing is fast even on a stock 68000.
Line patterns. Set rp→LinePtrn = 0xF0F0; for a dashed
line — the 16-bit pattern is applied cyclically to the line’s
pixels. 0xFFFF (default) is solid; 0xF0F0 is dashed;
0xCCCC is dotted-and-dashed. Store your own patterns as
16-bit masks.
Multiple pens. SetAPen(rp, n) sets the foreground pen
(colour index into the screen’s palette). SetBPen(rp, n)
sets the background pen, used by Text() in JAM2 mode.
SetAOlPen(rp, n) sets the outline pen for AreaEnd()
filled polygons.
Drawing modes. SetDrMd(rp, JAM1) writes only the
foreground pen; SetDrMd(rp, JAM2) writes foreground and
background (used for text-with-cleared-background);
SetDrMd(rp, COMPLEMENT) XORs (used for rubber-banding
selection rectangles); SetDrMd(rp, INVERSVID) swaps fg/bg
before drawing.
15.20. Filled shapes: RectFill and area fills
RectFill(rp, x1, y1, x2, y2) fills a rectangle in the
current pen. The endpoints are inclusive on both axes, so
RectFill(rp, 0, 0, 319, 255) fills a whole 320×256 screen.
SetAPen(win->RPort, 3);
RectFill(win->RPort, 10, 10, 100, 60);   /* filled rect */

SetAPen(win->RPort, 2);
DrawEllipse(win->RPort, 200, 40, 30, 20); /* outlined ellipse cx,cy,rx,ry */

SetAPen(win->RPort, 4);
DrawCircle(win->RPort, 250, 40, 20);      /* outlined circle cx,cy,r */
Area fills. For polygons, use the AreaMove /
AreaDraw / AreaEnd triplet. This requires that the
RastPort has an AreaInfo and TmpRas set up first — one-
time setup:
struct AreaInfo areaInfo;
struct TmpRas   tmpRas;
UWORD           areaBuf[200];         /* Big enough for the polygon */
PLANEPTR        tmpBuf;

InitArea(&areaInfo, areaBuf, sizeof(areaBuf) / 5);
win->RPort->AreaInfo = &areaInfo;

tmpBuf = (PLANEPTR)AllocRaster(scr->Width, scr->Height);
InitTmpRas(&tmpRas, tmpBuf, RASSIZE(scr->Width, scr->Height));
win->RPort->TmpRas = &tmpRas;

/* Now draw a filled triangle: */
SetAPen(win->RPort, 3);
AreaMove(win->RPort, 100, 100);
AreaDraw(win->RPort, 200, 100);
AreaDraw(win->RPort, 150, 180);
AreaEnd(win->RPort);

/* Cleanup: */
FreeRaster(tmpBuf, scr->Width, scr->Height);
Behind AreaEnd() is a Blitter operation that scans the
temp raster and fills every enclosed pixel. Very fast for
large polygons; slower per-pixel than RectFill for small
ones. Use RectFill for rectangles and Area* for
anything else.
The complete pattern is in code/c-examples/graphics/
gfx-shapes.c.
Ellipses and arcs. DrawEllipse(rp, cx, cy, rx, ry)
draws an outlined ellipse; there is no built-in filled
ellipse, but you can approximate one via Area* with
many AreaDraw calls stepping around the perimeter.
15.21. Fill patterns
The Amiga has hardware-friendly stipple patterns. Set the
fill pattern for the next RectFill, AreaEnd, or
PolyDraw:
UWORD pattern[] = {
    0xF0F0, 0xF0F0, 0xF0F0, 0xF0F0,   /* First row of pattern */
    0x0F0F, 0x0F0F, 0x0F0F, 0x0F0F,   /* Alternate */
};
SetAfPt(win->RPort, pattern, 3);      /* 2^3 = 8-line tall pattern */
RectFill(win->RPort, 20, 20, 200, 100);
SetAfPt(win->RPort, NULL, 0);         /* Clear pattern */
The 3 in SetAfPt(rp, pat, 3) is the log2 of the pattern
height. A pattern of size N uses 1 << N lines.
For line patterns (dashed lines etc.), set rp→LinePtrn
directly (a 16-bit mask).
SetDrPt(rp, ptrn, size) similarly sets a dot pattern for
WritePixel operations.
15.22. Text output
Text is drawn into a RastPort just like a shape.
Move(rp, x, y) positions the pen at the text baseline
(not the top-left corner); Text(rp, "hello", 5) draws the
string.
Move(win->RPort, 20, 30);              /* baseline at y=30 */
Text(win->RPort, "Hello, Amiga!", 13);

/* Print at a different location with a bigger font: */
struct TextAttr attr = { "topaz.font", 11, 0, 0 };
struct TextFont *big = OpenFont(&attr);
if (big) {
    SetFont(win->RPort, big);
    Move(win->RPort, 20, 60);
    Text(win->RPort, "Big text", 8);
    SetFont(win->RPort, win->WScreen->RastPort.Font);  /* restore */
    CloseFont(big);
}
Fonts. Every screen has a default font
(scr→RastPort.Font), typically Topaz 8. Load bigger or
custom fonts with OpenFont() (RAM cache) or
OpenDiskFont() (from FONTS:). Close them with
CloseFont().
Text metrics. TextLength(rp, "abc", 3) returns the
width of a string in pixels for the current font.
FontHeight() returns line height. Combine these to
right-align, centre, or wrap text yourself.
Text styling. SetSoftStyle(rp, style, mask) requests
bold / italic / underline / extended styling. The graphics
library implements them in software (bold = draw twice
with a 1-pixel offset). Fonts that are pre-designed as
bold or italic take precedence.
15.23. Bitmaps and blitting
A struct BitMap is the raw drawing surface. Windows and
screens have one; you can allocate your own for off-screen
drawing.
struct BitMap *bm = AllocBitMap(320, 200, 4,
    BMF_CLEAR | BMF_INTERLEAVED, NULL);
if (!bm) return;

/* Wrap it in a RastPort so we can draw into it. */
struct RastPort myrp;
InitRastPort(&myrp);
myrp.BitMap = bm;

/* Draw into the offscreen bitmap. */
SetAPen(&myrp, 3);
RectFill(&myrp, 0, 0, 319, 199);
Move(&myrp, 20, 20);
SetAPen(&myrp, 1);
Draw(&myrp, 300, 180);

/* Blit the offscreen bitmap onto a window. */
BltBitMapRastPort(bm, 0, 0,
                  win->RPort, 10, 10,
                  320, 200, 0xC0);   /* minterm 0xC0 = copy */

FreeBitMap(bm);
BltBitMapRastPort() is the main blit call. The 0xC0
minterm is "destination = source"; other minterms let you
XOR, AND, OR, mask via a mask bitmap, etc. See chapter 14’s
Blitter section for the minterm table.
Interleaved bitmaps. The BMF_INTERLEAVED flag stores
all bitplanes in one contiguous allocation, interleaved
line-by-line. This is what the Blitter prefers for
per-plane operations, and it’s faster for full-bitmap
blits. Prefer it.
Chip vs fast RAM. Bitmaps used with the Blitter or as
display bitmaps must be in chip RAM (Blitter DMA can only
reach chip). If you AllocBitMap() succeeds, the bitmap is
in chip. Off-screen scratch buffers you never blit through
the Blitter can be in fast RAM using raw AllocMem.
15.24. Double buffering
Real games and demos need double buffering: draw the next frame into an off-screen bitmap, then swap it with the visible one during vertical retrace to avoid tearing.
The classic pattern using ScrollVPort() / WaitTOF():
struct BitMap *bm[2];
int visible = 0, drawing = 1;

bm[0] = AllocBitMap(320, 256, 5, BMF_CLEAR | BMF_INTERLEAVED, NULL);
bm[1] = AllocBitMap(320, 256, 5, BMF_CLEAR | BMF_INTERLEAVED, NULL);

/* Custom screen so we control display. */
struct Screen *scr = OpenScreenTags(NULL,
    SA_DisplayID, PAL_MONITOR_ID | LORES_KEY,
    SA_Depth,     5,
    SA_BitMap,    (ULONG)bm[0],
    TAG_END);

for (;;) {
    /* Draw into bm[drawing]. */
    struct RastPort back;
    InitRastPort(&back);
    back.BitMap = bm[drawing];
    /* ... draw next frame ... */

    /* Swap: point the ViewPort at the just-drawn bitmap. */
    scr->ViewPort.RasInfo->BitMap = bm[drawing];
    ScrollVPort(&scr->ViewPort);   /* Applies at next vblank */

    WaitTOF();                      /* Wait for retrace */

    /* Flip roles. */
    visible = drawing;
    drawing = 1 - drawing;
}
ScrollVPort() updates the display registers via the
Copper list; WaitTOF() blocks until vertical retrace.
The sister project’s bouncing_ball/main.c shows the
complete pattern; the boing_ball/render.c shows a
production-quality variant with per-frame timing.
15.25. The palette
Every screen has a palette of 2^depth colour registers.
Set individual entries with:
SetRGB4(&scr->ViewPort, 0, 0x0, 0x0, 0x0);   /* pen 0 = black */
SetRGB4(&scr->ViewPort, 1, 0xF, 0xF, 0xF);   /* pen 1 = white */
SetRGB4(&scr->ViewPort, 2, 0xF, 0x0, 0x0);   /* pen 2 = red */
Each component is a nibble (0-15) for OCS/ECS 4096-colour
palette. For AGA’s 24-bit palette, use SetRGB32():
SetRGB32(&scr->ViewPort, 0, 0x00000000, 0x00000000, 0x00000000);
SetRGB32(&scr->ViewPort, 1, 0xFFFFFFFF, 0xFFFFFFFF, 0xFFFFFFFF);
The 32-bit value is a fixed-point fraction: 0xFFFFFFFF is
max intensity. On OCS/ECS the low bits are ignored and the
top nibble is used.
Bulk palette load with LoadRGB4() or LoadRGB32() — takes
a table plus a count. Use for palette cycling and colour
animation:
UWORD table[32] = { ... 32 nibble-packed RGB values ... };
LoadRGB4(&scr->ViewPort, table, 32);
For AGA:
ULONG table[3 + 3*NUM_COLOURS] = { NUM_COLOURS << 16, /* R, G, B triplets */, 0 };
LoadRGB32(&scr->ViewPort, table);
The header format for LoadRGB32 is unusual: first word is
count << 16 | first_index, then RGB triplets in 8.24 fixed
point, then a terminating zero.
15.26. Copper: proper UCopList programming
|
Platform: Classic 68k Amiga chipset only. See the earlier "Copper, briefly" for details.
This subsection covers the OS-blessed way of installing a Copper list on classic 68k hardware. Not applicable to modern PPC AmigaOne, Sam4xx, or Pegasos hardware — those systems have no Copper. |
Chapter 14 introduced the Copper conceptually; here is the graphics.library-blessed way to install a Copper list of your own without disturbing Intuition.
The primitives, from graphics/gfxmacros.h:
-
CINIT(ucl, n)— allocate an entry-list of sizen. -
CWAIT(ucl, y, x)— WAIT for beam position. -
CMOVE(ucl, reg, value)— MOVE value to a custom register. -
CBUMP(ucl)— advance the entry pointer (auto-called by CWAIT/CMOVE). -
CEND(ucl)— end the list (adds the sentinel WAIT).
Sample: sky gradient via one MOVE per scanline (this is the technique the Boing Ball demo uses):
struct UCopList *ucl = AllocMem(sizeof(*ucl), MEMF_PUBLIC | MEMF_CLEAR);

CINIT(ucl, NUM_LINES * 3);
for (int i = 0; i < NUM_LINES; i++) {
    CWAIT(ucl, TOP_Y + i, 0);              /* wait scan line */
    CMOVE(ucl, custom.color[0], gradient[i]);
}
CEND(ucl);

/* Install into the ViewPort. */
scr->ViewPort.UCopIns = ucl;
RethinkDisplay();      /* Rebuild the master Copper list */

/* Later, to remove: */
scr->ViewPort.UCopIns = NULL;
RethinkDisplay();
FreeVCopList(ucl);
FreeMem(ucl, sizeof(*ucl));
The custom.color[0] in the CMOVE refers to
&custom.color[0], which is register $dff180. Any custom
register can be a MOVE target — custom.bplcon0 reprograms
the bitplane control mid-frame, custom.sprxpos moves
sprite X position mid-frame, and so on.
For real code studies, amiga_mcp/examples/boing_ball/
copper.c builds both a sky-gradient Copper list and a
rainbow variant used behind the classic Boing Ball. It shows
how to swap Copper lists between frames without visual
glitches.
15.27. HAM and HAM8 rendering
|
Platform: Classic 68k chipset only. See earlier "HAM and HAM8".
This subsection shows how to open HAM screens on classic 68k hardware. Not available on modern PPC AmigaOne, Sam4xx, or Pegasos. On those platforms, open a 24-bit RTG screen instead. |
HAM (Hold-And-Modify) is chapter 10’s territory in principle; in practice, it’s programmed like a normal bitmap with the display mode flag set:
struct Screen *scr = OpenScreenTags(NULL,
    SA_DisplayID, HAM_KEY | PAL_MONITOR_ID,   /* HAM6 */
    SA_Depth,     6,
    TAG_END);
or, on AGA:
    SA_DisplayID, HAM8_KEY | PAL_MONITOR_ID,  /* HAM8 */
    SA_Depth,     8,
Drawing operations still work; the display mode interprets your bitplanes as HAM data at scan-out time. The trick with HAM is how you compute pixel values, since adjacent pixels smear when they differ significantly from each other:
-
Bits 4-5 = 00: use as palette index (0..15).
-
Bits 4-5 = 01: hold R and G from previous pixel, blue = bits 0..3.
-
Bits 4-5 = 10: hold R and B, green = bits 0..3.
-
Bits 4-5 = 11: hold G and B, red = bits 0..3.
For pre-computed HAM images (loaded via a datatype), all this is handled for you. For real-time-generated HAM (a HAM plasma, a HAM 3D renderer), you do the mode-selection yourself per pixel; a per-scan-line dither ordering minimises smearing.
The sister project’s ham_test/main.c and ham_raster/
rasterizer.c are two very different applications of the
mode: ham_test renders a static 24-bit-source image with
smart dithering, and ham_raster does real-time HAM8 3D
rasterisation with Gouraud shading approximated via HAM
modify codes.
15.28. Hardware sprites
|
Platform: Classic 68k chipset only. See earlier "Sprites and BOBs".
Hardware sprites live in the chipset. Not available on modern PPC AmigaOne, Sam4xx, or Pegasos. On those systems, draw movable sprites into a bitmap and blit as usual. |
Eight hardware-composited 16-pixel-wide overlays (up to 64-wide on AGA), 3-colour each (colour 0 transparent), positioned by writing to per-sprite registers.
Get a sprite via GetSprite(); it returns a sprite number
you can use. Position it with MoveSprite(); change its
data with ChangeSprite(); release it with FreeSprite().
UWORD spriteData[] = {
    /* Sprite control words. */
    0,       0,           /* First control pair: VSTART/VSTOP/HSTART */
    /* Sprite image data. 2 bitplanes × 16 lines × 16 bits = 32 words */
    0x0000, 0x0FF0,       /* line 0: colour 2 (bit 0 = 0, bit 1 = 1) */
    0x0FF0, 0x1FF8,
    ...
    0x0000, 0x0000,       /* End marker */
};

struct SimpleSprite ss;
ss.height = 16;
LONG sprnum = GetSprite(&ss, -1);   /* Allocate any sprite */
if (sprnum >= 0) {
    ChangeSprite(&scr->ViewPort, &ss, spriteData);
    MoveSprite(&scr->ViewPort, &ss, 100, 50);
    /* ... use it ... */
    FreeSprite(sprnum);
}
Setting sprite colours: the Amiga assigns pens 17..19 to sprite 0, 21..23 to sprite 1, and so on. Set them the same way as other palette entries.
For real games the hardware sprites usually carry small
elements (bullets, cursors, HUD items). Larger animated
characters use BOBs (Blitter Objects) — the GELS (graphics
elements) system — or plain BltBitMapRastPort() calls in a
double-buffered loop.
15.29. Drawing to Workbench versus a custom screen
Drawing on a Workbench window — you don’t control the palette (the user does via prefs), your colour depth is whatever Workbench is running at, and other windows can partially occlude you (so you need proper refresh handling). Fine for utilities, editors, mail clients.
Drawing on a custom screen — full palette control, full
depth choice, no other windows to worry about (unless you
publish the screen with SA_PubName). This is what
games and demos use.
Custom screens are cheap: opening one takes a few
milliseconds, and closing it is instant. If you need
predictable colour rendering, open your own. If you want to
fit in with the desktop, use LockPubScreen(NULL) and draw
onto the Workbench.
15.30. Where to go next
The two chapters that follow — Intuition Tutorial and
Modern UI — cover the layers above graphics.library. For
low-level graphics, the primary sources are:
-
Amiga ROM Kernel Reference Manual: Libraries, chapter on
graphics.library. Every function’s autodoc. -
Amiga Hardware Reference Manual, chapters 6 (Blitter) and 7 (DMA time slots).
-
Amiga Intern (Data Becker, 1988), German, deep on Copper.
-
The sister project’s
boing_ball,plasma,ham_test,ham_raster,bouncing_ball,starfield, andfractalusdirectories at https://github.com/chrism/amiga_mcp/tree/main/examples — full working demos with bridge-instrumented state inspection. -
Aminet’s
gfx/misc/category has scanned-in tutorials from Amiga Format and Amiga Computing magazines on specific effects.
Next: Intuition, systematically.
15.31. Intuition: A Full Tutorial
Chapter 10 opened a minimal window and drew into it. This chapter covers Intuition systematically: window flags, screen management, the full IDCMP event stream, menus, requesters, standard gadgets without a toolkit, refresh handling, clipboard integration.
intuition.library predates every other windowing system you
have used — Xerox Star (1981) predates it, the Macintosh (1984)
predates it, X11 (1987) is contemporary. Its design choices are
different from every one of them. This chapter shows the design
in action so those choices stop being surprising.
The primary source is Amiga ROM Kernel Reference Manual:
Libraries, chapters on intuition.library and its dependent
libraries (layers.library, gadtools.library); everything
below is a distillation.
15.32. Windows in depth
The full OpenWindowTags() call as you would actually use it
in a production application:
code/c-examples/graphics/)struct Window *win = OpenWindowTags(NULL,
WA_Title, (ULONG)"My Application",
WA_ScreenTitle, (ULONG)"MyApp v1.0", /* shown on screen title bar when window active */
/* Position and size */
WA_Left, 50,
WA_Top, 30,
WA_InnerWidth, 400, /* client area size, not including borders */
WA_InnerHeight, 200,
WA_MinWidth, 200, /* minimum size for resize gadget */
WA_MinHeight, 100,
WA_MaxWidth, -1, /* no max */
WA_MaxHeight, -1,
/* Gadgets */
WA_DragBar, TRUE,
WA_CloseGadget, TRUE,
WA_DepthGadget, TRUE,
WA_SizeGadget, TRUE,
WA_SizeBBottom, TRUE, /* size gadget in bottom border, not right */
/* Behaviour */
WA_Activate, TRUE,
WA_SmartRefresh, TRUE, /* OS keeps a backing store */
WA_RMBTrap, FALSE, /* let RMB trigger menu */
/* Public screen — open on Workbench (NULL = default) */
WA_PubScreen, (ULONG)NULL,
/* Event mask */
WA_IDCMP, IDCMP_CLOSEWINDOW | IDCMP_REFRESHWINDOW |
IDCMP_NEWSIZE | IDCMP_MENUPICK |
IDCMP_MOUSEBUTTONS | IDCMP_MOUSEMOVE |
IDCMP_RAWKEY | IDCMP_VANILLAKEY,
TAG_END);Every tag corresponds to a settable field or flag. Details of each:
| Tag | Meaning |
|---|---|
|
Position on the screen (or on the parent public screen). |
|
Total window size including borders. |
|
Client-area size; OS computes total. |
|
Size limits for the size gadget. |
|
Title text (window title bar). |
|
String shown on the parent screen’s title bar while this window is active. |
|
Include the drag bar in the top border. |
|
Include the close gadget (top-left). |
|
Front/back gadgets (top-right). |
|
Bottom-right resize gadget. |
|
Move the size gadget to the bottom border (nice for scrollable content). |
|
Window occupies whole screen without borders. Used for game windows. |
|
No borders at all (careful — you can’t close it). |
|
Activate the window immediately. |
|
Capture the right mouse button (prevent menu popup). |
|
OS maintains an off-screen backing store. |
|
You handle REFRESHWINDOW yourself. Uses less RAM. |
|
You don’t want refresh at all. Use for read-only status displays. |
|
Send IDCMP_MOUSEMOVE events even when not dragging. |
|
Open on a specific public screen ( |
|
Alternative: open on a named public screen without locking. |
|
Open on a screen you opened yourself. |
|
Bitmask of events you want to receive. |
|
Include |
|
Attach a gadget list (from |
|
Screen title to show when this window activates. |
|
(OS 3.1+) Marker indicating this is a toolbox window. |
|
How many pending MOUSEMOVE messages to keep. Default 5. |
Refresh modes. SmartRefresh is easier — the OS keeps a copy of your window’s contents and repaints from it when a covered part reveals. Costs one extra bitmap per window.
SimpleRefresh is more memory-efficient — no backing store —
but you must handle IDCMP_REFRESHWINDOW:
case IDCMP_REFRESHWINDOW:
    BeginRefresh(win);
    /* Redraw everything in your window from scratch. */
    draw_my_content(win);
    EndRefresh(win, TRUE);
    break;
NoCareRefresh is for windows whose content is fine to look weird — status displays, permanent info boxes. Never uses backing store, never sends REFRESH events.
For most application windows, SmartRefresh. For a game running full-screen, NoCareRefresh (you redraw every frame anyway).
15.33. The full IDCMP event stream
Windows receive events on their UserPort as IntuiMessage
structures. Each message has:
-
Class— the event type (IDCMP_*constant). -
Code— event-specific detail. -
Qualifier— modifier keys held (shift, alt, ctrl, amiga, etc.). -
IAddress— event-specific pointer (gadget, menu item, etc.). -
MouseX,MouseY— mouse position at the event time. -
Seconds,Micros— timestamp.
The main event classes:
| Class | When |
|---|---|
|
User clicked the close gadget. |
|
Window was resized. Reflect the new size from |
|
Covered area exposed; if SimpleRefresh, redraw. |
|
Mouse button pressed or released. |
|
Mouse moved (needs |
|
Key event, hardware code. |
|
Key event, cooked ASCII. |
|
Menu item picked. Decode |
|
Held Help over a menu item. |
|
Menu about to open; opportunity to block or update. Reply with |
|
Gadget released (button, string field enter). |
|
Gadget pressed. |
|
Your window became active. |
|
Your window became inactive. |
|
~10 Hz idle tick. Use for animation and cursor blinking without a separate timer. |
|
Held Help over a gadget. |
|
Window moved or resized programmatically. |
|
Relative mouse motion (for FPS-style input). Needs |
|
User inserted/removed a disk. Rarely needed. |
Set the mask at open time with WA_IDCMP, or later with
ModifyIDCMP(win, newFlags).
Rawkey vs Vanillakey. RAWKEY gives you the hardware scan code — you use this for game input (arrow keys, function keys) and for key-up events (only RAWKEY has these). VANILLAKEY gives you the cooked ASCII character after keyboard-layout translation — you use this for text entry. Enable both if you need both.
Key codes for RAWKEY: F1 = 0x50, F2 = 0x51, … Escape
=== 0x45, Space = 0x40, Enter = 0x44, Return = 0x1C.
The full table is in <devices/inputevent.h>.
Qualifier flags. IEQUALIFIER_LSHIFT, _RSHIFT,
_LALT, _RALT, _CONTROL, _LCOMMAND, _RCOMMAND. AND
against msg→Qualifier to check which modifiers were held.
15.34. The event-loop pattern
The standard event-loop, complete:
for (;;) {
    ULONG got = Wait(1UL << win->UserPort->mp_SigBit |
                     SIGBREAKF_CTRL_C);

    if (got & SIGBREAKF_CTRL_C) break;

    struct IntuiMessage *im;
    BOOL closed = FALSE;

    while ((im = (struct IntuiMessage *)GetMsg(win->UserPort))) {
        ULONG cls  = im->Class;
        UWORD code = im->Code;
        UWORD qual = im->Qualifier;
        APTR  addr = im->IAddress;
        WORD  mx   = im->MouseX;
        WORD  my   = im->MouseY;
        ReplyMsg((struct Message *)im);   /* Reply ASAP */

        switch (cls) {
        case IDCMP_CLOSEWINDOW:
            closed = TRUE;
            break;

        case IDCMP_REFRESHWINDOW:
            BeginRefresh(win);
            draw_my_content(win);
            EndRefresh(win, TRUE);
            break;

        case IDCMP_NEWSIZE:
            /* Window resized — relayout if needed. */
            relayout(win);
            break;

        case IDCMP_MOUSEBUTTONS:
            if (code == SELECTDOWN) handle_click(mx, my, qual);
            break;

        case IDCMP_VANILLAKEY:
            handle_char((char)code);
            break;

        case IDCMP_RAWKEY:
            if (!(code & IECODE_UP_PREFIX)) {
                /* Key-down. */
                if (code == 0x45) closed = TRUE;   /* Escape */
                else handle_rawkey(code, qual);
            }
            break;

        case IDCMP_MENUPICK: {
            USHORT c = code;
            while (c != MENUNULL) {
                struct MenuItem *item = ItemAddress(menu, c);
                handle_menu_item(MENUNUM(c), ITEMNUM(c), SUBNUM(c));
                c = item->NextSelect;  /* Multi-select chain */
            }
            break;
        }

        case IDCMP_GADGETUP: {
            struct Gadget *g = (struct Gadget *)addr;
            handle_gadget(g->GadgetID);
            break;
        }
        }
    }

    if (closed) break;
}
The ReplyMsg() should happen as early as possible — before
you process the message — because Intuition may want to
recycle the message structure. Copy fields into local
variables first, reply, then handle.
15.35. Menus deeply
gadtools.library (from OS 2.0 on) provides high-level menu
construction; without it, you build menus manually as
struct Menu + struct MenuItem + struct IntuiText
chains. Both approaches produce identical menu bars; the
gadtools one is less code.
Gadtools way:
struct NewMenu newmenu[] = {
    { NM_TITLE, "Project",   0, 0, 0, (APTR)MENU_PROJECT },
    {  NM_ITEM, "New",      "N", 0, 0, (APTR)MI_NEW },
    {  NM_ITEM, "Open...",  "O", 0, 0, (APTR)MI_OPEN },
    {  NM_ITEM, "Save",     "S", 0, 0, (APTR)MI_SAVE },
    {  NM_ITEM, "Save As...","A",0, 0, (APTR)MI_SAVEAS },
    {  NM_ITEM, NM_BARLABEL,0,   0, 0, 0 },
    {  NM_ITEM, "Print...", "P", 0, 0, (APTR)MI_PRINT },
    {  NM_ITEM, NM_BARLABEL,0,   0, 0, 0 },
    {  NM_ITEM, "About...",  0,  0, 0, (APTR)MI_ABOUT },
    {  NM_ITEM, "Quit",     "Q", 0, 0, (APTR)MI_QUIT },

    { NM_TITLE, "Edit",       0, 0, 0, (APTR)MENU_EDIT },
    {  NM_ITEM, "Undo",     "Z", 0, 0, (APTR)MI_UNDO },
    {  NM_ITEM, NM_BARLABEL,0,   0, 0, 0 },
    {  NM_ITEM, "Cut",      "X", 0, 0, (APTR)MI_CUT },
    {  NM_ITEM, "Copy",     "C", 0, 0, (APTR)MI_COPY },
    {  NM_ITEM, "Paste",    "V", 0, 0, (APTR)MI_PASTE },

    { NM_END, NULL, 0, 0, 0, 0 }
};

APTR vi = GetVisualInfo(scr, TAG_END);
struct Menu *menu = CreateMenus(newmenu, TAG_END);
LayoutMenus(menu, vi, TAG_END);
SetMenuStrip(win, menu);

/* ...event loop... */

ClearMenuStrip(win);
FreeMenus(menu);
FreeVisualInfo(vi);
The UserData field (6th slot in NM_ITEM) is arbitrary —
use it to attach your own IDs, so you can dispatch on
GTMENUITEM_USERDATA(item) in the event handler rather
than nested MENUNUM/ITEMNUM decoding.
Sub-menus. NM_SUB items between `NM_ITEM`s. Amiga
menus support one level of nesting (item + subitem);
sub-sub-menus require workaround.
Checkmark items. Set the NM_ITEMDISABLED flag or use
CHECKIT / MENUTOGGLE:
{ NM_ITEM, "Sound", 0, CHECKIT | CHECKED, ~0, (APTR)MI_SOUND },CHECKIT gives it a checkmark; CHECKED starts checked;
the fifth field (MutualExclude) is a mask of items to
uncheck when this is checked (for radio-style groups).
Disabling items at runtime. Use OffMenu(win, menuNum)
and OnMenu(win, menuNum). Encode with the MENUENCODE
macros.
15.36. Requesters
Requesters are Intuition’s dialogs. The commonly-used ones:
EasyRequest — a quick alert box with buttons.
struct EasyStruct es = {
    sizeof(struct EasyStruct),
    0,
    "Save changes?",
    "Your document has been modified.\nDo you want to save it?",
    "Save|Discard|Cancel"
};

LONG choice = EasyRequest(win, &es, NULL);
/* choice: 0 = last button (Cancel here)
 *         1 = first (Save)
 *         2 = second (Discard) */
Buttons are separated by | in the flag string; the
rightmost is the "cancel" position and returns 0. Text
supports \n for line breaks and printf-style formatting
if you pass extra args after NULL.
AslRequestTags — the file-picker. Bundled with
asl.library since OS 2.0.
struct FileRequester *req = AllocAslRequestTags(ASL_FileRequest,
    ASL_Window,       (ULONG)win,
    ASL_Hail,         (ULONG)"Choose a file",
    ASL_InitialDrawer,(ULONG)"Work:",
    ASL_InitialPattern,(ULONG)"#?.c",
    TAG_END);
if (AslRequest(req, NULL)) {
    printf("Chose: %s%s\n", req->fr_Drawer, req->fr_File);
}
FreeAslRequest(req);
Also ASL_FontRequest, ASL_ScreenModeRequest — the OS’s
standard font and screen-mode pickers.
String/number entry. No built-in requester; use a small window with a string gadget, or roll your own. Applications like MUI provide native versions.
15.37. Standard gadgets without a toolkit
You can open a window with plain-Intuition gadgets, no gadtools/MUI/ReAction involved. Historical style:
static UBYTE stringBuf[80] = "default";

struct StringInfo si = {
    stringBuf, NULL, 0, 80, 0, 0, 0, 0, 0, 0, NULL, 0, NULL
};

struct Gadget stringGadget = {
    NULL,                             /* NextGadget */
    10, 20, 200, 14,                  /* pos + size */
    GADGHCOMP,                        /* Flags — GADGHCOMP = highlight complement */
    RELVERIFY | GADGIMMEDIATE,        /* Activation */
    STRGADGET,                        /* GadgetType */
    NULL,                             /* GadgetRender image */
    NULL,                             /* SelectRender */
    NULL,                             /* GadgetText */
    0,                                /* MutualExclude */
    (APTR)&si,                        /* SpecialInfo — StringInfo* here */
    GID_STRING,                       /* GadgetID */
    NULL                              /* UserData */
};

struct Gadget okGadget = {
    NULL, 10, 50, 60, 20,
    GADGHCOMP, RELVERIFY,
    BOOLGADGET, NULL, NULL,
    &(struct IntuiText){1,0,JAM1,5,4,NULL,"OK",NULL},
    0, NULL, GID_OK, NULL
};

/* Chain them: */
stringGadget.NextGadget = &okGadget;

/* Attach to window at open time via WA_Gadgets. */
struct Window *win = OpenWindowTags(NULL,
    WA_Gadgets, (ULONG)&stringGadget,
    ... other tags ...
    TAG_END);
Very verbose compared to gadtools (or MUI). But it works on Kickstart 1.3, doesn’t require any library to be loaded, and gives you complete control over rendering.
For anything post-1990, use gadtools.library (in ROM)
or MUI/ReAction (see chapters 18 and 32).
15.38. The clipboard
clipboard.device — 256 numbered clipboards (0 to 255),
each independent. The IFF-FTXT format (see chapter 17) is the
standard for cut-and-paste of text.
Writing text to the clipboard:
#include <devices/clipboard.h>
#include <libraries/iffparse.h>

struct IOClipReq *cr = (struct IOClipReq *)
    CreateExtIO(port, sizeof(struct IOClipReq));
OpenDevice("clipboard.device", 0, (struct IORequest *)cr, 0);

/* Build an IFF FORM/FTXT/CHRS chunk in memory. */
UBYTE *iffbuf = build_iff_chrs("Hello, clipboard!");
LONG iffsize = ...;

cr->io_Command = CMD_WRITE;
cr->io_Data    = iffbuf;
cr->io_Length  = iffsize;
DoIO((struct IORequest *)cr);

CloseDevice((struct IORequest *)cr);
DeleteExtIO((struct IORequest *)cr);
Reading is the same pattern with CMD_READ, and you parse
the FORM/FTXT container looking for CHRS chunks.
For anything real, use iffparse.library directly (chapter
17) — it handles the container parsing so you just deal with
the chunk content.
15.39. Layers and refresh
Intuition sits on top of layers.library, which handles
window-clipping algorithms — computing the visible parts of
each window when they overlap. When you draw into
win→RPort, the layer library clips your drawing to the
visible region.
You rarely need to touch layers.library directly. The
practical implications:
-
Drawing outside your window’s boundaries is safely clipped.
-
Drawing into a covered area is silently discarded (unless SmartRefresh is on, in which case it goes into the backing store).
-
Bulk operations (
BltBitMapRastPort) are more efficient when the destination is fully visible. Layer’s cost scales with the number of visible fragments.
For applications that need to draw a lot (games), open a custom screen where there are no other overlapping windows to worry about.
15.40. Public screens
A public screen is one that other applications may open windows on. Workbench is the primary public screen — every Workbench-launched app opens on it by default.
You can publish your own screen:
struct Screen *scr = OpenScreenTags(NULL,
    SA_DisplayID, HIRES_KEY | PAL_MONITOR_ID,
    SA_Depth,     3,
    SA_Title,     (ULONG)"MyApp's Screen",
    SA_PubName,   (ULONG)"MYAPP",
    TAG_END);

/* Now other apps can find this screen: */
struct Screen *found = LockPubScreen("MYAPP");
if (found) {
    /* Open a window on it, but hold the lock. */
    struct Window *win = OpenWindowTags(NULL,
        WA_PubScreen, (ULONG)found,
        ...
        TAG_END);
    UnlockPubScreen(NULL, found);
}
LockPubScreen(NULL) locks the default public screen
(Workbench). The lock prevents the screen being closed
while you have windows on it.
Public screens are how utility programs (docks, launchers, system monitors) share a screen with Workbench without opening their own.
15.41. Where to go next
The graphics-library primitives from chapter 30 combined with this chapter give you everything the classic Amiga API offered. For programs of any size, the toolkit chapters — MUI (chapter 18) and Modern UI / ReAction (chapter 32) — save you a great deal of code by handling layout and event routing for you.
Primary sources:
-
Amiga ROM Kernel Reference Manual: Libraries, chapter on
intuition.libraryand every gadgetclass sub-chapter. -
AmigaOS 3.5 Autodocs (in the OS 3.5 developer distro, reprinted on https://amigadev.elowar.com/) for the
NewLookMenus,WA_ScreenTitlesensitivity, and other post-1994 additions. -
Ralph Babel, The Amiga Guru Book, chapters on Intuition internals for the corner cases.
-
The sister project’s
plasma/main.c,dot_chase/main.c,game_of_life/main.cfor real event-loop patterns. -
Aminet’s
dev/misc/category has example Intuition programs — the Amiga developer disks from Commodore-CATS distributed sample code that is still freely available.
Next: the modern toolkit landscape — ReAction, ClassAct, MUI 4/5, Zune — the layer above Intuition that everyone building a real application uses.
Chapter 16. Modern UI Toolkits: MUI, ReAction, and Zune
|
Platform coverage
Covers MUI 3.9 / 4 / 5 (classic 68k, MorphOS, AmigaOS 4, AROS via Zune), ReAction (AmigaOS 3.2+ and 4.x, in ROM), Zune (AROS, source-compatible with MUI 3.9), and ClassAct (historical predecessor of ReAction). |
By the mid-1990s the stock gadtools.library widget set (chapter
10) had outgrown its usefulness. Applications needed richer
gadgets, real layout management, per-user theming, and
notification-driven event handling. Three toolkits emerged to
fill the gap; all three are still relevant in 2026. This
chapter covers all three, starting with the most widely-used
(MUI) and working through the others.
16.1. MUI in depth
MUI — the Magic User Interface — is the most widely-used third- party widget toolkit on classic AmigaOS, and it is the toolkit you should learn if you are writing new applications for 68k Amigas. On MorphOS, MUI 5 ships as the OS toolkit. On AROS, Zune is source-compatible. On AmigaOS 4, MUI and ReAction coexist. Learn MUI once and your GUI code runs on every Amiga-family platform.
MUI was written by Stefan Stuntz in the early 1990s as a shareware release. It defined a small object-oriented API on top of BOOPSI (chapter 4), added a rich set of pre-built classes, and — crucially — separated the application from its visual appearance. The user picks fonts, colours, spacing, sound effects, and the same application looks different for different users, without the programmer doing anything. Stuntz’s original manifesto in the early MUI docs is worth reading; it lays out design principles that most modern UI toolkits are still catching up to.[31]
16.1.1. The MUI mental model
Four ideas do all the work.
Objects. Every visible element (window, group, button, text
label, slider, checkbox) is a BOOPSI object created with
MUI_NewObject() or its convenience wrapper MUI_NewObjectTags.
Objects take tag lists of attributes at creation time.
Composition. Complex UIs are built by nesting groups.
Horizontal groups (MUIC_Group with MUIA_Group_Horiz = TRUE)
lay their children left-to-right. Vertical groups (default) top-
to-bottom. Groups within groups build any layout.
Notification. Attributes on any object can be watched. When attribute X on object A changes, cause attribute Y on object B to change (or send method M to object C). This is declarative — no event handler code — and it composes cleanly.
Configurability. The MUI Preferences editor lets the user
customise fonts, colours, spacings, keyboard shortcuts, and
window shapes for every registered MUI application. Your app
declares an MUIA_Application_Base string that MUI uses as the
prefs key.
16.1.2. A minimal MUI program
The classic "hello world":
#include <proto/exec.h>
#include <proto/muimaster.h>
#include <libraries/mui.h>
#include <clib/alib_protos.h>

int main(void)
{
    struct Library *MUIMasterBase =
        OpenLibrary(MUIMASTER_NAME, MUIMASTER_VMIN);
    if (!MUIMasterBase) return 20;

    Object *app = MUI_NewObject(MUIC_Application,
        MUIA_Application_Title,       "Hello",
        MUIA_Application_Version,     "$VER: hello 1.0 (25.7.26)",
        MUIA_Application_Copyright,   "(C) 2026",
        MUIA_Application_Author,      "Chris",
        MUIA_Application_Description, "MUI hello-world",
        MUIA_Application_Base,        "HELLO",
        SubWindow,
            MUI_NewObject(MUIC_Window,
                MUIA_Window_Title, "Hello MUI",
                MUIA_Window_ID,    MAKE_ID('H','E','L','O'),
                WindowContents,
                    MUI_NewObject(MUIC_Group,
                        Child, MUI_NewObject(MUIC_Text,
                            MUIA_Text_Contents, "Hello, MUI!",
                            MUIA_Text_PreParse, "\33c",
                            TAG_END),
                        TAG_END),
                TAG_END),
        TAG_END);

    if (!app) { CloseLibrary(MUIMasterBase); return 20; }

    /* Wire up: close-gadget on the window closes the app. */
    Object *win = NULL;
    get(app, MUIA_Application_ActiveWindow, &win);
    /* (The window we made is the only sub-window; grab it via the
     *  Application object's window list — omitted for brevity in
     *  this minimal example.  The mui-todo example does this
     *  properly.) */

    set(app, MUIA_Application_Iconified, FALSE);
    (void)DoMethod(app, MUIM_Application_Execute);   /* main loop */

    MUI_DisposeObject(app);
    CloseLibrary(MUIMasterBase);
    return 0;
}
Build:
$ m68k-amigaos-gcc -Wall -O2 -noixemul -o mui-hello mui-hello.cTwo things worth pointing out:
-
MUIA_Application_Baseis the string MUI uses as the prefs key for your app. Users set it in the MUI Preferences editor under "Applications." Everything MUI persists (window position, fonts, colours, keyboard shortcuts) is keyed off this. -
$VER:string is the standard AmigaOS version tag. TheVersioncommand scans binaries for a string starting with$VER:and prints it. Every executable should have one.
16.1.3. Notification: the important idea
The one thing that makes MUI worth learning is notification. A worked example — a slider that updates a text field:
Object *slider = MUI_NewObject(MUIC_Slider,
    MUIA_Slider_Min,    0,
    MUIA_Slider_Max,    100,
    MUIA_Slider_Level,  50,
    TAG_END);

Object *label = MUI_NewObject(MUIC_Text,
    MUIA_Text_Contents, "50",
    TAG_END);

/* Whenever the slider's Level changes, set the text of the label
 * to show the new value. */
DoMethod(slider,
    MUIM_Notify, MUIA_Slider_Level, MUIV_EveryTime,
    label, 3,
    MUIM_Set, MUIA_Text_Contents, MUIV_TriggerValue);
MUIM_Notify says: "on this object, when attribute X changes to
value Y, send method M with these arguments to that object." The
special value MUIV_TriggerValue in the argument list is
substituted at fire time for the new value of the watched attribute.
MUIV_EveryTime says "any change fires it" rather than a specific
target value.
Result: dragging the slider live-updates the label, with zero
event-handler code on your side. Compose enough of these and your
main loop becomes the empty MUIM_Application_Execute call.
Notification composes on any attribute of any object. Watch a
window’s MUIA_Window_Open and pop a dialog when it opens; watch
a listview’s MUIA_List_Active and update a "currently selected"
display; watch a checkbox’s MUIA_Selected and enable/disable
another widget. This is React’s controlled-input model, in 1993.
16.1.4. Common classes
The 30-second tour of every class you’d use:
| Class | Purpose |
|---|---|
|
The root. One per program. |
|
A window on a public screen or a custom one. |
|
A horizontal or vertical layout container. |
|
Static text. Supports MUI’s rich-text pre-parse ( |
|
Editable single-line text. |
|
Multi-line editor. |
|
Horizontal or vertical slider. |
|
Numeric input with up/down gadgets. |
|
Multi-choice cycling gadget (Amiga’s version of a dropdown). |
|
Radio buttons. |
|
Checkbox. |
|
Scrollable list of items. |
|
List + optional entries + scroll bar. |
|
RGB picker. |
|
Bitmap or system icon. |
|
Scrollbar (proportional gadget). |
|
Splitter between two groups. |
|
Tabbed pane. |
|
Menu bar. |
|
Menu item. |
|
Popup menu. |
|
A gadget that opens a popup on click. |
|
String input with a "…" button that opens a chooser. |
|
Popstring backed by the standard file requester. |
MUI 4 adds more advanced classes: MUIC_Bodychunk for scaled
images, MUIC_Poplist for a popup that shows an arbitrary list.
MUI 5 (MorphOS-shipped) adds compositing, alpha, and modern layout
helpers.
16.1.5. A worked example: mui-todo
The companion code/c-examples/mui-todo.c is a small but real
todo-list application. Features:
-
MUI window with a menu bar (Project > Quit; Todo > Add, Delete Selected).
-
Vertical group: string gadget for entering a new item, "Add" button, listview of current items, "Delete" button.
-
Notifications wire the Add and Delete buttons to their actions.
-
Persistence: on quit, the list is saved to
T:mui-todo.list; on start, the list is loaded from there.
Runnable:
$ make -C c-examples mui-todo
$ scp c-examples/build/mui-todo amiga:Work:bin/
1> Work:bin/mui-todo
[MUI window opens]
About 250 lines including comments. Study it after the mui-hello example.
16.1.6. The set and get macros
Every MUI attribute is accessible with set() and get()
(defined in <clib/alib_protos.h>):
/* Set: */
set(mywin, MUIA_Window_Title, "New Title");
set(gadget, MUIA_Disabled, TRUE);
set(mystring, MUIA_String_Contents, "hello");

/* Get: */
STRPTR text;
get(mystring, MUIA_String_Contents, &text);

LONG active;
get(mylist, MUIA_List_Active, &active);
Both are macros over SetAttrs() and GetAttr(). set accepts
a variable-length tag list; get takes a single attribute and a
pointer to receive the value.
16.1.7. The DoMethod invocation model
DoMethod(obj, methodid, arg1, arg2, …) sends a method to a
BOOPSI object. MUI’s method IDs include:
| Method | Purpose |
|---|---|
|
The internal implementation of set/get. |
|
Wire a notification (see above). |
|
Remove a notification. |
|
Invoke a |
|
The main loop. |
|
Send a numeric ID back to the main loop for handling. |
|
Pop the standard "About MUI" requester. |
|
Bring a window to the front. |
|
Add one entry to a list. |
|
Remove entries. |
The MUI SDK’s mui.h has the complete method table.
16.1.8. The main loop
MUIM_Application_Execute handles the event loop internally.
For simple apps that only rely on notification, that is all you
need. For apps that need to do work between events, use
MUIM_Application_Input in your own loop:
BOOL running = TRUE;
ULONG signals = 0;

while (running) {
    ULONG id = DoMethod(app, MUIM_Application_NewInput, &signals);

    switch (id) {
    case MUIV_Application_ReturnID_Quit:
        running = FALSE;
        break;
    case ID_ADD_ITEM:
        /* handle */
        break;
    default:
        break;
    }

    if (running && signals) {
        signals = Wait(signals | SIGBREAKF_CTRL_C);
        if (signals & SIGBREAKF_CTRL_C) running = FALSE;
    }
}
Return IDs are set via
DoMethod(app, MUIM_Application_ReturnID, ID_ADD_ITEM) from a
notification. Numeric IDs are yours to define.
16.1.9. Preferences and persistence
MUI stores window positions, sizes, and per-attribute
customisations under ENV:MUI/<AppBase>.prefs. Your app doesn’t
touch this — MUI does. When users tweak your app in the MUI
Preferences editor, the changes are picked up automatically the
next time the app opens.
For app-specific data (documents, settings that don’t belong in
MUI prefs), you manage it yourself — the mui-todo example uses a
simple line-per-item text file in T:.
16.1.10. Custom classes
MUI is BOOPSI, so you can create your own classes. A minimal class definition:
struct MUIP_MyClass_HandleClick { ULONG MethodID; };
#define MUIM_MyClass_HandleClick (TAG_USER | 42)

static ULONG my_dispatch(struct IClass *cl, Object *obj, Msg msg)
{
    switch (msg->MethodID) {
    case OM_NEW: {
        obj = (Object *)DoSuperMethodA(cl, obj, msg);
        if (!obj) return 0;
        /* per-instance init */
        return (ULONG)obj;
    }
    case OM_DISPOSE:
        /* per-instance cleanup */
        return DoSuperMethodA(cl, obj, msg);
    case MUIM_MyClass_HandleClick:
        Printf("Clicked!\n");
        return 0;
    default:
        return DoSuperMethodA(cl, obj, msg);
    }
}

struct MUI_CustomClass *cc = MUI_CreateCustomClass(
    NULL, MUIC_Area, NULL, sizeof(struct MyClassInstance), my_dispatch);
Custom classes are how MUI-heavy applications extend the toolkit
— DirOpus 5, YAM, IBrowse all have dozens of them. The dispatch
function is a switch on msg→MethodID.
For most application code you can build entirely from the stock classes.
16.1.11. Multiple platforms: MUI 3.9 vs MUI 4 vs MUI 5 vs Zune vs ReAction
-
MUI 3.9 (the classic 68k version, shareware since always, freeware in the 2000s) is the base. Aminet:
dev/mui/mui39dev.lhaandmui39usr.lha. -
MUI 4 and MUI 5 ship as part of MorphOS. They add MorphOS-specific compositing, alpha handling, and performance improvements. Source is mostly-compatible with 3.9; a few new attributes and classes exist only in 4+.
-
Zune is the AROS reimplementation. Source-compatible with MUI 3.9 for the vast majority of applications; a few obscure attributes are missing.
-
ReAction is Hyperion’s OS-3.2-and-4.x first-party alternative. Uses BOOPSI, similar class-and-attribute model, but incompatible source-wise.
Recommendation for new work: MUI (3.9-compatible). Runs on classic 68k with MUI 3.9 installed, on MorphOS out of the box, on AROS with Zune out of the box, on AmigaOS 4 with MUI 4 or 5 as an add-on.
16.1.12. References
-
Stefan Stuntz, MUI developer documentation — shipped with MUI 3.9 developer distribution. Includes the class reference, method list, and preferences-file format. https://muidev.de/.
-
MUI Class Reference (community-maintained) — https://muidev.de/reference/. Every class, every attribute, every method with usage examples.
-
Amiga MUI Programming by Ivan Hoffmann and Elizabeth Nolte (Abacus, 1994). ISBN 1-55755-260-6. Book-length MUI tutorial, out of print but on archive.org.
-
MorphOS MUI 5 documentation — https://www.morphos-team.net/ under Development.
-
Zune developer documentation — bundled with AROS distributions; also https://www.aros.org/documentation/.
-
YAM source code — https://github.com/jens-maus/yam — a large, well-written MUI application in current development. The single best-reading MUI codebase.
-
DirOpus5 source — https://github.com/DirOpus5 — extensive use of custom MUI classes.
-
Odyssey Web Browser source — MorphOS-only but a good example of MUI 5 usage.
16.2. ReAction
|
Platform
Ships in ROM on AmigaOS 3.2 and later and on all AmigaOS 4.x releases. Not available on classic 68k Kickstart 3.1 or earlier. Not available on MorphOS (uses MUI 5) or AROS (uses Zune). |
ReAction is the OS’s first-party widget toolkit. It evolved from ClassAct by Phantom Development, was acquired by Amiga Inc. in the late 1990s, and became the built-in toolkit for AmigaOS 3.5, 3.9, 4.0, and every subsequent release. From AmigaOS 3.2 onwards it ships in the Kickstart ROM itself, so ReAction applications need no external installer.
Like MUI, ReAction is object-oriented (BOOPSI-based, chapter 4)
and tag-driven. Unlike MUI, its class names follow the pattern
something.class — a real filesystem name; the classes are
.class and .gadget files in SYS:Classes/Gadgets/,
SYS:Classes/Images/, and SYS:Classes/Window/.
16.2.1. The class inventory
| Class file | Purpose |
|---|---|
|
Application window (equivalent to |
|
Layout container — horizontal, vertical, page. Nesting builds arbitrary layouts. |
|
Standard button. |
|
Single-line text input. |
|
Boolean checkbox. |
|
Radio-button group. |
|
Dropdown of choices. |
|
File-picker gadget (pops an ASL requester). |
|
Horizontal or vertical slider. |
|
Numeric input with increment/decrement. |
|
Rich list view (multi-column, sortable, selectable). |
|
Multi-line text editor. |
|
Simple bar/line/pie chart. |
|
Static image display. |
|
Static text label. |
|
Empty space for layout padding. |
|
Vertical or horizontal divider line. |
Every class exists as both a .gadget (for use inside a layout)
and — where it makes sense — a .image variant (for use as
static content). The label.image and bitmap.image are
commonly-embedded decorations.
16.2.2. A minimal ReAction program
#include <proto/exec.h>
#include <proto/intuition.h>
#include <proto/window.h>
#include <proto/layout.h>
#include <proto/button.h>
#include <classes/window.h>
#include <gadgets/layout.h>
#include <gadgets/button.h>
#include <reaction/reaction.h>
#include <reaction/reaction_macros.h>

int main(void)
{
    struct Library *WindowBase = OpenLibrary("window.class", 44);
    struct Library *LayoutBase = OpenLibrary("gadgets/layout.gadget", 44);
    struct Library *ButtonBase = OpenLibrary("gadgets/button.gadget", 44);
    if (!WindowBase || !LayoutBase || !ButtonBase) return 20;

    Object *ok_btn;

    Object *window = WindowObject,
        WA_Title,        "ReAction Hello",
        WA_CloseGadget,  TRUE,
        WA_DragBar,      TRUE,
        WA_DepthGadget,  TRUE,
        WA_Activate,     TRUE,
        WINDOW_Position, WPOS_CENTERSCREEN,
        WINDOW_Layout,   VLayoutObject,
            LAYOUT_SpaceOuter, TRUE,
            LAYOUT_AddChild, LabelObject,
                LABEL_Text, "Hello, ReAction!",
                LabelEnd,
            LAYOUT_AddChild, ok_btn = ButtonObject,
                GA_Text, "OK",
                GA_ID,   1,
                GA_RelVerify, TRUE,
                ButtonEnd,
            EndGroup,
    EndWindow;

    if (!window) goto out;

    struct Window *win = (struct Window *)
        DoMethod(window, WM_OPEN, NULL);
    if (!win) goto cleanup;

    ULONG done = 0;
    while (!done) {
        ULONG got = Wait(1UL << win->UserPort->mp_SigBit |
                         SIGBREAKF_CTRL_C);
        if (got & SIGBREAKF_CTRL_C) done = 1;

        ULONG result;
        WORD code;
        while ((result = DoMethod(window, WM_HANDLEINPUT, &code))
               != WMHI_LASTMSG) {
            switch (result & WMHI_CLASSMASK) {
            case WMHI_CLOSEWINDOW:
                done = 1;
                break;
            case WMHI_GADGETUP:
                if ((result & WMHI_GADGETMASK) == 1) {
                    Printf("OK pressed.\n");
                    done = 1;
                }
                break;
            }
        }
    }

    DoMethod(window, WM_CLOSE);

cleanup:
    DisposeObject(window);
out:
    if (ButtonBase) CloseLibrary(ButtonBase);
    if (LayoutBase) CloseLibrary(LayoutBase);
    if (WindowBase) CloseLibrary(WindowBase);
    return 0;
}
Notice the differences from MUI:
-
WindowObject,ButtonObject,LabelObjectare convenience macros fromreaction/reaction_macros.hthat wrapNewObject(NULL, "windowclass", …). -
WM_OPEN,WM_CLOSE,WM_HANDLEINPUTare Window-class methods — the analogue of MUI’sMUIM_Application_Execute/NewInput. -
Event dispatch uses a
WMHI_*classmask + gadget-ID pattern, more imperative than MUI’s notification-driven callbacks. -
Class-per-library. You open each class you use. On OS 3.2+ they are ROM-resident, so open is instant.
16.2.3. ListBrowser: the killer class
listbrowser.gadget is one of ReAction’s strongest classes:
multi-column data, sortable columns, per-cell custom
rendering, keyboard navigation, in-place editing, tree
hierarchy — all built-in.
struct ColumnInfo *ci = AllocLBColumnInfo(3, NULL);
SetLBColumnInfoAttrs(ci, 0, LBCIA_Title, "Name",
                            LBCIA_Weight, 40, TAG_END);
SetLBColumnInfoAttrs(ci, 1, LBCIA_Title, "Size",
                            LBCIA_Weight, 20,
                            LBCIA_AutoSort, TRUE, TAG_END);
SetLBColumnInfoAttrs(ci, 2, LBCIA_Title, "Modified",
                            LBCIA_Weight, 40, TAG_END);

struct List *rows = AllocMem(sizeof(*rows),
                              MEMF_PUBLIC | MEMF_CLEAR);
NewList(rows);
/* populate rows with LBNA_Column entries ... */

Object *lb = ListBrowserObject,
    GA_ID,                    10,
    GA_RelVerify,             TRUE,
    LISTBROWSER_ColumnInfo,   ci,
    LISTBROWSER_ColumnTitles, TRUE,
    LISTBROWSER_Labels,       rows,
    LISTBROWSER_ShowSelected, TRUE,
    LISTBROWSER_AutoFit,      TRUE,
    ListBrowserEnd;
A file manager’s file listing is a listbrowser.gadget;
NetSurf’s history view on OS 4 is one; DOpus5’s alternative
UI on OS 4 uses one. Any list-of-things widget in a modern
Amiga app: this class.
16.2.4. OS 4-and-3.5+ ReAction widget classes in detail
|
Platform: AmigaOS 3.5 / 3.9 (Haage & Partner), AmigaOS 3.2 (Hyperion), AmigaOS 4.x.
The classes below appear on AmigaOS 3.5 onward. Some (marked "OS 4 only") are exclusive to the PowerPC branch. If you target classic AmigaOS 3.1 or earlier, use MUI instead — these classes are not present. |
Beyond the core window.class + layout.gadget + button.gadget
minimum, ReAction ships a large set of higher-level widgets. The
ones you would actually reach for in a modern application:
application.class (OS 4 only). The root object for a
ReAction program on OS 4, analogous to MUI’s MUIC_Application.
Ties together multiple windows into one application; provides the
event loop, iconify behaviour, ARexx port registration, and
prefs-persistence hooks. Not present on OS 3.5/3.9/3.2 —
those platforms use window.class directly and roll their own
outer loop.
arexx.class (OS 4 only). Attaches an ARexx port to your
application via a class attribute. Handles command dispatch,
result formatting, and ARexx multitasking correctly. On 68k
classic ReAction, wire the ARexx port yourself with
rexxsyslib.library (chapter 11).
bevel.class (OS 3.5+). A visual bevel container — draws a
raised or recessed border around its children. Used for grouping
related controls visually. Analogous to MUI’s MUIC_Group with
MUIA_Frame.
bitmap.image (OS 3.5+, extended on OS 4). Displays a static
bitmap. On OS 4 it accepts Datatypes-loaded images directly (any
PNG/JPEG/GIF); on 3.5/3.9/3.2 you supply a struct BitMap.
chart.gadget (OS 3.5+). Bar, line, and pie chart display.
Not a full plotting library — for that you would embed a Cairo
port or something — but useful for status-display charts.
checkbox.gadget (OS 3.5+). Standard tri-state or two-state
checkbox. Attributes: GA_Selected, CHECKBOX_LabelPlace (left
or right of the box). Straightforward.
chooser.gadget (OS 3.5+). Dropdown menu — the Amiga’s
equivalent of an HTML <select>. Backed by a List of
`struct Node`s that you build yourself. Selection returns the
node’s index. Supports variable-height entries with custom
rendering hooks.
clicktab.gadget (OS 3.5+). Tabbed pane. Attributes:
CLICKTAB_Labels (a list of tab titles), CLICKTAB_Current
(selected tab index), CLICKTAB_PageGroup (layout group whose
child pages match the tabs). Widely used in Preferences editors.
datebrowser.gadget (OS 4 only). Calendar/date-picker gadget.
Attributes: DB_ClickDate, DB_MinDate, DB_MaxDate. Renders
a month at a time with next/previous navigation.
fuelgauge.gadget (OS 3.5+). Progress bar. Attributes:
FUELGAUGE_Level, FUELGAUGE_Max, FUELGAUGE_Percent,
FUELGAUGE_Ticks. Optional numeric readout. Use for download
progress, install progress, batch-processing status.
getcolor.gadget (OS 3.5+). Pops an ASL colour requester.
Attribute GC_Pen gives you the selected pen; GC_ScreenPointer
lets it enumerate the current screen’s palette.
getfile.gadget (OS 3.5+). Pops an ASL file requester.
Attributes: GETFILE_TitleText, GETFILE_Drawer,
GETFILE_File, GETFILE_FullFile (the assembled full path).
This is what you use anywhere you want a "browse…" button.
getscreenmode.gadget (OS 3.5+). Pops the ASL screen-mode
requester. Attribute GETSCREENMODE_DisplayID returns the
user-chosen mode ID. Combine with a WA_CustomScreen to let
users pick their own display mode.
glyph.image (OS 4 only). Vector-drawn iconography — up/down
arrows, close boxes, resize handles rendered at any size with
antialiasing. Used inside window borders and inline in menus and
tabs.
integer.gadget (OS 3.5+). Numeric input with up/down
increment gadgets on the side. Attributes: INTEGER_Number,
INTEGER_Minimum, INTEGER_Maximum, INTEGER_Arrows. Handles
range-clamping automatically.
label.image (OS 3.5+). Static text label. Supports
LABEL_Text (plain), LABEL_HotKey (underlined-letter for
keyboard shortcut mapping), LABEL_Style (bold/italic).
layout.gadget (OS 3.5+). The layout container. Modes:
horizontal (HLayoutObject macro), vertical (VLayoutObject),
page (PageLayoutObject — for tab panes). Full weight, minimum
size, and alignment attributes. This is the class that makes
ReAction usable for any nontrivial UI.
listbrowser.gadget (OS 3.5+, substantially extended on OS
4). Rich multi-column list view. Sortable columns, tree hierarchy,
in-place editing, per-cell custom rendering. See the earlier
detailed section.
palette.gadget (OS 3.5+). Colour-palette picker. Displays
all palette entries; click to select.
penmap.image (OS 4 only). Pen-remap image — draws an
image with the palette remapped for the current screen’s pens.
radiobutton.gadget (OS 3.5+). Radio-button group. Attribute:
RADIOBUTTON_Labels (list of options), RADIOBUTTON_Selected
(currently-selected index).
scroller.gadget (OS 3.5+). Proportional scrollbar.
Horizontal or vertical. Attributes: PGA_Total, PGA_Top,
PGA_Visible, PGA_NewLook. Usually attached to a viewer widget.
space.gadget (OS 3.5+). Invisible spacer for layout. Set a
minimum and/or maximum size and it consumes space without drawing.
speedbar.gadget (OS 4 only, added post-Update 2). A
horizontal or vertical toolbar with buttons, separators, and
customisable icons. Standard for OS 4 application toolbars.
string.gadget (OS 3.5+). Single-line text input. Standard
attributes: STRINGA_TextVal, STRINGA_MaxChars, STRINGA_HistoryLines
(dropdown history!).
tickbox.gadget (OS 4 only). Alternative to checkbox.gadget
with a slightly different visual style — a tick mark rather than
a checkmark. Cosmetic; use checkbox.gadget for portability.
texteditor.gadget (OS 3.5+, greatly extended in OS 4).
Multi-line text editor. Full undo/redo, cursor movement, styled
runs, search-and-replace. Basis for the standard text-editor
tools like NoWinED and the OS 4 Notepad.
virtual.gadget (OS 3.5+). Scrollable virtual canvas — put
a child gadget inside and it becomes scrollable when it exceeds
the visible area. Automatic scrollbar management.
16.3. ReAction vs MUI: how to choose
| Situation | Pick |
|---|---|
Classic 68k with a broad installed base (Kickstart 3.1–3.2) |
MUI 3.9. Installed everywhere via shareware distribution. |
OS 3.2+ only |
ReAction. In ROM, no external dependency. |
AmigaOS 4 |
ReAction. First-party, always in ROM. |
MorphOS |
MUI 5. Native to the OS. |
AROS |
MUI 3.9 through Zune. Source-compatible with classic MUI. |
One codebase, every Amiga |
MUI 3.9. Lowest common denominator with widest deployment. |
GPU-accelerated compositing |
MUI 5 on MorphOS or ReAction on OS 4. |
For new work in 2026 targeting classic 68k, MUI 3.9 remains the pragmatic default. For modern-only work, ReAction on OS 3.2/4 is the cleanest option.
16.4. ClassAct: the ancestor
|
Historical
Superseded by ReAction. Included here for context; you would not choose ClassAct for new work. |
ClassAct was the original commercial BOOPSI-class-based widget toolkit, released by Phantom Development in 1996. Amiga Inc. licensed it in 1998 and renamed it ReAction. The API is essentially identical to ReAction’s; the classes are named differently and the header layout differs slightly.
If you inherit ClassAct source, the porting effort to ReAction is largely a rename pass — the semantic API is the same.
16.5. Zune: MUI-compatible reimplementation on AROS
|
Platform
AROS only — ships with every AROS distribution as the default toolkit. |
Zune is AROS’s MUI-compatible widget toolkit. It re- implements the MUI 3.9 API from scratch (clean-room, in the AROS coding style), letting classic MUI source rebuild on AROS unchanged in the vast majority of cases.
What Zune supports:
-
Every core class from MUI 3.9 (
MUIC_Application,MUIC_Window,MUIC_Group,MUIC_Text,MUIC_String,MUIC_List,MUIC_Listview,MUIC_Slider,MUIC_Cycle,MUIC_Radio,MUIC_Checkmark, …). -
The full notification (
MUIM_Notify) system. -
Custom classes via
MUI_CreateCustomClass(). -
Preferences persistence.
What Zune does not support (as of 2026):
-
A handful of obscure MUI 3.9 attributes documented but never used by real applications.
-
Most MUI 4/5-specific classes (proprietary to MorphOS).
For practical purposes: if your MUI 3.9 application builds on
classic Amiga, it builds on AROS with Zune. The build system
points at Zune headers instead of MUI headers and links
against muimaster.library (which on AROS is an alias for the
Zune equivalent).
16.6. Cross-toolkit code: writing once for all platforms
The pragmatic approach for a modern application: write against MUI 3.9’s API, with a small compile-time shim for OS 4 that routes through ReAction if you want to. Sample header:
#if defined(__amigaos4__)
    #include <proto/window.h>
    #include <proto/layout.h>
    #include <proto/button.h>
    #include <reaction/reaction_macros.h>
    #define USE_REACTION 1
#else
    #include <proto/muimaster.h>
    #include <libraries/mui.h>
    #include <clib/alib_protos.h>
    #define USE_MUI 1
#endif
Wrap window creation in a helper function with one implementation per toolkit. The event loops look similar either way. Code sharing hits ~80% across MUI and ReAction targets for typical CRUD-style GUIs.
If sharing that much matters, an alternative is Hollywood (chapter 16) — the cross-platform multimedia scripting language runs identical source on every Amiga family and on macOS/Linux/Windows, with a unified widget API. Not as fast or as native-looking as MUI or ReAction, but maintenance-cheap.
Next: writing your own datatype, so any Datatypes-aware application can read files in your format.
Chapter 17. The IFF File Format
If you have opened an Amiga icon, viewed an Amiga picture, played an Amiga sound sample, or read a preferences file, you have handled an IFF — Interchange File Format — file. IFF is the near- universal container format on the Amiga. Understanding it once unlocks a dozen different formats you would otherwise treat as opaque blobs, and lets you read and write them from your own programs with about a hundred lines of C.
IFF was designed by Jerry Morrison at Electronic Arts in 1985 as a platform-neutral chunk-based container. Commodore adopted it for AmigaOS as the standard graphics and sound format, then extended it to icons, prefs, animation, and much else besides. The specification is short (35 pages) and freely available on archive.org.[32]
17.1. The shape of an IFF file
Every IFF file is a tree of chunks. A chunk is:
-
A 4-character ASCII ID (e.g.
"BODY","CMAP","ILBM"). -
A 32-bit big-endian size in bytes (of the data that follows, not including the 8-byte header).
-
That many bytes of data.
-
An optional padding byte if the size was odd (chunks are word- aligned).
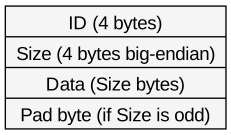
Chunks come in three flavours:
-
Data chunks — leaves in the tree. Their data is opaque to the IFF layer; the format-specific code (BODY of an ILBM, 8SVX audio samples, tooltype strings in an ICON chunk) knows how to read them.
-
Container chunks —
FORM,LIST,CAT. Their data is itself a sequence of chunks, indented one level deeper. -
Property chunks —
PROP. Used inside LIST containers to declare properties inherited by contained FORMs. Rare in practice.
Every complete IFF file starts with exactly one container chunk. The three container types:
| ID | Purpose |
|---|---|
|
A single object of a known type. Its data is a 4-byte format ID ( |
|
A collection of `FORM`s of the same type, sharing declared properties. Rare — LIST containers were envisaged for image archives but not much used. |
`CAT ` |
A "concatenation" — a collection of `FORM`s of possibly-different types, no shared properties. Common for animation catalogues. |
The trailing space in `CAT ` (four characters including the space) is part of the ID. This kind of thing is on-brand for IFF.
17.2. A hex dump of a minimal IFF-ILBM
A very small (2×2 pixel, 2 colours) ILBM file, dissected:
Offset    Bytes                       Interpretation
------    -----                       --------------
0x0000    46 4F 52 4D                 "FORM"
0x0004    00 00 00 3A                 Size = 58 bytes
0x0008    49 4C 42 4D                 "ILBM" (form type)
0x000C
0x000C    42 4D 48 44                 "BMHD" chunk id
0x0010    00 00 00 14                 Size = 20 bytes
0x0014    00 02 00 02                 Width=2, Height=2
0x0018    00 00 00 00                 X, Y offset = 0
0x001C    01 00 00 00                 Depth=1, Masking=None, Compression=None
0x0020    00 00 00 00                 pad, transp, xAsp, yAsp
0x0024    00 02 00 02                 PageWidth, PageHeight
0x0028
0x0028    43 4D 41 50                 "CMAP" chunk id
0x002C    00 00 00 06                 Size = 6 bytes (2 colours × 3 RGB)
0x0030    00 00 00                    Colour 0: black
0x0033    FF FF FF                    Colour 1: white
0x0036    00                          Pad byte
0x0037
0x0037    42 4F 44 59                 "BODY" chunk id
0x003B    00 00 00 04                 Size = 4 bytes
0x003F    C0 00                       Row 0: 0b11000000 (2 pixels wide)
0x0041    80 00                       Row 1: 0b10000000
0x0043    00                          Pad byte
0x0044                                End of file
Every chunk is 8 bytes of header plus data plus alignment padding.
An IFF reader is a state machine that reads 8 bytes, sees "BMHD",
knows to read 20 bytes of struct BitMapHeader, moves on. Nested
FORMs, LISTs, and CATs are handled by recursing into a container’s
data as if it were a whole new file, only bounded.
17.3. The formats that use IFF
The Amiga standard formats built on IFF:
| Form ID | Content |
|---|---|
|
Interleaved Bitmap — the Amiga image format. Bitplanes stored one at a time. BMHD, CMAP, BODY chunks minimum; CAMG (Amiga display mode), CRNG / DRNG (colour cycle ranges), ANNO (annotation), AUTH (author), DPI (dots per inch) common additions. |
|
8-bit sampled Voice — the Amiga sound format. VHDR (voice header), CHAN (stereo/mono), BODY (raw sample bytes). |
|
Simple MUSical Score — a Standard MIDI-like format from EA. |
|
Animation. A CAT of ILBM frames plus DLTA (delta) chunks for the differences between frames. |
|
Icon file ( |
|
Preferences file. Any prefs file ( |
|
Audio Master format. |
|
2D vector drawing. |
|
Formatted text — used by the clipboard for cut-and-paste of styled text. |
|
Turbo Silver 3D scene format. |
Third-party form types number in the dozens. If a program writes a
.iff file, chances are it’s a FORM of some type; run IFFDump on
it to identify.
17.4. iffparse.library
Reading and writing IFF from C is unpleasant if you do it manually
(the recursion, the endianness, the alignment, the size accounting).
iffparse.library — shipped since Kickstart 2.0 — does it all for
you.
The library is stream-oriented: you open an "IFF handle", tell it
which chunks you care about via StopChunk() calls, then walk the
file with ParseIFF(). When the parser sees a chunk you registered,
it returns to your code with the chunk’s ID, size, and a stream
pointer ready to read the data. Otherwise it skips the chunk and
recurses into containers automatically.
Basic usage — read the first BMHD from an ILBM:
#include <proto/exec.h>
#include <proto/dos.h>
#include <proto/iffparse.h>
#include <libraries/iffparse.h>
#include <datatypes/pictureclass.h>

struct Library *IFFParseBase = OpenLibrary("iffparse.library", 39);
struct IFFHandle *iff = AllocIFF();

iff->iff_Stream = (ULONG)Open("Work:pic.iff", MODE_OLDFILE);
InitIFFasDOS(iff);
OpenIFF(iff, IFFF_READ);

StopChunk(iff, ID_ILBM, ID_BMHD);

if (ParseIFF(iff, IFFPARSE_SCAN) == 0) {
    struct BitMapHeader bmhd;
    ReadChunkBytes(iff, &bmhd, sizeof(bmhd));
    Printf("Width=%ld height=%ld depth=%ld\n",
           (LONG)bmhd.bmh_Width,
           (LONG)bmhd.bmh_Height,
           (LONG)bmhd.bmh_Depth);
}

CloseIFF(iff);
Close(iff->iff_Stream);
FreeIFF(iff);
CloseLibrary(IFFParseBase);
Every four-character IFF ID has a macro constant, ID_xxxx, in
<libraries/iffparse.h>.
17.5. Writing IFF
The write side is equally clean. To create a new ILBM:
iff->iff_Stream = (ULONG)Open("Work:out.iff", MODE_NEWFILE);
InitIFFasDOS(iff);
OpenIFF(iff, IFFF_WRITE);

PushChunk(iff, ID_ILBM, ID_FORM, IFFSIZE_UNKNOWN);

  PushChunk(iff, 0, ID_BMHD, sizeof(bmhd));
  WriteChunkBytes(iff, &bmhd, sizeof(bmhd));
  PopChunk(iff);

  PushChunk(iff, 0, ID_CMAP, cmap_size);
  WriteChunkBytes(iff, cmap, cmap_size);
  PopChunk(iff);

  PushChunk(iff, 0, ID_BODY, IFFSIZE_UNKNOWN);
  for (int row = 0; row < height; row++) {
      for (int plane = 0; plane < depth; plane++) {
          WriteChunkBytes(iff, plane_data[plane] + row * row_bytes,
                          row_bytes);
      }
  }
  PopChunk(iff);

PopChunk(iff);

CloseIFF(iff);
IFFSIZE_UNKNOWN tells the library "I don’t know the size yet;
compute it for me when I `PopChunk()`". The library maintains a
stack of pending PushChunks and back-patches sizes when popped.
This is the trick that makes writing an IFF hierarchical.
17.6. The iff-dump companion program
Rather than write out a full IFF walker in this chapter, the
companion code in code/c-examples/iff-dump.c contains a
complete IFF hierarchical dumper. Compiled and run against an
Amiga icon file:
1> iff-dump SYS:System/Shell.info
FORM (1284 bytes) "ICON"
  ICON (74 bytes)
    [icon header — icon type, position, drawer state]
  GLYPH (620 bytes)
    [Workbench-4-Amiga standard icon image]
  GLYPH (620 bytes)
    [selected-state image]
  DRAWER (10 bytes)
    [window position and size when the drawer is opened]
The dumper source is ~200 lines including comments and shows the
full standard-usage pattern of iffparse.library, including
recursion into container chunks, handling of unknown chunk types,
and pretty-printing indentation.
Build it with the companion toolchain:
$ make -C c-examples iff-dump
$ scp c-examples/build/iff-dump amiga:Work:bin/
Test targets: any .info icon file, any .iff picture (Aminet
has thousands under pix/), any .8svx sample.
17.7. The iff-inspect and related community tools
Modern community-maintained IFF tools:
-
IFFTools by David Kinder — set of CLI utilities for inspecting and manipulating IFF files. Aminet:
util/misc/IFFTools.lha. -
iffparse (in the AmigaOS Storage drawer) — the reference binary for the library.
-
VisualPrefs — a graphical prefs-file editor that also works as an IFF inspector.
-
DirOpus5's built-in IFF viewer.
For debugging your own IFF-writing code, iff-dump from the
companion is usually enough.
17.8. Reading Amiga icons in detail
Amiga icons (.info files) are IFF ICON forms on OS 3.5+ and
raw structures on older systems. The raw structure is a
struct DiskObject from <workbench/workbench.h> followed by
its embedded gadget bitmap data and tooltype strings; the
icon.library GetDiskObject() and PutDiskObject() functions
handle both variants transparently.
If you want to just read the tooltypes from an icon (a very common need — e.g. reading your program’s own configuration from its icon):
#include <proto/icon.h>
#include <workbench/workbench.h>

struct Library *IconBase = OpenLibrary("icon.library", 39);
struct DiskObject *dobj = GetDiskObject("Env:Sys/console.prefs");

if (dobj) {
    STRPTR *tt = (STRPTR *)dobj->do_ToolTypes;
    STRPTR val = FindToolType(tt, "MYAPP_DEBUG");
    if (val) Printf("Debug flag = %s\n", val);
    FreeDiskObject(dobj);
}

CloseLibrary(IconBase);
FindToolType returns a pointer to the value part of a
KEY=VALUE tooltype, or NULL. The MatchToolValue() helper
compares a value against candidate strings for enum-style
tooltypes.
This is how virtually every Amiga program reads its own configuration. It’s less flexible than YAML or JSON, but a human can edit it with Workbench and it Just Works.
17.9. Reading prefs files
Prefs files under ENV:Sys/ are all IFF PREF forms containing
some format-specific chunks. The pattern for reading one — say,
the current pointer preferences:
iff->iff_Stream = (ULONG)Open("ENV:Sys/pointer.prefs", MODE_OLDFILE);
InitIFFasDOS(iff);
OpenIFF(iff, IFFF_READ);

StopChunk(iff, ID_PREF, ID_PNTR);  /* pointer chunk in a PREF form */

if (ParseIFF(iff, IFFPARSE_SCAN) == 0) {
    struct PointerPrefs pp;
    ReadChunkBytes(iff, &pp, sizeof(pp));
    /* pp.pp_Which, pp.pp_Height, pp.pp_XOffset, pp.pp_YOffset ... */
}
The chunk formats for each prefs type are documented in the RKM
Libraries volume, chapter on preferences.library and its
successor preferences.library v40+.
Because prefs are IFF, you can build config-management workflows
that check them into git as canonical files and drop them into
ENVARC:Sys/ from a User-Startup fragment.
17.10. Related third-party formats
Non-Commodore Amiga file formats that use IFF:
-
DPaint’s ANIM format — animation as delta frames between ILBM keyframes.
-
AmigaGuide’s .guide files — actually not IFF, but the contemporary equivalent. Text-based.
-
MED / OctaMED songs — IFF containers with instrument samples, patterns, and song data.
-
NewIcons and GlowIcons formats — extensions of the base icon format.
-
PageStream .prj documents — IFF container with page layout.
For each of these the format-specific structure documentation is usually shipped with the application; some are on the Amiga Documentation Archive at https://amigadev.elowar.com/.
17.11. Related but non-IFF formats you will meet
Not everything on the Amiga is IFF:
-
MOD files are a custom fixed-header format from the ProTracker lineage — see the Audio chapter.
-
LhA archives are Yoshi Okumura’s LZH-based archive format.
-
AmigaGuide documentation is text with escape sequences.
-
PostScript documents (print-oriented) are Adobe’s language.
-
ADF / HDF disk images are raw block dumps with no wrapper.
But when in doubt: check the first four bytes. If they say FORM,
LIST, or `CAT `, you have an IFF.
17.12. References
-
Electronic Arts, EA IFF 85: Standard for Interchange Format Files (Jerry Morrison, 1985). The canonical spec. On archive.org and reprinted in the RKM Devices, Appendix B.
-
Amiga ROM Kernel Reference Manual: Devices, chapter on
iffparse.library. -
Amiga ROM Kernel Reference Manual: Libraries, chapter on
icon.libraryfor icon-format details. -
IFFTools documentation, Aminet
util/misc/IFFTools.lha. -
The Amiga Documentation Archive — https://amigadev.elowar.com/ — hosts the RKM series in browsable HTML form.
Next: the widget toolkit chapter — MUI in depth — where every gadget is a BOOPSI object and every layout is declarative.
Chapter 18. Writing a Datatype
The Datatypes system (chapter 4) is one of AmigaOS’s most elegant subsystems: any application that says "please display file X" gets the right rendering for free, because format-specific handling is delegated to installable datatype classes. If you invent a new file format — or want to add support for an existing format to every DT-aware Amiga program at once — you write a datatype. This chapter walks through it end-to-end, with a companion example that adds a datatype for a made-up "heat-map" format so you can see the whole shape.
The primary reference is the Amiga ROM Kernel Reference Manual:
Libraries, chapter on datatypes.library and the individual
class descriptions (pictureclass, soundclass, animationclass,
textclass).[33]
18.1. The class hierarchy
Datatypes are BOOPSI classes (chapter 4). They inherit from
datatypesclass (DATATYPESCLASS), which itself extends
gadgetclass. The full hierarchy for a picture datatype:
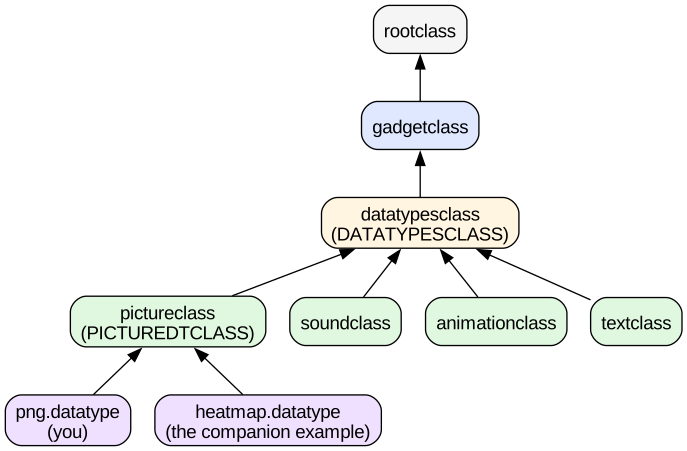
You pick the right base class for what your format is:
-
Image / picture — inherit from
pictureclass. -
Sound / sampled voice —
soundclass. -
Animation —
animationclass. -
Text (formatted or plain) —
textclass. -
Something else —
datatypesclassdirectly.
Your class overrides a small number of methods, primarily:
-
OM_NEW— construct an instance from a file/stream. -
OM_GET— return per-instance attributes (bitmap, sample data, dimensions, colour palette). -
DTM_WRITE— save an instance back to a file (optional, for writable formats). -
DTM_TRIGGER— respond to user actions on the instance (play, stop, next-frame).
The subclass gets the base class’s implementation of everything else — window management, colour negotiation, keyboard focus, menu integration — for free.
18.2. Registration: the class descriptor file
Every datatype has two components:
-
The class library — a
.datatypefile inSYS:Classes/DataTypes/. Same on-disk format as a library; contains the BOOPSI class dispatcher. -
The descriptor file — a plain-text file in
DEVS:DataTypes/tellingdatatypes.libraryhow to recognise this format from file contents.
The descriptor is IFF (surprise), with a few required chunks:
FORM: DTHD (descriptor header)
    dth_Name         "heatmap"          ; class name
    dth_BaseName     "heatmap"          ; base file name
    dth_Pattern      "#?.hmap"          ; filename pattern
    dth_Mask         { magic-mask bits } ; bytes at start of file to match
    dth_GroupID      GID_PICTURE
    dth_ID           4H4D               ; unique ID
    dth_Flags        0
FORM: SORT (recognition rules)
    ...bytes to compare in the file to identify it...
datatypes.library’s recogniser scans `DEVS:DataTypes/ at boot
and builds a table. When an application calls
ObtainDataTypeA() on a file, the recogniser checks each
descriptor’s mask/sort in order and picks the first match.
The recognition rules can be as simple as "the file starts with
FORM???ILBM`" (an ILBM picture) or as sophisticated as "the
first four bytes are one of a set of magics, and byte 12 is a
plausible width value." The `SORT
chunk in the descriptor lets
you express complex conditions.
18.3. The companion example: heatmap.datatype
The companion source at
code/c-examples/heatmap-datatype/heatmap.c implements a
complete picture datatype for a made-up "heat-map" format. The
format is:
Offset  Bytes    Meaning
0       4        Magic: "HMAP"
4       2        Width  (big-endian UWORD)
6       2        Height (big-endian UWORD)
8       W*H      Byte per pixel, 0=cold blue to 255=hot red
Given that format, the datatype:
-
Recognises the file by its
HMAPmagic. -
Reads width, height, and pixel data.
-
Generates a 256-colour palette (blue to red gradient).
-
Constructs a
struct BitMapin chip RAM with the pixels mapped to the palette. -
Exposes it as a normal
pictureclassinstance so MultiView, DirOpus, any picture-viewer program, and IBrowse can all display it.
The class dispatcher in outline:
static ULONG heatmap_dispatch(struct IClass *cl, Object *obj, Msg msg)
{
    switch (msg->MethodID) {
    case OM_NEW:      return handle_om_new(cl, obj, (struct opSet *)msg);
    case OM_DISPOSE:  return handle_om_dispose(cl, obj);
    case OM_GET:      return DoSuperMethodA(cl, obj, msg);
    case OM_SET:      return DoSuperMethodA(cl, obj, msg);
    case DTM_FRAMEBOX: return handle_framebox(cl, obj,
                              (struct dtFrameBox *)msg);
    case DTM_TRIGGER: return DoSuperMethodA(cl, obj, msg);
    default:          return DoSuperMethodA(cl, obj, msg);
    }
}
handle_om_new() opens the file, reads header + pixels, sets
PDTA_BitMapHeader, PDTA_ColorRegisters, PDTA_BitMap, and
returns the object. That’s the bulk of the work.
Build it with the makefile at
code/c-examples/heatmap-datatype/Makefile:
$ make -C c-examples/heatmap-datatype
$ scp c-examples/heatmap-datatype/build/heatmap.datatype amiga:SYS:Classes/DataTypes/
$ scp c-examples/heatmap-datatype/heatmap.dtdescr amiga:DEVS:DataTypes/heatmap
Restart datatypes.library (or reboot). Then any .hmap file
opens with MultiView. Also, any Aminet-installed application
that uses datatypes.library — GraphicPreview, DPaint’s Load
requester, DirOpus’s file browser — gains support for .hmap
without knowing anything about it.
That is the elegance of datatypes: one class shipped once
extends every existing application, because the code path
"open a file the user picked" goes through
ObtainDataTypeA() in every well-behaved app.
18.4. Detailed shape of the class
Here is the header of the datatype class library:
/* Library base + tag defs */
struct HeatmapClassBase {
    struct Library lib_Base;
    BPTR           SegList;
    struct Library *IntuitionBase;
    struct Library *UtilityBase;
    struct Library *IFFParseBase;
    struct Library *DataTypesBase;
    struct IClass *class;      /* the actual BOOPSI class */
};

/* Library init: called by exec.library after LoadSeg. */
struct Library *LibOpen(struct HeatmapClassBase *cb)
{
    cb->lib_Base.lib_OpenCnt++;
    return &cb->lib_Base;
}

/* Class creation. */
BOOL LibExpunge(struct HeatmapClassBase *cb)
{
    if (cb->class) {
        FreeClass(cb->class);
        cb->class = NULL;
    }
    return TRUE;
}

BOOL create_class(struct HeatmapClassBase *cb)
{
    struct IClass *super = ObtainEngine(PICTUREDTCLASS);
    if (!super) return FALSE;

    cb->class = MakeClass(NULL, NULL, super,
                          sizeof(struct HeatmapInstance),
                          0);
    if (!cb->class) return FALSE;

    cb->class->cl_Dispatcher.h_Entry = (APTR)heatmap_dispatch;
    return TRUE;
}
MakeClass() creates a public class that
datatypes.library can look up by name. The cl_Dispatcher is
the switch statement covered above. LibOpen, LibClose,
LibExpunge are standard library boilerplate — every
.datatype file is a library with those entry points.
18.5. Testing: MultiView, DTPictures, and the SDK examples
The Amiga SDK ships a DTPictures test program in
SDK:Examples/Classes/DataTypes/. It exercises every method
your class implements. Use it as a regression check while
developing.
MultiView (in SYS:Utilities/MultiView) is the standard
user-facing datatype viewer. Feed it a .hmap file:
1> MultiView Work:test/example.hmapIf your datatype works, the file opens. If not, you get an
"unknown format" requester. Debug with SnoopDos or
Enforcer (chapter 20 covers debugging in depth).
18.6. Registering the datatype at install time
Real datatype installers copy:
-
The
.datatypefile toSYS:Classes/DataTypes/. -
The descriptor file to
DEVS:DataTypes/. -
Optionally an icon (
.info) for the descriptor file for users who browseDEVS:DataTypesfrom Workbench.
Then either reboot, or force datatypes.library to rescan
with:
1> datatypes ; from the Datatypes SDK; forces a rescanFor a distributable installer, use the standard Installer
script format (see the AmigaOS 3.x Installer Guide, in the RKM
Devices volume) — this gives you the OS’s standard
install-with-checkbox-dialogs experience that users are
familiar with.
18.7. The Aminet datatype ecosystem
Aminet’s util/dtype/ directory has ~250 third-party
datatypes covering:
-
Images — every historical format including GIF, PNG, JPEG, TIFF, TGA, PCX, BMP, PSD, WebP, HEIC.
-
Sound — MP3, Ogg Vorbis, FLAC, AIFF, WAV, various tracker formats.
-
Video — MPEG, QuickTime, AVI, WebM.
-
Documents — PDF (limited), PostScript, RTF.
Every one of these was added without changing any application. Datatype is the Amiga’s answer to macOS’s Uniform Type Identifiers and Linux’s XDG mimetype system, from 1994.
Notable third-party datatype developers:
-
Andreas Kleinert — dozens of image and animation datatypes.
-
Sigbjørn Skjæret — sound formats.
-
David Cotton (DCon) — text and document formats.
These developers are still active; new datatypes appear on Aminet several times a year.
18.8. Datatypes in datatypes-consuming code
You already saw the consumer side in chapter 4:
Object *obj = NewDTObject("Work:pictures/foo.png",
    DTA_SourceType, DTST_FILE,
    DTA_GroupID,    GID_PICTURE,
    TAG_END);
To draw the resulting picture into your window:
struct BitMap *bm = NULL;
GetDTAttrs(obj, PDTA_BitMap, &bm, TAG_END);
if (bm) {
    struct BitMapHeader *bmhd = NULL;
    GetDTAttrs(obj, PDTA_BitMapHeader, &bmhd, TAG_END);
    BltBitMapRastPort(bm, 0, 0,
                      win->RPort, x, y,
                      bmhd->bmh_Width, bmhd->bmh_Height,
                      0xC0);
}
DisposeDTObject(obj);
Notice you never touch the format-specific code. As long as
someone wrote a datatype for PNG, JPEG, WebP, or your
.hmap files, your consumer works.
For sound:
Object *obj = NewDTObject("Work:sounds/foo.mp3",
    DTA_SourceType, DTST_FILE,
    DTA_GroupID,    GID_SOUND,
    TAG_END);
DoDTMethod(obj, NULL, NULL, DTM_TRIGGER, NULL, STM_PLAY, NULL);
Same shape, different GroupID.
18.9. References
-
Amiga ROM Kernel Reference Manual: Libraries, chapters on
datatypes.library,pictureclass,soundclass,animationclass,textclass. -
AmigaOS 3.5 Datatype API Reference (Amiga Inc., 1999) — the Haage & Partner update introduced several new attributes and methods.
-
Andreas Kleinert, Datatypes on Aminet — the largest set of production datatype source code, useful as reference. https://aminet.net/util/dtype/.
-
AmigaOS Datatypes Developer Guide on https://amigadev.elowar.com/ — browsable HTML version of the official documentation.
Next: writing a hardware device driver — the deepest layer of Amiga programming.
Chapter 19. Writing a Device Driver
Amiga device drivers are the deepest layer of Amiga programming
below the OS. They implement the API that exec.library’s
`DoIO()/SendIO() call into, they run at arbitrarily high
priority (often driven by interrupts), and they are what makes
Zorro cards, serial ports, hard drives, network cards, and every
other piece of Amiga hardware accessible from the standard OS
APIs. This chapter walks you through writing one, using a small
but complete example: a simulated network interface that speaks
the SANA-II protocol (chapter 12 covered SANA-II from the
consumer side).
The primary reference is the Amiga ROM Kernel Reference Manual:
Devices (Addison-Wesley, 1991), which walks through
console.device, serial.device, audio.device, and gives you
the general shape of every .device file. For the specific
protocol you are implementing (SANA-II, block-device, storage,
etc.) the relevant standard document lives on
Commodore-Amiga, SANA-II
Device Driver Specification, 1991; extended by Ariadne, DKB, and
Individual Computers in subsequent years. Modern revision at
https://amigadev.elowar.com/sana2/.
19.1. The shape of a device
A device is a library that:
-
Exposes the same six standard library entry points (
LibOpen,LibClose,LibExpunge,Extended). -
Additionally exposes
BeginIO()(LVO-30) andAbortIO()(LVO-36). -
Owns a queue of pending
struct IORequeststructures. -
Signals its own task when new requests arrive (usually via a message-port hook), processes them, fills in a status code, and replies.
The consumer side of this is what we saw in chapter 9:
struct MsgPort *port = CreateMsgPort();
struct IOStdReq *req = (struct IOStdReq *)CreateIORequest(port, sizeof(*req));
OpenDevice("foo.device", 0, (struct IORequest *)req, 0);
req->io_Command = CMD_WRITE;
req->io_Data    = buffer;
req->io_Length  = len;
DoIO((struct IORequest *)req);
CloseDevice((struct IORequest *)req);
The device side is what the driver author implements. Every
CMD_WRITE above lands as a BeginIO() call on the driver, with
the caller’s IORequest as an argument.

The two arrows out of dev distinguish the two invocation
modes:
-
Immediate (
IOF_QUICK) — for cheap commands (likeCMD_UPDATEor a status query) the driver processes them synchronously insideBeginIO()and returns. The caller sees the result on return; no port signal. -
Queued — for anything that has to wait on hardware (a disk seek, a network packet in transit) the driver enqueues the request on its internal list, signals its own worker task, and returns. The worker task processes the request later and `ReplyMsg()`s back to the caller’s port when done.
DoIO() handles both cases: if the driver returns without
setting IOF_QUICK, DoIO does the WaitPort() for the reply
before returning.
19.2. A minimal SANA-II network device
The SANA-II standard defines an Amiga network device driver API. It’s the interface Roadshow (and every historical stack) talks to. Implementing one means:
-
Exposing a
.devicefile loadable fromDEVS:Networks/. -
Implementing the standard SANA-II commands:
CMD_READ,CMD_WRITE,S2_ONLINE,S2_OFFLINE,S2_GETSTATIONADDRESS,S2_CONFIGINTERFACE,S2_DEVICEQUERY, and a handful of others. -
Handling packet queueing, broadcast filtering, MTU control.
-
Reporting statistics.
The companion code/c-examples/sana2-skel/ implements a
"loopback" SANA-II device that:
-
Accepts opens as any real network device would.
-
On
CMD_WRITE(send packet), queues the packet. -
On
CMD_READ(receive packet), returns queued packets written by the same driver. -
Reports itself as an Ethernet-class device with a configurable MAC address.
-
Fully compatible with Roadshow,
AddNetInterface,ShowNetStatus,TCP:.
You install it with:
1> Copy sana2-loop.device DEVS:Networks/loopback.device
[edit DEVS:NetInterfaces/loopback to reference the device]
1> AddNetInterface loopback
And ShowNetStatus shows the interface up. Any TCP connection
made to 127.0.0.1 on the same interface loops back through
your driver.
This is a real, useful driver — kernel-level "hello world" that
you can inspect with SnoopDos, exercise from Shell scripts,
and grow features into.
19.3. The structure of the driver source
The full source is about 500 lines across four files:
code/c-examples/sana2-skel/
  Makefile
  loopback.c          Main library entry points + BeginIO logic
  loopback-io.c       IORequest queue, packet dispatch, ReadPacketType
  loopback-utils.c    Broadcast filtering, buffer allocation
  loopback.h          Shared struct definitions
Key excerpts from loopback.c:
/* The driver's shared state — one instance per Open. */
struct LoopbackUnit {
    struct Unit           unit;             /* Exec Unit header */
    struct SignalSemaphore sem;
    struct MinList        rx_queue;         /* Pending RX packets */
    struct MinList        tx_queue;         /* Pending TX packets */
    struct MinList        tracker_list;     /* SANA-II per-type queues */
    ULONG                 stat_packets_rx;
    ULONG                 stat_packets_tx;
    ULONG                 stat_bytes_rx;
    ULONG                 stat_bytes_tx;
    UBYTE                 station_address[6];
    BOOL                  online;
};

/* Every OpenDevice comes here. */
LONG LibOpen(struct IOSana2Req *ior, ULONG unitnum, ULONG flags)
{
    struct LoopbackBase *lb = (struct LoopbackBase *)LibOpenBase();
    lb->lib_OpenCnt++;

    if (unitnum > 0) {
        ior->ios2_Req.io_Error = IOERR_OPENFAIL;
        ior->ios2_WireError    = S2WERR_UNIT_NOT_FOUND;
        return IOERR_OPENFAIL;
    }

    struct LoopbackUnit *u = &lb->unit[unitnum];

    /* First open? Initialise. */
    if (u->unit.unit_OpenCnt == 0)
        init_unit(u);

    u->unit.unit_OpenCnt++;
    ior->ios2_Req.io_Unit  = &u->unit;
    ior->ios2_Req.io_Error = 0;
    return 0;
}

/* Every DoIO/SendIO comes here. */
void BeginIO(struct IOSana2Req *ior)
{
    struct LoopbackUnit *u = (struct LoopbackUnit *)ior->ios2_Req.io_Unit;

    ior->ios2_Req.io_Error = 0;
    ior->ios2_Req.io_Message.mn_Node.ln_Type = NT_MESSAGE;

    switch (ior->ios2_Req.io_Command) {

    case CMD_READ:                    handle_read(u, ior);           break;
    case CMD_WRITE:                   handle_write(u, ior);          break;
    case S2_BROADCAST:                handle_broadcast(u, ior);      break;
    case S2_MULTICAST:                handle_multicast(u, ior);      break;

    case S2_ONLINE:                   u->online = TRUE;
                                      reply(ior);                    break;
    case S2_OFFLINE:                  u->online = FALSE;
                                      reply(ior);                    break;

    case S2_GETSTATIONADDRESS:
        memcpy(ior->ios2_SrcAddr, u->station_address, 6);
        memcpy(ior->ios2_DstAddr, u->station_address, 6);
        reply(ior);
        break;

    case S2_CONFIGINTERFACE:
        memcpy(u->station_address, ior->ios2_SrcAddr, 6);
        reply(ior);
        break;

    case S2_DEVICEQUERY:              handle_devicequery(u, ior);    break;
    case S2_GETGLOBALSTATS:           handle_getstats(u, ior);       break;

    case S2_READORPHAN:               handle_readorphan(u, ior);     break;

    default:
        ior->ios2_Req.io_Error   = IOERR_NOCMD;
        ior->ios2_WireError      = S2WERR_GENERIC_ERROR;
        reply(ior);
        break;
    }
}

/* Send the reply back to the caller. */
static void reply(struct IOSana2Req *ior)
{
    if (ior->ios2_Req.io_Flags & IOF_QUICK) {
        /* Synchronous — leave IOF_QUICK set; DoIO returns immediately. */
    } else {
        ReplyMsg(&ior->ios2_Req.io_Message);
    }
}
The full source in the companion has the packet-queue
management, the per-type "tracker" registration
(S2_TRACKTYPE / S2_UNTRACKTYPE, so a stack can subscribe to
one Ethernet type without seeing others), the SANA-II
error codes, and the S2_DEVICEQUERY response that reports
"I am an Ethernet device, my MTU is 1500 bytes, my hardware
type is Ethernet II."
19.4. Library boilerplate
Every .device file needs the resident-module boilerplate at
the top of its binary. The pattern:
/* Force the linker to place this at the start of the file. */
LONG jmpstub(void) { return -1; }

struct Resident lib_resident = {
    RTC_MATCHWORD,           /* magic */
    &lib_resident,           /* self */
    &lib_end,                /* end address */
    RTF_AUTOINIT,            /* auto-init flags */
    VERSION,
    NT_DEVICE,
    0,                        /* priority */
    "loopback.device",        /* name */
    "$VER: loopback.device 1.0 (25.7.26)",
    &lib_init_table,          /* init table */
};

ULONG lib_end = 0;

/* Init table — Exec walks this to construct the Library base. */
struct { ULONG size, funcs, init_struct, init_fn; }
    lib_init_table = {
        sizeof(struct LoopbackBase),
        (ULONG)lib_function_table,
        0,
        (ULONG)lib_init,
    };

/* Function table — Exec places these at LVOs. */
ULONG lib_function_table[] = {
    (ULONG)LibOpen,       /* LVO -6  */
    (ULONG)LibClose,      /* LVO -12 */
    (ULONG)LibExpunge,    /* LVO -18 */
    (ULONG)LibExtended,   /* LVO -24 */
    (ULONG)BeginIO,       /* LVO -30 */
    (ULONG)AbortIO,       /* LVO -36 */
    -1,                    /* end marker */
};
This is boilerplate that never varies for a device. The AmigaOS
NDK ships a reference version in NDK:Examples/Devices/; every
new device you write should be a modification of that
template.
19.5. Interrupt-driven devices
For real hardware — a Zorro network card, an audio card — the driver receives interrupts from the hardware and needs to service them promptly. The pattern:
-
Install an interrupt server with
AddIntServer(INTB_EXTER, &my_interrupt);for a Zorro-II interrupt. -
The server function runs in supervisor mode, checks the card’s status registers, and either handles the event immediately (if trivial) or signals the driver’s worker task.
-
The worker task wakes up, drains completed I/O, updates ioreqs, and replies to callers.
Example — the RX interrupt handler for a hypothetical Ethernet card:
ULONG rx_isr(APTR data, APTR is)
{
    struct LoopbackBase *lb = (struct LoopbackBase *)data;

    /* Check hardware: is a packet ready? */
    if ((*card_status_reg & CARD_RX_READY) == 0)
        return 0;

    /* Copy from card DMA buffer to internal ring. */
    struct RxSlot *slot = &lb->rx_ring[lb->rx_head];
    slot->len = *card_length_reg;
    copy_from_card(slot->buf, slot->len);
    lb->rx_head = (lb->rx_head + 1) % RX_RING_SIZE;

    /* Wake worker. */
    Signal(lb->worker_task, lb->rx_sig);

    return 1;  /* Handled */
}
Interrupt code is constrained: no library calls other than a
handful of Exec functions (Signal, PutMsg, Enable,
Disable), no memory allocations, no library-opening. Do the
minimum, signal the worker, get out.
Details are in the RKM Devices volume, chapter on interrupt servers. On modern hardware (Vampire, PiStorm) the interrupt path is often simulated via CPU signals, but the API is the same.
19.6. Testing your driver
-
SnoopDos shows every
OpenDevice/DoIO/SendIO/CloseDevicecall your driver receives, and every I/O request status. -
Scout shows your device on the Devices list with its IORequest queue and the tasks blocked waiting on it.
-
AmiTCP diagnostic tools (
ShowNetStatus,NetStat) exercise the SANA-II interface end-to-end.
Kernel-space debugging without an MMU means "print statements
in the driver" — use KPrintf from the debug library (see the
Debugging chapter) to log to a serial console or a
capture file.
Iterate: drop new driver into DEVS:Networks/, run
AddNetInterface, exercise with Ping, capture logs. Reboot
if it crashes hard; usually you can just re-RemoveDevice()
and reload it in place.
19.7. Where to go from here
-
The SANA-II reference source, an actual Ariadne or X-Surf driver, lives on Aminet under
driver/net/in many cases with source. Study a production driver alongside the companion skeleton. -
The RKM Devices volume covers block-device (
trackdisk.device,scsi.device), serial (serial.device), audio (audio.device), and console (console.device) archetypes. Each is a different API on top of the same base library shape. -
Individual Computers' open-source drivers for their ACA and X-Surf cards on GitHub — https://github.com/individualcomputers — are excellent reference for modern Zorro drivers.
-
PiStorm’s emulated devices in https://github.com/captain-amygdala/pistorm show how a Raspberry-Pi-driven CPU emulator can present Amiga devices as if they were real hardware.
Next: the debugging chapter — every tool you need to figure out what a driver (or an application) is actually doing.
Chapter 20. Scripting: ARexx
ARexx is the Amiga’s automation layer. It is a full programming language, more capable than the Shell, and — crucially — the OS’s standard IPC mechanism for driving GUI applications. Any well-written Amiga app has an ARexx port, and any ARexx script can send commands to any port. This is the same idea as macOS’s AppleScript, DBus on Linux, or COM automation on Windows, and it predates all three.
If you have not met ARexx before: it is a dialect of the Rexx language originally designed by Mike Cowlishaw at IBM in 1979. Bill Hawes ported and extended it for the Amiga in 1987 as a commercial product, and Commodore bundled it starting with AmigaOS 2.0 (1990).[34] It has been in every Amiga install since.
20.1. The 30-second sample
Save to RAM:hello.rexx:
/* Anything on the first line must be a comment */

say 'Hello, ARexx!'

do i = 1 to 3
    say i '*' i '=' i*i
end
Two important quirks:
-
The very first line must be a comment starting with
/*. This is how the ARexx interpreter tells "this is a Rexx script" from "this is a Shell script." If the first line is anything else, the script is refused. -
Every command that looks like a keyword —
say,do,end,if,then,else— is one; anything else is either a variable assignment (x = 42) or a call to the host command environment (see below).
Run it from a Shell:
1> rx RAM:hello
Hello, ARexx!
1 * 1 = 1
2 * 2 = 4
3 * 3 = 9
rx is the ARexx invoker command; it lives in SYS:Rexxc/rx. The
file extension .rexx is conventional but not required — rx foo
runs foo.rexx if foo doesn’t exist.
Before you can run any script, the ARexx interpreter itself has to
be resident. It is started at boot by S:User-Startup:
SYS:System/RexxMast >NIL:If rx reports "ARexx not resident," you need to add or run that
line. It costs about 40 KB of memory.
20.2. The language
Rexx is a small language. The whole reference fits in a slim book.
Assignment with =:
x = 42
name = 'Alice'
list = 'a b c'                /* strings are the universal type */
Everything is a string. Numeric operations happen on demand:
x + 1 treats x as a number if it can. This shape is close
to Tcl or awk. There is no strict typing.
Variables are dynamically typed and lexically case-preserving
but effectively case-insensitive (all references to Foo and
foo refer to the same variable).
Control flow:
if x > 0 then
    say 'positive'
else if x < 0 then
    say 'negative'
else
    say 'zero'

do i = 1 to 10 by 2
    say i
end

do forever
    line = linein('input.txt')
    if line = '' then leave
    say line
end

do while more_to_do
    ...
end

select
    when x = 1 then say 'one'
    when x = 2 then say 'two'
    otherwise say 'many'
end
Functions (called "internal functions") — a return value
becomes the caller’s value:
say 'The answer is:' answer()
exit

answer: procedure
    return 42
procedure isolates local variables — without it, all variables
are global, which is how Rexx originally worked and is occasionally
useful.
Compound variables (associative arrays) use the "stem" syntax with a trailing dot:
user.1 = 'alice'
user.2 = 'bob'
user.0 = 2                    /* by convention, count in .0 */

do i = 1 to user.0
    say user.i
end

/* Sparse / string keys work too. */
count.'total' = 0
count.'files' = 42
Stems are how you pass structured data around; every function that takes a list of things takes a stem.
String manipulation is where Rexx shines. Built-in functions
include substr, length, left, right, pos, word,
words, wordindex, wordpos, translate, strip, space,
copies, abbrev, reverse, upper, lower, and a dozen more.
Combined with implicit type coercion, string processing looks like:
line = 'the quick brown fox'
say words(line)               /* 4 */
say word(line, 3)             /* brown */
say translate(line, 'X', ' ') /* theXquickXbrownXfox */
say reverse(word(line, 2))    /* kciuq */
Parse is Rexx’s built-in string decomposition — a mini regex language optimised for the "split this line into parts" case:
line = 'name=Alice age=30 role=engineer'
parse var line 'name=' name ' ' rest
parse var rest 'age='  age  ' ' rest
parse var rest 'role=' role
say name age role
/* Alice 30 engineer */

parse value date('E') with day '-' month '-' year
parse is worth learning; it replaces most short regexes in Rexx
code.
20.2.1. Built-in function reference (partial)
REXX has a small standard library. The functions you use daily, grouped:
| Function | Behaviour |
|---|---|
|
Length in characters. |
|
Substring from |
|
First / last |
|
Index of first occurrence (1-indexed); 0 if not found. |
|
Character-by-character replace: each |
|
Trim leading ( |
|
Collapse runs of whitespace to exactly |
|
Reverse the string. |
|
Case conversion. |
|
String repeat. |
|
True if |
| Function | Behaviour |
|---|---|
|
Word count. |
|
The |
|
Character index of the |
|
Word index of |
|
Substring starting at word |
|
Delete |
| Function | Behaviour |
|---|---|
|
Standard. |
|
Variadic max/min. |
|
Random integer in range. |
|
Formatted number, with digit widths. |
|
Truncate to |
|
Numeric ↔ single-byte character. |
|
Numeric ↔ hex string. |
| Function | Behaviour |
|---|---|
|
Open a stream. |
|
Close. |
|
Read one line. |
|
Write one line. |
|
Byte-level read / write. |
|
Bytes / lines remaining. |
|
End-of-file indicator. |
| Function | Behaviour |
|---|---|
|
Current host command environment name. |
|
Query system lists ( |
|
Time in various formats (default |
|
Date in various formats ( |
|
System settings — CWD, priority, stack size. |
|
True if file exists. |
|
Read environment variable. |
|
Set a global variable (persists across scripts). |
The full reference is in Bill Hawes’s ARexx User’s Reference
Manual. The .doc file that ships in SYS:Rexxc/ARexx.doc is a
reformatted version of the same material.
20.3. File I/O
ARexx has both a POSIX-shaped and a stream-shaped I/O API. The POSIX one:
call open in, 'RAM:data.txt', 'READ'
do while ~eof(in)
    line = readln(in)
    say line
end
call close in

call open out, 'RAM:out.txt', 'WRITE'
call writeln out, 'hello'
call close out
Or the built-in streams — linein, lineout, charin, charout:
do while lines('RAM:data.txt') > 0
    say linein('RAM:data.txt')
end
call lineout 'RAM:out.txt', 'hello'
lines() returns 0 at end of file.
20.4. The host command environment
ARexx as the system-wide glue between applications:
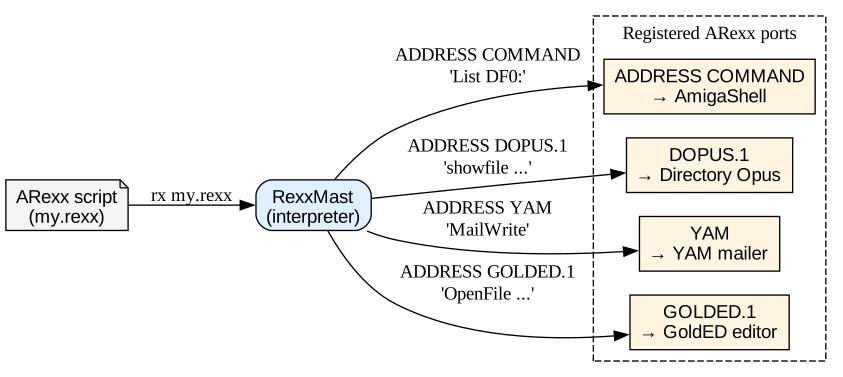
A bare word in ARexx — a token that is neither a keyword nor a
recognised function — is passed to the current host command
environment as a string command. The default environment is
ADDRESS COMMAND, which sends the string to the AmigaDOS Shell.
Which is why:
'List DF0:'
'Copy RAM:foo TO Work:foo QUIET'…just work in an ARexx script — they get executed as Shell
commands, and their return codes come back in the special variable
RC.
The clever part is that any application can install itself as a host command environment. When an ARexx-aware app starts, it opens a named message port. From your script:
address 'DOPUS.1'
'showfile Work:src/main.c'
'wait pattern #?.c'
address 'DOPUS.1' tells the interpreter that subsequent bare-string
commands should be delivered as messages to Directory Opus’s port.
DOpus receives them, executes them (opening the file, waiting on a
pattern), and returns.
This is the game. Applications expose their functionality as ARexx commands, and scripts orchestrate across applications. If you want to build a workflow that opens a file in an editor, saves a picture from a paint program, and emails the result, it is one ARexx script.
Applications typically document their ARexx commands in an
"ARexx port" section of their manual, or a .doc file in their
install directory.
The SHOWLIST 'p' command (in ARexx) or the Rexx command from
the Shell lists all currently open ARexx ports on the system.
call showlist 'p', , '.', 0

/* Or as a one-liner: */
say showlist('p')
20.5. A slightly larger example
Rename every .txt file in the current directory to .md, in one
script:
/* retire-txt.rexx — .txt -> .md in the current directory */

address command
'List #?.txt LFORMAT="%n" >T:txt-list'

call open list, 'T:txt-list', 'READ'
do while ~eof(list)
    name = strip(readln(list))
    if name = '' then iterate
    newname = strip(name, 'T', '.txt') || '.md'
    say 'Rename' name '->' newname
    'Rename' name newname
end
call close list

address command
'Delete T:txt-list QUIET'
Notable techniques:
-
address commandsets the current environment; every quoted string thereafter goes to the Shell. -
List LFORMATprints one name per line into a temp file (no need to shell-pipe on classic Amiga where pipes are more work). -
String concatenation with
||.+would numerically add.
20.6. Cross-application scripts, worked
Two concrete examples that show ARexx doing what it does best — coordinating separate applications.
Example 1: automate an image conversion in Personal Paint.
The script tells the running Personal Paint instance to load a
picture, apply a filter, save the result. Personal Paint exposes
an ARexx port called PPAINT.
/* pp-batch.rexx — process every IFF file in Work:incoming */

options results
address 'PPAINT'

do while lines('T:pplist') > 0
    file = strip(linein('T:pplist'))
    if file = '' then iterate

    'LoadBrush "' || file || '"'
    'Contrast 25'                    /* +25% contrast */
    'Sharpen'
    out = 'Work:out/' || filepart(file, '.iff') || '_HD.iff'
    'SaveBrush "' || out || '" FORMAT IFF'
    say 'Wrote' out
end
exit

/* Trivial filename helper. */
filepart: procedure
    parse arg full '.' ext
    parse var full base '/' tail
    return tail = '' , base , tail
If Personal Paint returns an error, RC is non-zero and
RESULT (thanks to options results) holds the string. Wrap in
if RC ~= 0 then … for robust batch processing.
Example 2: send an email through YAM from a script.
YAM exposes a rich ARexx port. To send a canned message:
/* notify.rexx — send an alert via YAM */

parse arg subject rest
if subject = '' then do
    say 'Usage: rx notify subject body...'
    exit 20
end

address 'YAM'
'MailWrite'
'WriteTo "ops@example.com"'
'WriteSubject "' || subject || '"'
'WriteText'
'WriteLine "' || rest || '"'
'WriteLine ""'
'WriteLine "-- sent from AmigaOS"'
'WriteQueue'
'MailSendAll'
say 'Queued.'
Any ARexx-aware app is scriptable in this same shape. Wordworth, GoldED, Directory Opus, ImageFX, DPaint 5, and dozens more all speak the same protocol. Cross-app scripts — say, "save the image from Personal Paint, insert it into a Wordworth document, send that document as email via YAM" — are two dozen lines.
20.7. Giving your own program an ARexx port
If you write applications for other people to script, exporting an
ARexx port takes one message-port plus a RexxMsg dispatch loop.
The essence:
#include <proto/exec.h>
#include <proto/rexxsyslib.h>
#include <rexx/storage.h>
#include <rexx/rxslib.h>

/* The port name applications can address. */
#define PORT_NAME "MYAPP"

int main(void)
{
    struct Library *RexxSysBase = OpenLibrary("rexxsyslib.library", 0);
    if (!RexxSysBase) return 20;

    struct MsgPort *port = CreatePort(PORT_NAME, 0);
    if (!port) { CloseLibrary(RexxSysBase); return 20; }

    ULONG portSig  = 1UL << port->mp_SigBit;
    ULONG breakSig = SIGBREAKF_CTRL_C;

    for (;;) {
        ULONG got = Wait(portSig | breakSig);
        if (got & breakSig) break;

        struct RexxMsg *rm;
        while ((rm = (struct RexxMsg *)GetMsg(port))) {
            STRPTR command = ARG0(rm);        /* full command line */

            /* Very simple dispatch: */
            if (strcmp(command, "hello") == 0) {
                rm->rm_Result1 = 0;               /* success */
                rm->rm_Result2 = 0;
            } else if (strcmp(command, "quit") == 0) {
                rm->rm_Result1 = 0;
                ReplyMsg((struct Message *)rm);
                goto done;
            } else {
                rm->rm_Result1 = 5;               /* WARN */
                rm->rm_Result2 = 0;
            }
            ReplyMsg((struct Message *)rm);
        }
    }

done:
    DeletePort(port);
    CloseLibrary(RexxSysBase);
    return 0;
}
That is the skeleton. Realistically you would tokenise the command
line with strtok, dispatch to a table of handlers, and use
options results on the script side to return values via
rm→rm_Result2 (which points to a newly-`CreateArgstring’d
result string).
Any ARexx script can now do:
/* my-driver.rexx */
address 'MYAPP'
'hello'
'quit'
Note the caveats: CreatePort with a name registers the port
in the public Exec port list; make sure the name is unique and
capitalised in a distinctive way (MYAPP, not myapp). Two apps
with the same port name is a first-come-first-served collision.
20.8. ARexx as a plugin language
Because ARexx is bundled with every OS install, application authors use it as their extension language. Directory Opus, YAM, GoldED, Wordworth, Personal Paint, DPaint 5, ImageFX and most of the professional-quality apps expose deep functionality through it. If you want to write a custom command for your editor, an ARexx script is the answer, and no compilation is required.
The counterpart is that your own applications should offer an
ARexx port. The RexxSyslib interface is documented in the RKM;
the shape is a message port that receives RexxMsg structures, a
few standard reply codes, and a dispatch loop. Under a hundred
lines of C.
For a modern, cleaner scripting alternative, Hollywood offers a Lua-based multimedia scripting language, and Amiga Python ports exist (Python 2.7 for 68k, Python 3.x on OS 4). Neither has the system-wide reach of ARexx, but for greenfield in-application scripting they are ergonomic options.
| Linux tool | ARexx role |
|---|---|
bash / sh |
Shell — for boot scripts, one-liners, simple flow control |
Python / Ruby |
ARexx — for anything more than 20 lines, and for anything that talks to another program |
DBus / AppleScript |
ARexx’s inter-application messaging is exactly this |
If you install one new package tomorrow, install
Bpsw or RexxPlus — they add extra function libraries to
ARexx (better string handling, math, TCP sockets). And read the
Bugreport and README files in SYS:Rexxc/ to see what your
install ships with.
Next: getting online.
Chapter 21. Networking
The Amiga was designed in 1984, when a TCP/IP stack was a research project. It got its first workable one in 1993, and the API that lineage established is still the one you use today. This chapter covers picking a stack, configuring it, and writing socket code.
The layer cake as it looks on classic AmigaOS 3.x with Roadshow:
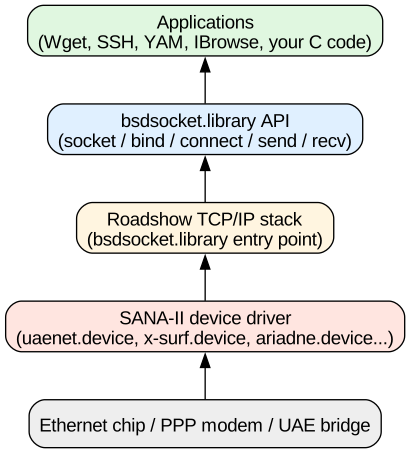
21.1. Stacks, historically and now
Four TCP/IP stacks have mattered on the Amiga:
-
AS225 — Commodore’s own, released as an extra-cost package in 1993; rare now, mostly of historical interest.
-
AmiTCP — the community stack, from Finland, released the same year. It reverse-engineered the AS225 API and became the standard; every application that could talk to a network on Amiga was written to the AmiTCP
bsdsocket.libraryinterface. -
Miami — commercial, from Nordic Global, mid-1990s. Popular because it had a friendly GUI configurator when everything else was config files. Later renamed MiamiDx.
-
Roadshow — the current standard. Written by Olaf Barthel, descended from an AmiTCP-compatible base, actively maintained, ships as the default stack in AmigaOS 3.2 and later. Also available for older OS versions on Aminet.[35]
The API — bsdsocket.library — is stable across all of them, so a
program written for AmiTCP in 1996 links unmodified against Roadshow
in 2026. If you are on OS 3.2, you have Roadshow. If you are on
older Kickstart, install Miami Deluxe (freeware since Nordic Global
folded) or the AmiTCP genesis distribution.
21.1.1. A short history of Amiga networking
The Amiga was never sold as a networked machine. Commodore’s management assumed it was a home computer, and the Zorro slot was much easier to fill with a video-genlock card or a hard-drive controller than an Ethernet card in the late 1980s. The first commercially-available Ethernet cards for the Amiga were the Ameristar A2065 (1990) and the Hydra 5000 (1991) — both Zorro II cards using the National Semiconductor DP8390 chipset, both targeting the small niche of Amiga users on office networks who needed to talk to Novell NetWare servers.
The first real Amiga TCP/IP stack was Commodore’s AS225 Release
1, an extra-cost package released in 1993 that provided
bsdsocket.library, ARP, IP, TCP, UDP, NFS client, and a set of
BSD-derived tools (ftp, telnet, finger). AS225 was slow,
buggy, and priced out of reach of hobbyists (US$150 for the base
package).
The community response was AmiTCP, released by Ari Huttunen
and Tomi Ollila at the Helsinki University of Technology in
1993. AmiTCP re-implemented bsdsocket.library from the BSD source
code and shipped for free. It was better than AS225, quickly
became the standard, and directly inherited the BSD sockets API
that the Amiga stack has followed since.
Miami (1996) and later MiamiDx was a commercial stack from Nordic Global (Holger Kruse) with a friendly GUI setup wizard and support for PPP, SLIP, and — critically — modems. It sold well in the mid- to late-1990s as home internet spread and users needed something easier than editing config files. It is now freeware following Nordic Global’s closure.
Genesis (1999) was a commercial stack from Active Technologies bundled with Amiga Inc’s OS 3.5 and 3.9. It was technically fine but forever lived in the shadow of Miami.
Roadshow — the current standard — is by Olaf Barthel, one of the most productive AmigaOS developers of the last three decades. It descends from an earlier stack called AmiTCP/IP Genesis (not related to the Amiga Inc. "Genesis") and is written to modern coding standards, is actively maintained, integrates with OS 3.2, and supports IPv4-only. IPv6 support is a community project in progress but not standard as of writing.[36] Roadshow ships with Kickstart/Workbench 3.2, and is available as an add-on for older OS versions.
For OS 4 and MorphOS, the stack is part of the OS base install and is a direct descendant of BSD’s own TCP/IP code, ported to those platforms independently.
For AmigaOS 4, the stack ships in the box. For MorphOS the stack is
part of the base install. For AROS, bsdsocket.library is part of
the standard build.
21.2. Configuring Roadshow (OS 3.2 default)
Roadshow’s configuration lives in DEVS:NetInterfaces. Each
interface — Ethernet, PPP, SLIP, a virtual TUN — is a text file
with Name=Value lines. A typical Ethernet interface:
device=uaenet.device
unit=0
requiresinitdelay=no
configure=dhcp
ipaddress=DHCP
Then in S:User-Startup:
C:AddNetInterface DHCPThat is the whole thing. On next boot, you have a DHCP-configured
network. ShowNetStatus (in C:) prints the current state:
1> ShowNetStatus
DHCP           up, MTU 1500
    inet 192.168.1.104 netmask 255.255.255.0 broadcast 192.168.1.255
For a static configuration, replace the configure=dhcp line with
explicit ipaddress, netmask, and add S:NetInterfaces entries
for gateway and DNS. The Roadshow docs, in DOCS:Roadshow/, walk
through every option.
Under FS-UAE, the emulated Ethernet card is uaenet.device (as
shown above); it bridges to the host network, so DHCP just works.
On a real Amiga, replace uaenet.device with x-surf.device,
ariadne.device, or whatever your actual card exposes.
21.3. The basic tools
With a stack up, these commands come from the Roadshow install:
| Command | Purpose |
|---|---|
|
ICMP echo — standard behaviour. |
|
Route probe. Slower than modern implementations; still useful. |
|
DNS lookup. |
|
Interface status. |
|
Active connections, listening ports. |
|
Address-resolution table. |
|
Interactive telnet client. Try |
|
Interactive FTP client. |
|
Download files by URL. Same syntax as GNU wget. |
|
Amiga-specific web clients used by installers. |
For a general-purpose "curl or wget" experience, install wget from Aminet — it is a real port and behaves as you expect.
21.4. SSH
AmigaSSH and OpenSSH port (in SDK: from OS4Depot for OS 4,
Aminet comm/net/ for 68k) are the two current SSH clients. As of
2026 both support modern ciphers (AES-256-CTR, ChaCha20-Poly1305)
and RSA/Ed25519 keys. Copy your keys to SYS:Prefs/Env-Archive/HOME/.ssh/
— the ports honour the standard .ssh/config layout.
The SSH command is a full drop-in for OpenSSH’s ssh client from
the user’s point of view. Scp works the same. Sftp opens an
interactive session; combine with a graphical wrapper like
AmiFTP for a file-manager view.
21.5. HTTPS on classic hardware, briefly
Modern HTTPS uses ciphers and certificate chains that a 7 MHz 68000 was never designed to handle. On a stock A500 emulated at 7 MHz, opening a modern HTTPS site takes tens of seconds and often fails outright on the cipher negotiation. Two ways around this:
-
Turn on the emulator’s CPU cheat — WinUAE and FS-UAE both allow running the CPU at "as fast as possible" while emulating custom chips at real speed. Any 68020+ configuration handles TLS 1.2.
-
Use a proxy on a modern machine that terminates TLS and hands you plain HTTP. Ollierc’s HTTPS proxy (Aminet,
comm/net/) is one option; stunnel on your Mac talking to the emulator is another.
Once you are on 68030+ or an FPGA Vampire, HTTPS is workable albeit slow.
21.6. Programming: sockets
bsdsocket.library is a BSD-shaped API. You will recognise every
function. The only Amiga wrinkle is that you have to open the
library first and use its errno, not a global one.
#include <proto/exec.h>
#include <proto/dos.h>
#include <proto/socket.h>
#include <sys/socket.h>
#include <netinet/in.h>
#include <netdb.h>
#include <string.h>

struct Library *SocketBase;

int main(void)
{
    SocketBase = OpenLibrary("bsdsocket.library", 4);
    if (!SocketBase) {
        Printf("bsdsocket.library not available — is your stack running?\n");
        return 20;
    }

    LONG s = socket(AF_INET, SOCK_STREAM, 0);
    if (s < 0) goto fail;

    struct hostent *he = gethostbyname("example.com");
    if (!he) goto fail;

    struct sockaddr_in addr = {0};
    addr.sin_family = AF_INET;
    addr.sin_port   = htons(80);
    memcpy(&addr.sin_addr, he->h_addr, he->h_length);

    if (connect(s, (struct sockaddr *)&addr, sizeof(addr)) < 0) goto fail;

    const char *req = "GET / HTTP/1.0\r\nHost: example.com\r\n\r\n";
    send(s, req, strlen(req), 0);

    char buf[1024];
    LONG n;
    while ((n = recv(s, buf, sizeof(buf) - 1, 0)) > 0) {
        buf[n] = 0;
        PutStr(buf);
    }

    CloseSocket(s);
    CloseLibrary(SocketBase);
    return 0;

fail:
    Printf("Error %ld\n", (LONG)Errno());
    if (s >= 0) CloseSocket(s);
    CloseLibrary(SocketBase);
    return 10;
}
Two Amiga-specific things:
-
CloseSocket()— notclose(). The library maintains its own socket table and cannot usedos.library’s `Close. -
Errno()— a function call. There is noerrnovariable becausebsdsocket.libraryis per-task-safe.
Otherwise this is BSD sockets. select() works. poll() works.
The build line:
$ m68k-amigaos-gcc -Wall -O2 -noixemul -o tcp-echo tcp-echo.c \
      -lnet
-lnet pulls in the bsdsocket.library inline stubs (name is
compiler-specific; on SAS/C it is -lnetlib).
For a servers, bind/listen/accept work as expected. There
is no fork(), so multi-client servers use either select() in a
loop, or spawn a task per connection with CreateNewProc().
The latter is not fork — the child shares the parent’s memory —
but it does give you a fresh execution context to recv into.
21.7. A minimal TCP echo server
To show the server side of bsdsocket.library, here is a small
one-at-a-time echo server on TCP port 7000.
#include <proto/exec.h>
#include <proto/dos.h>
#include <proto/socket.h>
#include <sys/socket.h>
#include <netinet/in.h>
#include <string.h>

struct Library *SocketBase;

int main(void)
{
    SocketBase = OpenLibrary("bsdsocket.library", 4);
    if (!SocketBase) return 20;

    LONG srv = socket(AF_INET, SOCK_STREAM, 0);
    if (srv < 0) { Printf("socket: %ld\n", (LONG)Errno()); return 10; }

    LONG one = 1;
    setsockopt(srv, SOL_SOCKET, SO_REUSEADDR, &one, sizeof(one));

    struct sockaddr_in addr = {0};
    addr.sin_family = AF_INET;
    addr.sin_port   = htons(7000);
    addr.sin_addr.s_addr = INADDR_ANY;

    if (bind(srv, (struct sockaddr *)&addr, sizeof(addr)) < 0) {
        Printf("bind: %ld\n", (LONG)Errno());
        CloseSocket(srv);
        return 10;
    }

    if (listen(srv, 5) < 0) {
        Printf("listen: %ld\n", (LONG)Errno());
        CloseSocket(srv);
        return 10;
    }

    Printf("Echo server on :7000. Ctrl-C to stop.\n");

    for (;;) {
        struct sockaddr_in peer;
        LONG plen = sizeof(peer);
        LONG cli = accept(srv, (struct sockaddr *)&peer, &plen);
        if (cli < 0) {
            if (SetSignal(0, 0) & SIGBREAKF_CTRL_C) break;
            continue;
        }

        char buf[512];
        LONG n;
        while ((n = recv(cli, buf, sizeof(buf), 0)) > 0) {
            send(cli, buf, n, 0);
        }
        CloseSocket(cli);
    }

    CloseSocket(srv);
    CloseLibrary(SocketBase);
    return 0;
}
Test it from your Mac while the Amiga is running the server:
$ nc <amiga-ip> 7000
hello
hello
^D
The single-client design is intentionally simple — a real server
would either select() across multiple sockets in one process, or
spawn a worker task per accepted connection with
CreateNewProcTags(NP_Entry, worker_fn, …). Both patterns are
straightforward once the socket calls are familiar.
21.8. Cross-mounting recipes: sharing files with the host
Practical setups you will actually use:
| Host side | Amiga side |
|---|---|
Give the FS-UAE config a |
|
Run |
Mount with |
Run |
|
Run |
|
A share on a NAS mounted on the Mac |
Any of the above — the Amiga doesn’t know or care about the underlying protocol |
The "directory hard drive" in the emulator remains the fastest
path for casual work. smbfs is the right answer for real Amiga
hardware on a normal home network — it works with modern macOS
Samba servers and Linux smbd without tweaking.
21.9. NAT, port forwarding, and modern network stacks
Under FS-UAE (or WinUAE with the slirp network setting), the
emulator does user-mode NAT to your host machine. Outbound
connections just work; inbound requires a port-forward in the
emulator’s settings. For a real Amiga on modern networks, use
whatever router configuration you use for any device.
slirp in FS-UAE also intercepts DNS via a built-in resolver, so
you do not have to configure a DNS server on the Amiga side unless
you want to. configure=dhcp grabs the emulator-side settings.
21.10. Filesystem over the network
Two common ways to expose Amiga files to your host and vice versa:
-
Directory hard drive in the emulator — the shared directory appears as a normal Amiga volume. Fastest path. See [Getting Hands-On].
-
SMB via smbfs —
smbfsfrom Aminet (comm/net/) is a filesystem handler that mounts an SMB share as an Amiga volume. Works with modern macOSsmbdand Samba. Modest performance; fine for editing files. -
FTP with AmiFTP or Dopus5’s FTP module — for transferring files between machines.
-
NFS exists (
nfsd.device) but is rare in practice.
For real Amiga hardware, cheap options include a PiStorm or Vampire board with Ethernet, a Zorro II network card, or a serial PPP link to a Raspberry Pi acting as a router.
21.11. Web serving from the Amiga
If you want to actually run a webserver, AWebserver and
HAP are the classic options; more recently Miami’s httpd
and various forks of boa. Traffic is not exactly cloud-scale, but
serving a personal home page from an A1200 is well within reach.
Next: what modern Amiga OSes look like on top of everything we’ve covered.
Chapter 22. Debugging Tools: A Deep Dive
Chapter 9 introduced the debugging landscape. This chapter is the reference: every tool you would install on a serious Amiga development machine, what it catches, how to invoke it, and how to integrate its output into a modern development workflow.
The Amiga has no MMU-based process protection on classic 68k, no
gdb for the kernel, and no built-in stack trace. The tooling
that grew up around this constraint is inventive: every OS entry
point is patchable at runtime, so utilities exist that patch the
whole OS just to see what applications are doing.
22.1. A quick classification
| Category | Tool | What it catches |
|---|---|---|
System-call tracer |
SnoopDos |
Every library / device call |
Wild-pointer detector |
Enforcer |
Reads/writes to page 0, ROM, or unallocated memory (requires MMU on 68030+) |
Wild-pointer detector |
MuForce |
Modern Enforcer replacement |
Wild-pointer detector |
WipeOut |
Alternate, sometimes more accurate than MuForce |
Live task inspector |
Scout |
Tasks, ports, semaphores, interrupts, libraries |
Live task inspector |
X-Oper |
Older, still functional |
Live task inspector |
TaskiX |
Compact alternative |
System info |
SysInfo, ReportPlus, SysCheck |
Hardware and OS state snapshot |
Debug-print router |
Sushi |
Routes |
Debug-print router |
DebugKick |
Legacy serial capture |
Symbolic address lookup |
SegTracker |
Decodes PC values in Enforcer hits back to symbols |
Symbolic address lookup |
ADebug |
Post-mortem exception decoder |
Debugger |
DevPac MonAm |
Symbolic 68k debugger, part of DevPac |
Debugger |
HRTmon |
Cartridge/ROM-based low-level debugger |
Debugger |
WinUAE debugger |
Ctrl-D in the emulator; low-level 68k monitor |
Post-mortem |
Grim Reaper (OS 4) |
Full backtrace and register dump on crash |
Every classic-Amiga developer has SnoopDos + Scout + Enforcer/MuForce
Sushi + SegTracker installed. Modern OS 4 developers use Grim Reaper
plus gdb over serial or IP.
22.2. SnoopDos: the system-call tracer
SnoopDos patches most dos.library and exec.library entry
points to log every call from every task. It is the Amiga’s
strace + ltrace + dtrace in one program.
Install:
1> Copy Aminet:util/moni/SnoopDos.lha RAM:
1> LhA x RAM:SnoopDos.lha RAM:
1> Copy RAM:SnoopDos SYS:System/
Run:
1> SnoopDos
[a window opens with a real-time trace]
A live SnoopDos session on Workbench opening a Shell:
Workbench          FindTask("MYPORT")                       Result: 0x00000000
Workbench          CreatePort("MYPORT", 0)                  Result: 0x004a2b50
Workbench          Open("CON:0/0/640/200/Shell/AUTO/WAIT", MODE_NEWFILE)  Result: 0x001f4c00
Workbench          Read(0x001f4c00, 0x004b0000, 1024)       Result: 0
Workbench          LoadSeg("SYS:System/Shell")              Result: 0x004b1800
Workbench          CreateNewProc([Shell 2])                 Result: 0x004a3000
Shell 2            OpenLibrary("dos.library", 39)           Result: 0x00fc0000
Shell 2            OpenLibrary("intuition.library", 39)     Result: 0x00fc4000
...
You can filter by task name (Show > Filter… > Task = Shell)
and by call type (Show > Options > OpenLibrary only) to reduce
noise.
Configuration lives in tooltypes on the SnoopDos icon; standard
options include KPRINTF=YES (also send output over serial via
kprintf, so Sushi can capture it) and SHOWKICKPATCHES=YES
(also trace calls into ROM libraries).
Use it for:
-
"Why is this app failing to find its library?" — see the
OpenLibrarycall and its result. -
"What file is this app opening?" — every
Open,Read,Write,Close. -
"Which task is holding a semaphore?" — filter for
ObtainSemaphore.
Every serious Amiga developer runs SnoopDos with a filter tuned to their current investigation.
22.3. Enforcer and MuForce: wild-pointer detection
Enforcer requires a 68030 or later with an MMU. It sets up memory-region traps so that:
-
Any read from
$00000000–$000000ff(page zero) — traditionally a symptom of dereferencing a NULL pointer — is caught and logged. -
Any write to Kickstart ROM region is caught.
-
Any access outside your program’s allocated memory blocks (freed memory, un-`AllocMem`ed memory) is caught.
Output goes to serial via kprintf by default; capture with
Sushi.
Sample Enforcer hit:
LONG READ from 0000004C   PC: 001a3f40   USP: 001c6000   SR: 0000
Task: 004a3000 "Shell 2"    Hunk 0000 Offset 00001f40  (my-app+1f40)
D0: 00000000 D1: 00000004 D2: 00000000 D3: 00000010 D4: 00000000 ...
A0: 004b8100 A1: 00000000 A2: 00000000 A3: 004b8000 A4: 004b8100 ...
Stack backtrace: 001a3ff0 001a4020 001a4080
Reading this: at PC $001a3f40, executing a LONG READ from
$4c (a NULL dereference — 4c is 0 + 76, so probably
base + 76 where base was NULL). The offending code is at
my-app+0x1f40 — use SegTracker to convert this to a symbolic
address.
Install Enforcer:
1> Copy Aminet:util/moni/Enforcer.lha RAM:
1> LhA x RAM:Enforcer.lha RAM:
1> RAM:Enforcer > NIL: &
By default it starts as a background daemon that stays running. Anything crashes with a wild pointer, Enforcer logs it.
MuForce is functionally equivalent but often catches things
Enforcer misses (particularly on 68060). WipeOut is an
alternative with a slightly different set of trade-offs. All
three are on Aminet under util/moni/.
22.4. SegTracker: symbol resolution
Enforcer output gives you PC addresses. To turn those into
function+offset symbol names, you need SegTracker.
SegTracker patches LoadSeg and UnLoadSeg to record every
loaded segment’s name and address range. Enforcer output then
includes a "seg name + offset within segment" line.
Install:
1> Copy Aminet:util/moni/SegTracker.lha RAM:
1> LhA x RAM:SegTracker.lha RAM:
1> RAM:SegTracker > NIL: &
Now Enforcer hits look like:
LONG READ from 0000004C   PC: 001a3f40
Hunk 0000 Offset 00001f40  (my-app+1f40 = 'process_request'+0x40)
Which is enough to open the source file, find process_request(),
count 64 bytes into it, and find the bug. This is the closest
classic Amiga gets to a symbolic debugger.
For a full toolchain, build your app with -Wl,-Map=my-app.map
(gcc/vlink linker map output) and cross-reference SegTracker’s
offset against the map.
22.5. Sushi: the debug-print router
Debug output on the Amiga is traditionally emitted via KPrintf
or dprintf (from the debug library) to the serial port. Sushi
captures the serial output and routes it to:
-
A window on the Workbench screen.
-
A file on disk.
-
Another serial port.
-
All three at once.
Install and run:
1> Copy Aminet:util/moni/Sushi.lha RAM:
1> LhA x RAM:Sushi.lha RAM:
1> RAM:Sushi WINDOW=CON:0/0/800/300/Sushi/CLOSE/AUTO/WAIT LOG=T:sushi.log &
Now every KPrintf in every program appears in the window and
gets logged to T:sushi.log. Combined with SnoopDos (with
KPRINTF=YES) and Enforcer, this gives you three complementary
streams: syscalls, memory-touches, and application-level debug
prints, all in one log.
In your own code, kprintf() from <clib/debug_protos.h> is
the standard call:
#include <clib/debug_protos.h>

void doit(int n)
{
    kprintf("doit(%ld) called from task %s\n",
            n, FindTask(NULL)->tc_Node.ln_Name);
    ...
}
The call sends its output via the serial port; Sushi (or a host-side serial capture) picks it up. On modern emulators you enable serial capture in the emulator config; on real hardware you use a null-modem cable.
22.6. Scout: the interactive inspector
Scout is a MUI application that shows you the OS’s live state: tasks, ports, semaphores, interrupts, libraries, devices, memory regions, timers, resources. Refresh rate is configurable (1 Hz to 10 Hz).
Install (needs MUI):
1> Copy Aminet:util/moni/Scout.lha RAM:
1> LhA x RAM:Scout.lha RAM:
1> Copy RAM:Scout SYS:System/
1> SYS:System/Scout
Tabs (or list-view rows in older versions):
-
Tasks — every task with priority, state, stack usage, signal mask. Right-click for
Break,TaskPri,Freeze. -
Ports — every named message port with its owner and message queue depth.
-
Semaphores — every signal semaphore with owner + queue.
-
Interrupts — every installed interrupt server.
-
Libraries — every open library with refcount and version.
-
Devices — every open device with unit list.
-
Memory — free/used chip and fast, plus allocation fragments.
-
Assigns — everything Assign shows plus per-assign volume and refcount.
-
Screens — every Intuition screen.
-
Windows — every Intuition window with position, size, gadgets.
Scout is the Amiga’s Activity Monitor / htop / Task Manager. If you leave one thing running while you work, this is it.
22.7. The WinUAE debugger
If you develop under UAE, the emulator has a built-in
low-level debugger accessible with Ctrl-D (or via the config
menu). Features:
-
Real-time 68k disassembly at the current PC.
-
Memory dump / edit / search.
-
Breakpoints (address, memory-access, exception).
-
Single-step (T for trace).
-
Watchpoints.
-
Full CPU register display.
Not source-level; but as an emulator-attached low-level debugger, it complements source-level tooling well.
Type ? at the debugger prompt for the full command reference,
or see the WinUAE debugger documentation at
https://www.winuae.net/.
22.8. gdb on AmigaOS 4
AmigaOS 4 has real symbolic gdb. Native (on the target
machine) or remote via serial or IP:
(target) # gdb serverstub --tcp=1234 my-app
(host)   $ ppc-amigaos-gdb my-app
(gdb)    target remote 192.168.1.42:1234
(gdb)    b main
(gdb)    run
Full source-level debugging: breakpoints, backtraces, variable inspection, all of it. If you develop for OS 4, this is the toolkit.
22.9. The Grim Reaper
On OS 4 crashes, the Grim Reaper requester appears (chapter 13). Options in the requester:
-
Continue — resume the crashed task at the fault (rarely useful).
-
Restart — restart the task from its entry point.
-
Cancel — kill the crashed task and let the rest of the system continue.
-
View more info — expand to a full register dump, disassembly, and stack backtrace with symbols.
The Reaper’s default action is Cancel; the fault is logged to
SYS:Utilities/Fault.log for later analysis. Grim Reaper is
the single feature of OS 4 that most changes the day-to-day
development experience relative to classic Amiga.
22.10. Recipes
"My program crashes on start" — Run Enforcer + SegTracker
+ Sushi. Launch. Watch the log. If the crash is a wild
pointer, Enforcer catches it. If the crash is a Guru
Meditation with no Enforcer output, the fault is probably
inside a supervisor-mode routine (an interrupt handler) that
Enforcer can’t guard. Try MuForce, which handles some
supervisor-mode faults.
"My program leaks memory" — SnoopDos with a filter for
AllocMem, AllocVec, FreeMem, FreeVec. Compare counts
before and after suspected leak.
"Program X hangs the whole system" — Scout on another
machine (or under emulation): does X have a task stuck in
Wait()? Which semaphore? Who owns it? Usually the culprit
is a Forbid() that was never `Permit()’d.
"Where is time going?" — Not straightforward on classic
Amiga (no perf), but Scout’s task-CPU-usage column is a
reasonable start. For real profiling, SnoopDos with
timestamps, or run your program under AProfiler (Aminet
dev/misc/).
"Kernel driver debugging" — kprintf liberally, capture
with Sushi, tail the log while exercising the driver from a
Shell script.
22.11. References
-
Amiga ROM Kernel Reference Manual: Libraries, chapter on
debug.library. -
Michael Sinz, Enforcer Documentation, on Aminet as part of the Enforcer distribution.
-
Jörg von Frantzius, Sushi Documentation, on Aminet.
-
Sam Jordan, Scout Documentation, on Aminet.
-
Grim Reaper technical reference, in Hyperion’s OS 4 SDK.
-
The English Amiga Board debugging sub-forum for current practice: https://eab.abime.net/.
Next: the culture side of the platform, starting with audio and tracker music, which is where the Amiga’s uniqueness in 1988 was most visible.
Chapter 23. Early Development Tools
This chapter is a historical tour of how you actually built software for the Amiga between 1985 and about 1995 — the compilers, assemblers, monitors, ROM debuggers, and cross- development workflows that produced everything from AmigaBASIC apps to Kickstart itself. Most of the tools mentioned here still work. Some are still shipped. Understanding them is useful for reading old Aminet source, for maintaining a real '90s codebase, and for the same reason you would read about K&R C — this is the substrate on which the whole platform was built.
The primary sources for this chapter are Ralph Babel’s Amiga Guru Book, the Kickstart 1.3-through-3.1 developer documentation, and Bill Hawes' original developer notes for various commercial tools; secondary sources include Jimmy Maher’s The Future Was Here and the extensive Aminet archives of vintage compiler distributions.[37]
23.1. How the Amiga was originally built
Kickstart 1.0 was cross-compiled on Sun-3 workstations running SunOS, using a modified Amiga cross-C compiler by Wilson Vega and Andy Finkel at Amiga Corporation. The kernel was written mostly in 68000 assembly with C for higher- level parts (the DOS packet layer was BCPL, from MetaComCo, as covered in chapter 2). The build product was a set of Motorola S-record files (see below) sent to an EPROM programmer to burn the physical Kickstart chips.
The Amiga’s ability to self-host its own build came later, with Lattice C in 1986 and AztecC shortly after. By the time Kickstart 2.0 was being developed in 1989–1990 the engineering team at Commodore-West Chester ran their builds on A3000 development boards using in-house tools.
This is why the developer distribution has always been well-
partitioned into pieces that make sense as a cross-development
target: the include files, the autodoc reference, the linker
libraries (amiga.lib, debug.lib) all treat the Amiga as
something you might be building for from a different machine.
The RKM series was consciously written to support both
self-hosted and cross-development.
23.2. Motorola S-records
An S-record file is Motorola’s ASCII format for representing an executable or a memory image. Every line is:
S<type><length><address><data...><checksum>Each field is ASCII hex. Types:
| Type | Purpose | Length of address |
|---|---|---|
|
Header record (metadata, filename, comment) |
2 bytes (4 hex chars) |
|
Data record with 16-bit address |
2 bytes |
|
Data record with 24-bit address |
3 bytes |
|
Data record with 32-bit address |
4 bytes |
|
Count of preceding data records |
2 bytes |
|
Count of preceding data records (24-bit count) |
3 bytes |
|
End record with 32-bit start address |
4 bytes |
|
End record with 24-bit start address |
3 bytes |
|
End record with 16-bit start address |
2 bytes |
An example — the smallest useful S1 file, which writes six
bytes to address $001000 and specifies the start address as
$001000:
S00600004844521B
S1131000010203040506078E
S9030000FCDecoding the middle line:
-
S1— data record with 16-bit address. -
13— total record length in bytes (0x13= 19 bytes following the byte count). -
1000— starting address$1000. -
010203040506— six data bytes. -
Then a run of
07bytes (padding to length). -
8E— one’s-complement checksum of the length+address+data.
You process S-records with any modern SREC toolchain (GNU
objcopy -O srec, srec_cat from the SRecord package, Motorola
m68k-elf-objcopy). The Amiga developer distribution
historically shipped AsmOne, DevPac, SAS/C, and other
tools that produced S-records for direct programming into
EPROMs.
The reason to know about S-records in 2026:
-
If you build a modern Kickstart replacement — say, AROS m68k or an experimental ROM patch — the output is a binary image you flash to a ROM chip. Most ROM programmers accept either raw binary or S-records; the S-record format is often the safer choice for verification because it includes addressing and a checksum per line.
-
Community-supplied Kickstart patchers (
RelokKick,SoftKick,KickIt) that load a Kickstart image into RAM and boot from it accept both raw ROM binaries and S-record files. -
If you build custom expansion-card firmware — a small autoconfig ROM for a home-brew Zorro card, for example — the toolchain output is almost universally S-records.
A trivial converter, in one line of shell (with an m68k cross-toolchain installed):
$ m68k-elf-objcopy -O srec my-firmware.elf my-firmware.srecReading S-records back on the host:
$ srec_cat my-firmware.srec -o my-firmware.bin -binarysrec_cat from the srecord package
(http://srecord.sourceforge.net/) is the tool for anything
non-trivial — merging, offsetting, checksumming, extracting.
23.3. RomWack: the ROM debugger
RomWack is a low-level ROM debugger that lives in every Kickstart from 1.x onwards. It runs at the very bottom of the OS stack and lets you inspect memory, disassemble, set breakpoints, and step 68000 code from a serial terminal — while the machine is in an otherwise broken state. It is the tool that Commodore’s engineers used to develop Kickstart itself.
You enter RomWack from a serial terminal (9600 8N1) connected to the Amiga’s serial port, by pressing space three times during the very early boot process (before the ROM checksum completes). Once in, the prompt is:
Amiga ROM Wack
>Commands are short — one or two letters — and take hex arguments. The essentials:
| Command | Purpose |
|---|---|
|
Help |
|
Show CPU registers (D0-D7, A0-A7, PC, SR) |
|
Dump |
|
Assemble at |
|
Unassemble (disassemble) |
|
Set breakpoint at |
|
Clear breakpoint at |
|
Go — execute from |
|
Trace one instruction |
|
Write |
|
Fill n bytes with val |
|
Set PC to |
|
Quit (returns to boot process) |
RomWack is not sophisticated — no symbolic debugging, no watchpoints, no source-level anything. But it is always present, requires no additional hardware beyond a serial cable, and works on a machine that is otherwise unbootable. It is the Amiga’s kernel debugger of last resort. Modern developers use it mostly for diagnosing Kickstart problems on custom ROM builds and for recovering FPGA machines that boot but don’t respond to keyboard input.
The RomWack source code is available in the AROS repository (https://github.com/aros-development-team/AROS) as part of the kickstart-boot code, and community documentation lives on the English Amiga Board wiki. The 68000 Amiga assembler in the 1980s that Commodore-CATS distributed to developers included a RomWack cheat sheet as its inside back cover.
23.4. Historical assemblers
Before you write a line of C on the Amiga, you write assembler. Every serious 1980s Amiga developer had at least one of these.
23.4.1. SEKA (1986)
SEKA was the first widely-used Amiga assembler, a shareware
release by Kuma Software (later Fred Fish Disks). Simple text
editor plus assembler in one program; produced .o object
files that a separate linker (SEKA’s own BLink predecessor)
joined. Feature set:
-
Full 68000 instruction set.
-
Macros with parameter substitution.
-
Conditional assembly.
-
Include files.
-
No relocation — the assembled output was position- specific.
SEKA is now completely obsolete — every replacement is
better — but almost every Aminet-hosted 68k assembly source
file from before 1989 is written in SEKA syntax and needs
minor tweaks (mostly directive rename: DC.W for
.dc.w, SECTION for .section) to build with modern
assemblers.
23.4.2. DevPac (1987–1994)
Devpac was HiSoft’s commercial-quality assembler. Three programs:
-
GenAm — the assembler proper, with a full ANSI-standard Motorola syntax, macros, structures, relocation, and output as either object files or executable Hunk files.
-
ED — a full-screen text editor tuned for assembly (labels highlighted, register-syntax colouring, tab stops at Motorola column positions).
-
Debugger (MonAm) — a symbolic debugger with breakpoints, single-step, memory-inspect, register-view.
Devpac 3 (1993) is what most Amiga assembly programmers used in the last commercial years of the platform. Fast, robust, and the assembler that produced most Aminet source you would still assemble today.
Devpac was released as freeware by HiSoft in the mid-2000s and
is on Aminet at dev/asm/devpac3.lha.
23.4.3. AsmOne / AsmPro (1990s)
AsmOne was a Rainbow Arts assembler that shipped as an integrated development environment: a full-screen editor, an assembler, and a debugger, all in one program with a common UI. Popular among game and demo developers because you could edit, assemble, debug, and go back to edit in seconds without touching the CLI.
AsmPro was the third-party continuation of AsmOne after Rainbow Arts stopped supporting it. AsmPro is still actively maintained by the community and is on Aminet.
23.4.4. vasm and vlink (2000s–present)
vasm is Volker Barthelmann’s cross-platform assembler, targeting 68k (and many other architectures). It is the modern default: builds on macOS, Linux, and Windows; produces Hunk or ELF output; understands multiple syntaxes (Motorola, Devpac, AsmOne). vlink is the companion linker.
vasm plus vlink is what a modern 68k Amiga assembly programmer
uses. It builds Aminet-era source unmodified in most cases and
integrates cleanly with a modern build system (make,
CMake, GitHub Actions).[38]
23.5. Historical C compilers
23.5.1. Lattice C (1986)
The first commercial C compiler on the Amiga. Lattice C
version 3.10, released in 1986, was ported from the MS-DOS
version. It shipped with a K&R front-end (no ANSI yet), a
Motorola-standard code generator, and the amiga.lib shim
library. Lattice C is what a lot of Amiga applications were
built with in the late 1980s: Deluxe Paint, various early
compilers, the original Aminet applications.
Lattice was acquired by SAS Institute Inc. in 1989. The compiler was renamed SAS/C starting with version 5.0.
23.5.2. SAS/C (1989–2007)
SAS/C was, throughout the classic-Amiga era, the professional C compiler of choice. Continuous updates from 5.0 through 6.58 (the last commercial release, 1994) plus the 6.58-Init patch release in 2007 when SAS made the compiler freeware. Features that made it good:
-
Full ANSI C compliance with useful extensions.
-
Aggressive optimiser (loop unrolling, register allocation, common-subexpression elimination) that produced code competitive with hand-written assembly for many workloads.
-
Comprehensive
#pragmadirectives for Amiga-specific things (library base pointers, register argument conventions, tag list handling). -
An IDE (CManager) that made the standard edit-compile- debug cycle painless.
-
Excellent debugger with source-level breakpoints, watchpoints, and expression evaluation.
-
Support for all Amiga library conventions natively.
SAS/C 6.58 is on Aminet at dev/c/sc658-init.lha. Install it
on a real or emulated 68k Amiga; it Just Works. Modern C99
features are absent (SAS/C predates C99), but the compiler
is otherwise entirely capable of building Aminet-era code.
23.5.3. Aztec C (1986–1993)
Aztec C (Manx Software) was the SAS/C competitor. Similar capability, similar user base. Manx went out of business in the mid-1990s and the compiler was never released as freeware, so Aztec C is a historical curiosity but not really used today.
23.5.4. DICE (Dillon’s Integrated C Environment)
DICE was Matthew Dillon’s freely-distributed C
compiler, released around 1990. Similar quality to Lattice/SAS
but always free. DICE is on Aminet at dev/c/dice.lha and is
particularly popular for small Amiga projects because it is
lightweight, produces small binaries, and has minimal
external-library dependencies.
23.5.5. GCC and the modern era
Modern Amiga C development uses:
-
vbcc — Volker Barthelmann’s C compiler. Portable retargetable compiler; native and cross variants; produces both 68k and PowerPC output. On Aminet and at http://sun.hasenbraten.de/vbcc/.
-
bebbo’s GCC — a GCC 6.5-based cross-compiler for 68k AmigaOS. Cross-hosted on Linux and macOS. See chapter 9 for setup.
-
Native GCC on Amiga — GCC 2.95 and 3.4 have been ported to native 68k Amiga; slow but functional.
-
GCC on AmigaOS 4 — Hyperion’s OS 4 SDK ships GCC 8+.
-
clang / LLVM on AmigaOS 4 — community-maintained port.
For new development in 2026, use vbcc (native or cross) or bebbo’s GCC (cross). See chapter 9 for the practicalities.
23.6. AmigaBASIC and AMOS
Not all Amiga programming was in C or assembler.
23.6.1. AmigaBASIC (1985–1990)
AmigaBASIC was Microsoft’s BASIC dialect, bundled with early Workbench releases (1.1 through 1.3.2). It included graphics primitives that talked to the custom chipset, sprite handling, and a MOD-style sound library. AmigaBASIC was buggy — Microsoft was ambivalent about the Amiga after the port was contracted — and Commodore dropped it from Workbench 2.0 onwards.
If you have a 1988-era A500 with Workbench 1.3, AmigaBASIC is on the Extras disk. It runs poorly on Kickstart 2.0+ and needs manual patching to run on Kickstart 3.x. Historical interest only.
23.6.2. AMOS (1990–1995)
AMOS (AMOS Professional and AMOS BASIC) was François Lionet’s BASIC dialect specifically for the Amiga, sold by Mandarin Software (later Europress). AMOS became enormously popular for game development in Europe in the early 1990s: rich sprite and music primitives, hardware-accelerated blit routines, a small built-in compiler that turned AMOS BASIC into machine code at reasonable speed.
AMOS games shipped commercially (Miami Chase, Ork,
Fungus, plus thousands of shareware and PD titles). The
language is still fondly remembered as the Amiga’s answer to
Basic-with-training-wheels. AMOS Professional was released as
freeware in the 2010s and is on Aminet at
dev/amos/amosPro200.lha.
23.6.3. Blitz Basic and AmiBlitz
Blitz Basic 2 (Acid Software, 1994) was AMOS’s serious competitor: compiled BASIC with a much more Amiga-native programming model, closer to actual C-with-BASIC-syntax than to interpreted BASIC. Blitz was widely used for commercial games (Skidmarks, Payback, dozens of others).
Blitz Basic went dormant in the 2000s but was revived as
AmiBlitz — an actively-maintained open-source fork with
support for modern OS 3.2, better libraries, and integration
with modern debuggers. AmiBlitz is on Aminet at
dev/basic/amiblitz3.lha and is the current answer for
"I want to write a game or a demo and I don’t want to hand-
code 68k assembly."
23.7. Hollywood and modern scripting
Hollywood (Airsoft Softwair, 2003–present) is a Lua-flavoured multimedia scripting language that runs on every current Amiga OS (68k, OS 4, MorphOS, AROS) and on non-Amiga hosts (macOS, Linux, Windows). Popular for prototyping cross-platform multimedia applications because the same Hollywood source builds executables for every target platform.
Hollywood is commercial (~€100 for a licence) with a limited- functionality demo. If you want to build something that works on your Mac, your Amiga, and your Windows machine from one codebase, Hollywood is the current best answer.
23.8. Cross-development workflows
The classic Amiga workflow of "sit at the Amiga and edit / compile / test" is fine for anything under ~1 MB of source. Beyond that, the compile cycle on real 68k hardware is slow enough that a cross-development workflow saves real time.
The modern cross-development stack:
-
Source under version control on your host machine (Mac, Linux, Windows). Any modern SCM works: git, hg, fossil.
-
Cross-compile with bebbo’s GCC or vbcc. Both produce Hunk-format Amiga binaries directly.
-
Deploy to the Amiga via a shared directory. Under FS-UAE, a directory-HDF makes your build output appear as a volume the moment
makefinishes. On real hardware, a shared SMB folder or SFTP push serves the same purpose. -
Run on the Amiga. Under FS-UAE you can snapshot the emulator state before each test, so a bad crash is a single-keystroke recovery.
-
Debug. Under UAE the built-in debugger (Ctrl-D) does low-level 68k inspection; on OS 4 hardware,
gdbover serial or IP debugger works.
A workflow diagram, per the code companion:

The companion code/ directory implements exactly this workflow.
tools/build-and-deploy.sh builds and deploys in one command:
$ ./tools/build-and-deploy.sh ~/AmigaShared/bin
[builds]
Deployed to /Users/chris/AmigaShared/bin
Inside the Amiga you can now run e.g.:
1> Work:bin/hello23.9. Programming for the ROM
If you write a Kickstart module, an autoconfig-card ROM, or a resident-command block, the tooling is:
-
Write in 68k assembly (vasm), or C compiled with position-independent code enabled (rare for non-ROM code).
-
Link with a linker script that places the code at the target ROM address (e.g.,
$F80000for a Kickstart module). -
Set up the ROM header — 8-byte signature (
0x11114ef9), reset vector, checksum, version, module list. -
Convert the linked binary to S-records with
srec_catorobjcopy, and burn to an EPROM (physical hardware) or save as a.romfile (emulator).
The RKM Devices volume, chapter "Devices" and the "Building Custom Amiga OS Modules" appendix, covers this in detail. If you are building a modern ROM module, the AROS m68k build system is a good reference: it uses vasm, vlink, and a custom linker script to produce a bit-identical Kickstart replacement.
Modern flash-programmer hardware (MiniPro TL866, Fluxatek GQ-4X) accepts either raw binary or S-records and can program the standard EPROMs the Amiga uses (27C010, 27C020, 27C400). The DIP32 sockets in classic Amigas fit them directly.
23.10. The relevance of all this in 2026
If your goal is "write and ship a modern Amiga application," you use vbcc or bebbo GCC and this chapter is history. But:
-
If you build an FPGA Amiga (chapter 3), you may find yourself producing a custom ROM image that needs S-record output.
-
If you contribute to AROS, the build produces ROMs and boot loaders with the same tools discussed here.
-
If you rescue a broken Amiga, RomWack over a serial cable is genuinely useful.
-
If you read Aminet source from 1990, you will meet SEKA, Devpac, and SAS/C syntax on your first day.
-
If you write Amiga demos or games, AmiBlitz and vasm are active projects with modern documentation and lively communities.
Understanding the tools the Amiga was built with is not just historical — it is practical background for anyone who wants to understand why the modern development stack is shaped the way it is.
23.11. References
-
Ralph Babel, The Amiga Guru Book (Ralph Babel, 1993). ISBN 3-89468-063-6. Comprehensive OS-programming reference including detailed coverage of resident modules, Hunk file format, and ROM building.
-
Amiga ROM Kernel Reference Manual: Devices (Addison-Wesley, 1991). Chapter on device design has the best treatment of autoconfig ROM programming.
-
Motorola S-Record Format Specification, Motorola Semiconductor Products, order code AN-970/D. The canonical S-record reference.
-
SRecord package documentation at http://srecord.sourceforge.net/.
-
SAS/C 6.58 documentation and includes at https://aminet.net/dev/c/sc658-init.lha and following files.
-
vbcc documentation at http://sun.hasenbraten.de/vbcc/.
-
vasm / vlink documentation at http://sun.hasenbraten.de/vasm/.
-
AmiBlitz project on GitHub, https://github.com/AmiBlitz.
-
AROS m68k build documentation at https://github.com/aros-development-team/AROS/wiki.
-
English Amiga Board development sub-forum, https://eab.abime.net/. Active discussion of vasm, vbcc, bebbo GCC, and modern retro-development workflows.
-
Big Book of Amiga Hardware, https://amiga.resource.cx/. Includes historical developer-tool inventories.
Chapter 24. 68k Assembly Programming
|
Platform: Classic 68k Amiga only. Very little of this applies to PowerPC AmigaOne (which uses PowerPC assembly, a completely different instruction set).
Everything in this chapter is 68k assembly. If you want to program the PowerPC AmigaOne, X5000, or Tabor in assembler you want a PowerPC ISA reference — not this chapter. The 68k concepts (library calls, calling convention shape, chipset-direct programming) transfer intellectually, but the mnemonics and register layouts do not. |
The book has stayed in C so far because C is where most Amiga development actually happens. But there are three good reasons to learn 68k assembler:
-
Reading old code. Every Aminet package from before 1994 has hand-written assembly somewhere in it. Every Copper trick in every classic demo is assembler. Every optimised inner loop in a shipped 1990s game is assembler.
-
Chipset-direct programming. When you want to touch the custom chip registers without
graphics.libraryin the way — a raw Copper list, direct Blitter kick, Paula audio withoutaudio.device— assembler is the natural language. -
Understanding the platform. Amiga library calling conventions, the LVO mechanism, and the Hunk executable format all become obvious in assembler in a way they do not in C.
This chapter is a working programmer’s introduction. It assumes you have written some assembly before (any ISA is fine — x86, ARM, 6502, whatever) and are comfortable with the basic model of registers, addressing modes, and stacks.
24.1. The toolchain
The modern 68k assembler is vasm by Volker Barthelmann and Frank Wille, paired with vlink for linking. Both are cross-platform: they run on macOS, Linux, and Windows and produce Amiga Hunk-format executables.
If you followed chapter 3, you already have bebbo’s amiga-gcc which includes an internal assembler. But for hand-written assembly the canonical tool is vasm — its syntax matches the Motorola standard that every 1990s Amiga assembler used, so old source builds unchanged.
Install:
$ brew install vasm vlink # macOS
$ apt install vasm-m68k # Debian/Ubuntu (in some distros)Or build from source:
$ git clone https://github.com/vasm/vasm.git
$ cd vasm && make CPU=m68k SYNTAX=mot
$ sudo cp vasmm68k_mot /usr/local/bin/vasm
$ git clone https://github.com/frankwille/vlink.git
$ cd vlink && make
$ sudo cp vlink /usr/local/bin/You will also need the Amiga NDK — Native Developer Kit —
which supplies the .i include files with all the LVO
constants, library base offsets, and struct definitions. The
NDK 3.9 archive is on Aminet at dev/misc/NDK_3.9.lha; the OS
3.2 NDK is a paid purchase from Hyperion. Either works for
classic-68k development.
Once you have vasm, vlink, and the NDK, a typical build is:
$ vasm -Fhunk -m68000 -o hello.o -I ~/NDK_3.9/Include_I hello.s
$ vlink -bamigahunk -Rshort -o hello hello.o ~/NDK_3.9/lib/amiga.libOr with a Makefile — see code/asm-examples/Makefile for a
template that handles every example in the companion directory.
24.2. 68k CPU basics for C programmers
The Motorola 68000 has:
-
Eight data registers
D0–D7, each 32 bits wide. Used for arithmetic, comparisons, bit manipulation. Any data register can be operated on as byte (.b), word (.w), or long (.l) — the suffix on the instruction determines the size. -
Seven address registers
A0–A6, each 32 bits wide, plusA7which is the stack pointer (aliased toSP). Address registers hold pointers; you use them for indirect addressing modes. -
Program counter
PC, and a 16-bit status registerSRwith condition-code bits (N, Z, V, C, X), an interrupt mask, and a supervisor-mode flag.
Instructions look like:
move.l #100,d0 ; d0 = 100
add.l #5,d0 ; d0 = d0 + 5
move.l d0,d1 ; d1 = d0
cmp.l #200,d0 ; compare d0 to 200
beq.s somewhere ; branch if equal (short branch)
move.l #buffer,a0 ; a0 = &buffer
move.b #42,(a0)+ ; *a0++ = 42 (byte)
move.w #100,(a0)+ ; *a0++ = 100 (word)
lea label(pc),a0 ; a0 = &label (PC-relative)
jsr subroutine ; call subroutine
rts ; return from subroutineCommon suffixes:
-
.b— byte (8-bit) -
.w— word (16-bit) -
.l— long (32-bit)
Common addressing modes (using D0/A0 as examples):
-
d0— data register direct -
a0— address register direct -
(a0)— memory at address in A0 -
(a0)+— same, then post-increment A0 -
-(a0)— pre-decrement A0, then memory at A0 -
100(a0)— memory at (A0 + 100) -
100(a0,d0.w)— memory at (A0 + 100 + D0 as sign-extended word) -
#value— immediate literal -
label— absolute address -
label(pc)— PC-relative
That is enough to read every Amiga assembly source you will meet. The full instruction set is in Motorola’s M68000 8-/16-/32-Bit Microprocessor User’s Manual.
24.3. The Amiga library calling convention
Every OS library function on the Amiga is called through the same pattern:
-
The library base pointer goes in
A6. -
Function arguments go in specific data and address registers (documented per function in the RKM autodocs).
-
JSRto a negative offset from A6 — the LVO (Library Vector Offset). -
The return value comes back in
D0. -
Any register the function uses is saved and restored by the library — you don’t need to preserve caller-saved state.
Concrete example — calling DisplayBeep(NULL):
move.l IntuitionBase,a6 ; base pointer in a6
move.l #0,a0 ; arg 1 = NULL screen
jsr _LVODisplayBeep(a6) ; jump to base - offset_LVODisplayBeep is a constant defined in
intuition_lib.i from the NDK. It’s -96 in this case. The
JSR resolves to jsr -96(a6), which is exactly what the CPU
executes.
The NDK includes have a _LVOxxx symbol for every library
function on the system. include exec/exec_lib.i gets you all
the exec ones; include intuition/intuition_lib.i gets you
intuition; and so on.
Register-argument mapping per library function is documented in
the RKM autodocs. E.g. for graphics.library’s `Move():
Move(rp, x, y)
A1 D0 D1So to call it in assembler:
move.l GfxBase,a6
move.l rastport,a1
move.l #100,d0
move.l #50,d1
jsr _LVOMove(a6)24.4. Your first assembly program: Hello, World
The smallest complete Amiga assembly program that prints text via
dos.library:
;
; hello.s — Hello World via dos.library.
;
; Assemble:
; vasm -Fhunk -m68000 -o hello.o -I <NDK>/Include_I hello.s
; Link:
; vlink -bamigahunk -Rshort -o hello hello.o <NDK>/lib/amiga.lib
;
include "exec/exec_lib.i"
include "dos/dos_lib.i"
_ExecBase equ 4 ; the classic Amiga: SysBase at absolute 4
section code,code
start:
move.l _ExecBase,a6
lea dosname,a1
moveq #0,d0 ; version 0 = any
jsr _LVOOpenLibrary(a6)
move.l d0,dosbase
beq.s done ; if NULL, give up
move.l d0,a6 ; a6 = DOSBase
lea hello_msg,a0
move.l a0,d1 ; arg 1: pointer to string
jsr _LVOPutStr(a6)
move.l _ExecBase,a6
move.l dosbase,a1
jsr _LVOCloseLibrary(a6)
done:
moveq #0,d0 ; return code
rts
section data,data
dosname: dc.b "dos.library",0
even
hello_msg: dc.b "Hello, Amiga (from 68k assembly)!",10,0
even
dosbase: dc.l 0Points worth explaining:
-
_ExecBase equ 4— every classic Amiga stores the exec library base pointer at absolute address 4. Reading a long from$00000004gives youSysBasewithout needing any bootstrap. -
moveq #0,d0— MOVE Quick, a smaller/faster encoding ofmove.l #0,d0that only works for immediate values -128..127. Ubiquitous in Amiga assembler for setting D0 to small constants. -
jsr _LVOOpenLibrary(a6)— the JSR encoding uses the short signed offset form._LVOOpenLibraryequals-552. -
section code,codeandsection data,data— vasm hunk directives. Code goes in the CODE hunk; data goes in the DATA hunk. WhenLoadSeg()loads this executable, it allocates both hunks in RAM and applies relocations. -
even— align to a word boundary. Required after odd-length strings on the 68000 because the CPU cannot address words at odd addresses.
Build and run:
$ vasm -Fhunk -m68000 -o hello.o -I ~/NDK_3.9/Include_I hello.s
$ vlink -bamigahunk -Rshort -o hello hello.o
$ (copy to Amiga)
1> hello
Hello, Amiga (from 68k assembly)!amiga.lib isn’t needed for this one because we call every
function through the LVO indirect. It becomes necessary when
you use assembler stubs for tag-list functions like
OpenWindowTags (a variadic wrapper).
24.5. Line drawing in assembly
Calling graphics.library’s `Move and Draw to draw a line
on a Workbench window. This example opens a small window and
draws two lines.
include "exec/exec_lib.i"
include "intuition/intuition_lib.i"
include "graphics/graphics_lib.i"
section code,code
start:
move.l _ExecBase,a6
; Open intuition.library
lea intname,a1
moveq #39,d0
jsr _LVOOpenLibrary(a6)
move.l d0,intbase
beq exit
; Open graphics.library
lea gfxname,a1
moveq #39,d0
jsr _LVOOpenLibrary(a6)
move.l d0,gfxbase
beq close_int
; Open a small window
move.l intbase,a6
lea newwin,a0
jsr _LVOOpenWindow(a6)
move.l d0,win
beq close_gfx
; Get the RastPort pointer
move.l win,a0
move.l wd_RPort(a0),rastport
; Set foreground pen to 1
move.l gfxbase,a6
move.l rastport,a1
moveq #1,d0
jsr _LVOSetAPen(a6)
; Move(rp, 20, 20)
move.l rastport,a1
move.l #20,d0
move.l #20,d1
jsr _LVOMove(a6)
; Draw(rp, 200, 100)
move.l rastport,a1
move.l #200,d0
move.l #100,d1
jsr _LVODraw(a6)
...Notice the pattern: for each library call, load the library base into A6, put arguments in the specific registers the function expects, JSR to the LVO. Compare to the C equivalent:
SetAPen(win->RPort, 1);
Move(win->RPort, 20, 20);
Draw(win->RPort, 200, 100);Same three calls; the C compiler generates roughly the same instructions with less typing. The point of writing this by hand is to see the calling convention, not to type it every time.
Full source is in code/asm-examples/line.s.
24.6. Chipset-direct programming: the custom.h layout
Every hardware register on the classic Amiga chipset is at a
fixed offset from $DFF000. In assembly you either hard-code
the addresses:
move.w #$0F00,$DFF180 ; COLOR00 = redOr (better) use the NDK’s hardware/custom.i include file
which defines a Custom struct with each register as a named
offset:
include "hardware/custom.i"
move.l #$DFF000,a5
move.w #$0F00,color00(a5) ; struct-field-style_custom is defined in hardware/custom.i too if you want the
symbol.
Full register list is in the hardware/custom.i include; the
programmer-facing reference is the Amiga Hardware Reference
Manual (chapter 14 covers all the registers systematically).
24.7. Direct Blitter: hand-rolled rectangular copy
graphics.library wraps the Blitter for you. When you want it
raw — for a demo or a game where you know the exact operation
you need — the pattern is:
-
Ensure the Blitter is idle (
WAITBLIT). -
Set
BLTCON0andBLTCON1for the operation. -
Set
BLTAxxx,BLTBxxx,BLTCxxx,BLTDxxxfor source and destination pointers, modulos, first/last word masks, shift amounts. -
Set
BLTSIZE— writing to this register kicks the blit. -
Optionally wait for completion.
include "hardware/custom.i"
include "hardware/blit.i"
lea _custom,a5
; Wait until the Blitter is idle.
waitblit:
btst #14,dmaconr(a5) ; BBUSY bit
bne.s waitblit
; Copy 32×32 pixel region from src to dst.
;
; BLTCON0 = source-A enabled | destination enabled |
; minterm 0xC0 (dest = A)
move.w #$09F0,bltcon0(a5)
move.w #$0000,bltcon1(a5) ; no special flags
move.l src,bltapt(a5) ; source address
move.l dst,bltdpt(a5) ; dest address
move.w #0,bltamod(a5) ; source modulo
move.w #0,bltdmod(a5) ; dest modulo
; BLTSIZE: bits 15..6 = height (32), bits 5..0 = width in words (2)
move.w #(32<<6)|(2),bltsize(a5)Writing to BLTSIZE starts the blit. The CPU can do other
work while the Blitter runs; a subsequent waitblit blocks
until finished.
Full example in code/asm-examples/blitter.s.
24.8. Direct Copper programming
A Copper list is a stream of 16-bit words in chip memory. Each instruction is two words:
-
MOVE:
<value>, <register offset>— writes value to register at ($DFF000+ offset). -
WAIT:
<VP, HP>, <VE, HE>— waits until beam reaches (VP, HP), masked by (VE, HE). -
SKIP: like WAIT but skips the next instruction.
You install the Copper list by writing its address to COP1LC
and then writing to COPJMP1 (any value) to trigger the
jump.
include "hardware/custom.i"
section chipdata,data_c ; must be in chip RAM
copperlist:
dc.w color00,$0F00 ; COLOR00 = red
dc.w $6001,$FFFE ; WAIT scanline 96
dc.w color00,$00F0 ; COLOR00 = green
dc.w $B001,$FFFE ; WAIT scanline 176
dc.w color00,$000F ; COLOR00 = blue
dc.w $FFFF,$FFFE ; end marker
section code,code
install_copper:
lea _custom,a5
lea copperlist,a0
move.l a0,cop1lc(a5)
move.w #0,copjmp1(a5) ; trigger the jumpThe Copper begins executing from copperlist at the next
vertical retrace. Three bands appear: red at the top, green in
the middle, blue at the bottom.
You almost never install a raw Copper list like this on a
running system — you clobber Intuition’s Copper and the
display goes wild. Real code either takes over the machine
entirely (Forbid/Disable, LoadView(NULL)) or uses
graphics.library’s `UCopList mechanism (chapter 10).
Full example in code/asm-examples/copper.s.
24.9. Direct Paula audio
Paula has four DMA-driven audio channels. Playing a sample is:
-
Load sample data into chip memory (Paula DMA needs chip RAM).
-
Write the sample’s address to
AUDxLC(Location, high and low words as a long). -
Write the length in words to
AUDxLEN. -
Write the period (a divider — smaller = higher pitch) to
AUDxPER. -
Write the volume (0..64) to
AUDxVOL. -
Enable the channel’s DMA by setting the corresponding bit in
DMACON.
The channel plays the sample and then either stops or (if the loop-back bit is set) restarts.
include "hardware/custom.i"
include "hardware/dmabits.i"
start:
lea _custom,a5
; Load Paula channel 0 with our sample.
move.l #sample,aud0(a5) ; AUD0LC (aud0 = aud0lc)
move.w #(sample_end-sample)/2,aud0(a5)+aud_len ; AUD0LEN in words
move.w #400,aud0(a5)+aud_per ; AUD0PER
move.w #64,aud0(a5)+aud_vol ; AUD0VOL
; Enable channel 0 DMA.
move.w #DMAF_SETCLR|DMAF_AUD0|DMAF_MASTER,dmacon(a5)
; Wait a few seconds
move.l #500000,d0
delay:
subq.l #1,d0
bne.s delay
; Turn off the audio channel.
move.w #DMAF_AUD0,dmacon(a5)
moveq #0,d0
rts
section chip,data_c ; chip-memory-required section
sample:
; 128-sample sine wave, 8-bit signed, generated at build time
; or from another tool
sample_end:The data_c section directive puts the sample in chip
memory — Paula’s DMA cannot reach fast RAM. If the sample
lives elsewhere, AllocMem with MEMF_CHIP and copy it in.
Full example in code/asm-examples/audio.s.
24.10. HAM mode from assembly
Opening a HAM screen from raw assembly means asking Intuition for the mode, or setting up the chipset yourself. The Intuition route is cleaner:
newscreen:
dc.w 0,0 ; LeftEdge, TopEdge
dc.w 320,256 ; Width, Height
dc.w 6 ; Depth (6 for HAM6)
dc.b 0,1 ; DetailPen, BlockPen
dc.w HAM ; ViewModes = HAM
dc.w CUSTOMSCREEN ; Type
...Then OpenScreen(newscreen) and you have a HAM6 screen. The
pixel encoding is documented in chapter 10.
For raw-chipset HAM, set BPLCON0 bit HAM_BIT and provide 6
bitplanes' worth of DMA fetches. Full example in
code/asm-examples/ham.s.
24.11. Dual playfield
Dual playfield uses BPLCON0’s `DBLPF_BIT and two independent
bitplane sets. The odd bitplanes (1, 3, 5) form playfield 1;
the even ones (2, 4, 6) form playfield 2. Each has its own
scroll offset (BPLCON1 low and high nibbles). Playfield 1 sits
in front; colour 0 of playfield 1 is transparent.
The setup involves:
-
Configuring
BPLCON0for dual playfield. -
Setting up all six bitplane pointers (
BPL1PT..BPL6PT). -
Setting horizontal scroll via
BPL1MOD(playfield 1) andBPL2MOD(playfield 2). -
Adjusting
BPLCON1for per-pixel scroll offsets.
The companion code/asm-examples/playfield.s sets up a
dual-playfield display with two scrolling test patterns.
24.12. Hardware sprites direct
Each of the 8 hardware sprites has a pair of pointer registers
SPRxPT at $DFF120..$DFF13E and, per-line, a two-word
control word encoding the vertical extent, horizontal position,
and pixel data.
Setting sprite 0 to display at (100, 50):
; Sprite data must be in chip memory.
move.l #spritedata,spr0pt(a5) ; sprite 0's data pointer
spritedata:
dc.w $3220,$5A00 ; vstart=50, hstart=100, vstop=90
; 16 lines × 2 words per line = image data
dc.w $03C0,$03C0
dc.w $0FF0,$0FF0
...
dc.w $0000,$0000 ; end marker (both words zero)Colours 17, 18, 19 (palette entries) provide sprite 0’s three displayable colours. Colour 0 in the sprite bitmap is transparent. Same for sprites 2, 4, 6 in their palette groups.
Full example in code/asm-examples/sprite.s.
24.13. Interrupt handlers
Installing a vertical-blank interrupt handler:
move.l _ExecBase,a6
lea myint,a1
moveq #INTB_VERTB,d0 ; interrupt bit 5 (VERTB)
jsr _LVOAddIntServer(a6)
myint:
; Interrupt code runs here. Constraints:
; * Only a handful of Exec functions may be called
; * You must not raise the priority level
; * Return with cleared Z flag to let subsequent servers run
move.b #$ff,my_flag
moveq #0,d0 ; clear Z; other servers run
rts
myint_struct: ; struct Interrupt
dc.l 0,0 ; ln_Succ, ln_Pred
dc.b 2 ; ln_Type = NT_INTERRUPT
dc.b 0 ; ln_Pri
dc.l name ; ln_Name
dc.l 0 ; is_Data
dc.l myint ; is_CodeInterrupt code cannot call any function that might block or
signal a task from the wrong context. The safe list is
Signal, PutMsg, Cause, Disable, Enable. Anything else
is a corruption waiting to happen.
The idiom for anything non-trivial: signal a task and return immediately. The task handles the actual work.
Full example in code/asm-examples/irq-vbl.s.
24.14. Where to go from here
-
Amiga Hardware Reference Manual, 3rd edition — the definitive chipset reference. Every custom register, every timing table. On archive.org.
-
Amiga ROM Kernel Reference Manual: Libraries — the C reference doubles as an assembler reference for library function signatures, since every C function has a register- mapped equivalent.
-
Motorola M68000 User’s Manual — CPU reference.
-
VBCC / vasm documentation — http://sun.hasenbraten.de/vasm/.
-
The AsmOne/AsmPro tutorial series on Aminet (
docs/misc/AsmTutorials.lha) — historical but still-relevant learning material. -
English Amiga Board’s Coder’s Corner — https://eab.abime.net/forumdisplay.php?f=112 — active contemporary 68k asm discussion.
-
The sister project’s boing_ball, plasma, and fractalus examples at https://github.com/chrism/amiga_mcp/tree/main/examples are in C but demonstrate exactly the chipset-direct techniques discussed here at a scale larger than fits in a chapter.
The companion code/asm-examples/ directory has runnable
versions of every example sketched above, each with a Makefile
for vasm + vlink and a per-file comment explaining what it
demonstrates and what to run to see the result.
Part V: Part V: Culture and Media
The reason the Amiga has a working community in 2026: the music, the games, the demos, and the print output.
|
Platform coverage: primarily classic 68k, since the cultural output of the platform predates the PowerPC branches. Modern equivalents on OS 4 / MorphOS / AROS noted where relevant. |
Chapter 25. Audio and Tracker Culture
For a decade the Amiga was the reference platform for sample-based music. Every 1990s dance track was made on one; every teenage bedroom in Europe had a copy of ProTracker; every demo scene compo had a music category that ran on Paula’s four DMA channels. The demoscene and tracker-music communities are the reason the Amiga has a functioning cultural life in 2026.
This chapter covers the hardware (Paula, briefly), the file format (MOD and its descendants), the workflow (ProTracker and its heirs), the modern layer (AHI and the modern trackers), and enough C to make Paula produce sound from a program you write.
25.1. Paula and how sample playback works
Paula (chapter 14) has four DMA audio channels. Each channel independently reads sample data from chip RAM, applies a volume, and produces analogue audio at a programmable period. The channels are hard-wired to the stereo output:
-
Channels 0 and 3 → left.
-
Channels 1 and 2 → right.
Playing a sample means:
-
Load the sample data into chip memory as signed 8-bit values (typically a
.rawor the sample part of an8SVXIFF). -
Write the sample’s address to
AUDxLC(channelxlocation). -
Write the length in words to
AUDxLEN. -
Write the period (a number, roughly
3546895/frequency) toAUDxPER. -
Write the volume (0-64) to
AUDxVOL. -
Enable the channel’s DMA by setting the corresponding bit in
DMACON. -
The channel plays the sample once (or, if you set the loop-back-to-start bit, repeatedly).
An interrupt fires when the sample finishes. Your program either loads the next sample or stops the DMA.
That is the whole model. All the sophistication of a modern tracker (arpeggios, portamento, vibrato, sample offset, volume envelopes) is done in software: the tracker’s interrupt handler updates the channel registers per sample-tick (usually 50 Hz PAL) to produce the desired effect.
25.2. The MOD file format
MOD — Ultimate SoundTracker Module, universally called just "MOD" — is a fixed-header binary containing:
-
Header (20 bytes) — song title (padded to 20 chars).
-
Sample metadata × 31 (30 bytes each) — for each sample: name, length, finetune, volume, loop-start, loop-length.
-
Song length (1 byte) — number of pattern positions.
-
CIAA byte (1 byte) — historically 0x7f; ignored.
-
Pattern-order table (128 bytes) — sequence of pattern numbers to play.
-
Magic (4 bytes) —
"M.K."(or"FLT4","6CHN","8CHN","M!K!","4CHN"for variants). -
Patterns (1024 bytes each) — a pattern is 64 rows of 4 channels × 4 bytes = 1024 bytes. Each channel’s 4 bytes encode a sample number, a period (note pitch), and an effect+parameter.
-
Sample data — the raw 8-bit signed audio, back-to-back.
The 4-channel M.K. format is the classic. 6- and 8-channel
variants (from OctaMED, FastTracker) extend the channels per
row.
Reading a MOD is straightforward:
struct ModFile {
char title[20];
struct {
char name[22];
UWORD length_words; /* sample length in words */
UBYTE finetune;
UBYTE volume; /* 0..64 */
UWORD loop_start_words;
UWORD loop_length_words;
} samples[31];
UBYTE song_length;
UBYTE cia;
UBYTE order[128];
char magic[4];
/* pattern data follows */
};Every value is big-endian.
25.3. The MOD effect table
Each note cell in a pattern is 4 bytes: sample-number-hi
(nibble), period (12 bits), sample-number-lo (nibble),
effect (4 bits), parameter (8 bits). So each note packs:
which sample to trigger, at what pitch, with what modifier
(effect number 0-F, parameter 0x00-0xFF).
Common effects:
| Effect | Meaning |
|---|---|
0 |
Arpeggio: cycle three notes rapidly. |
1 |
Portamento up (slide pitch). |
2 |
Portamento down. |
3 |
Tone portamento (slide to target note). |
4 |
Vibrato. |
7 |
Tremolo. |
9 |
Sample offset (start from given position). |
A |
Volume slide. |
B |
Position jump (change song position). |
C |
Set volume. |
D |
Pattern break (jump to next pattern). |
E |
Extended (16 sub-effects: fine porta, retrigger, etc.). |
F |
Set tempo / BPM. |
A tracker player is essentially a small state machine that walks the pattern data at the current tempo, updates the four channel registers per-tick according to the current row’s effects, and increments the row counter.
The reference is Peter Hanning’s Amiga MOD Format
document, on Aminet at
docs/misc/AmigaModFormat.lha.[39]
25.4. ProTracker
ProTracker was Amiga’s flagship tracker from 1990 to 1993. Four channels, 31 samples, 128-pattern songs. Its keyboard- based note-entry UI became the template every subsequent tracker (FastTracker on PC, SchismTracker cross-platform, Renoise professionally) copied.
The current maintained version — ProTracker 2.3E by Amiga
demoscene developers — runs on OS 3.x and 3.2, and is on
Aminet at mus/edit/PT23e.lha. Its interface has not
substantively changed since 1993 and by common consent should
not.[40]
The workflow:
-
Load or record samples with
Sample Editor(F3). -
Compose patterns note-by-note in
Pattern Editor(F2). -
Sequence patterns in
Song Position List. -
Assemble final mix, export to
.mod.
ProTracker is where thousands of chart-hit trance and Eurodance tracks were composed. If you want to write music for the Amiga, this is where to start.
25.5. OctaMED, Renoise, and modern trackers
OctaMED SoundStudio (RBF Software, later freeware) extended
tracker music to 8+ channels, added MIDI support, richer
effect commands, and multi-timbral samples. Standard MIDI file
import/export. Freeware since the late 2000s; on Aminet at
mus/edit/OctaMEDSSE.lha.
AmiTracker — a modern MorphOS-and-OS-4 tracker with FM synthesis and effects.
Renoise (renoise.com) is the modern professional PC/Mac tracker. Its file format is XML+ZIP but source-compatible with the tracker workflow. Import an OctaMED module → export to Renoise for further mixing → export back to MOD for playback on real Amiga hardware.
25.6. Amiga’s most famous tracker musicians
Without which any coverage of Amiga tracker culture is incomplete:
-
4mat / Matthew Simmonds — composed hundreds of MODs, many appearing in demos and games. Modern https://4mat.bandcamp.com/.
-
Purple Motion / Jonne Valtonen — helped define the Finnish trance-tracker sound.
-
Skaven / Peter Hajba — later ported his style into Remedy Entertainment’s game soundtracks.
-
Necros / Andrew Sega — ProTracker rock and metal.
-
Chris Hülsbeck — commercial games (Turrican) via MOD.
-
Karsten Obarski — author of the original SoundTracker in 1987, the ancestor of every subsequent tracker.
Their catalogues are on ModArchive (https://modarchive.org/), which hosts >150,000 modules with attribution.
25.7. First run: getting sound out of your Amiga in fifteen minutes
Before going deeper, a concrete step-by-step: start with no audio software installed and end up hearing a MOD play. Every subsequent example builds on this base.
Prerequisites: an Amiga (real or emulated), Workbench 3.x booted, an internet connection (or ability to shuttle files from a modern machine). Under FS-UAE, mount a shared directory so you can drop files in from the Mac side; on real hardware, use whatever transfer mechanism you have.
Step 1 — Get a MOD file. ModArchive is the largest
curated source. Any classic 4-channel .mod file works. Good
starter picks:
-
4mat / space_deliria.mod — light and pretty (search on https://modarchive.org/)
-
Purple Motion / Second Reality soundtrack MODs
-
Chris Hülsbeck / Turrican 2 title — MOD conversions of the game soundtrack
Download three or four; save them into a directory called
Work:music/ on your Amiga.
Step 2 — Install a MOD player. The community-standard choices are:
-
HippoPlayer (Aminet
mus/play/HiP240.lha) — the classic MOD player, MUI-based GUI, plays essentially every tracker format. This is probably what you want. -
DeliTracker (Aminet
mus/play/Deli216.lha) — the alternative. Multi-format, plugin architecture, older but still worked. -
PlaySID (Aminet
mus/play/PlaySID.lha) — SID (Commodore 64) music player, unrelated to MOD but handy.
Download HippoPlayer’s .lha archive. On the Amiga, extract:
1> Copy Work:downloads/HiP240.lha RAM:
1> CD RAM:
1> LhA x HiP240.lha
1> Copy Hippo/#? SYS:Tools/ ALL CLONEStep 3 — Play a MOD. From the Shell:
1> SYS:Tools/Hippo Work:music/space_deliria.modThe Hippo window appears; music starts. That’s it — your Amiga is now a music machine. On a stock A500 the sound comes out of Paula (chapter 14) at 8-bit, 22 kHz effective sample rate; on a modern Amiga with an AHI-configured sound card at 44.1 kHz stereo it sounds much better.
Step 4 — Play a MOD from your own program. Take the
companion code/c-examples/portable/mod-play.c — it uses
ptplayer.library to decode any 4-channel MOD.
Install ptplayer.library first (Aminet
mus/play/ptplayer.lha):
1> Copy Work:downloads/ptplayer.lha RAM:
1> LhA x RAM:ptplayer.lha
1> Copy RAM:ptplayer/Libs/ptplayer.library LIBS:Build and run mod-play on your Amiga (or cross-compile from your Mac and copy the binary over):
$ m68k-amigaos-gcc -Wall -O2 -noixemul -o mod-play mod-play.c
$ (copy mod-play to your Amiga)
1> mod-play Work:music/space_deliria.mod
Playing Work:music/space_deliria.mod. Press Ctrl-C to stop.
[music plays]
^CUnder FS-UAE or WinUAE, verify your emulator’s audio is enabled (Audio > Sound > Emulation: full). On real hardware, plug an audio cable into the Amiga’s stereo RCA jacks.
Step 5 — Modern audio via AHI. If your setup has AHI
configured (chapter 8; AHI ships with OS 4 and MorphOS; on
classic 68k install mus/misc/ahiusr40.lha from Aminet):
1> audio-ahi
Playing 1 second of 440 Hz stereo through AHI...
Done.That’s the companion code/c-examples/portable/audio-ahi.c —
generates a sine wave in memory and plays it through AHI’s
16-bit stereo output. Works on classic 68k with the AHI
install, and natively on OS 4 / MorphOS.
Troubleshooting:
-
"ptplayer.library missing" — you skipped step 4a. Get it from Aminet, install into
LIBS:. -
"MOD plays but sounds wrong" — the MOD is probably a non-standard format (6- or 8-channel, or an XM/S3M/IT variant). ptplayer only handles 4-channel MOD. Use HippoPlayer for anything else.
-
"No sound at all" — check emulator audio settings; on real hardware, check the volume knob and audio cables.
-
"Crackling / broken sound" — chip RAM full? Paula needs the sample data in chip memory. Free some up or use AHI on a fast-RAM machine.
25.8. Playing a MOD from your own program
Standard AmigaOS way: use the mus/play/HippoPlayer or
mus/play/DeliTracker from Aminet, with your program spawning
it via SystemTagList(). That’s polite but not integrated.
To actually decode a MOD yourself, you have two options:
Option A: ptplayer.library — the ProTracker replay routine
extracted as a library. On Aminet at mus/play/ptplayer.lha.
Load a MOD into memory, call PT_Init(), PT_Play(),
PT_End(). About 20 lines of C. Sample:
#include <proto/exec.h>
#include <proto/ptplayer.h>
struct Library *PTPlayerBase = OpenLibrary("ptplayer.library", 6);
BPTR f = Open("Work:music.mod", MODE_OLDFILE);
LONG size = SeekEnd(f, 0, OFFSET_END);
Seek(f, 0, OFFSET_BEGINNING);
UBYTE *modbuf = AllocMem(size, MEMF_CHIP);
Read(f, modbuf, size);
Close(f);
PT_Init(modbuf, PT_MODE_STEREO, 0);
PT_Play();
/* ... wait for keyboard interrupt ... */
PT_End();
FreeMem(modbuf, size);
CloseLibrary(PTPlayerBase);Option B: use AHI — the modern audio API — for higher
quality output on RTG-hardware machines. AHI has a
Sample-style API where you submit sample buffers and get
callbacks when they finish; you handle the tracker state
machine yourself.
For a working self-contained example, see the companion
code/c-examples/mod-play.c which uses ptplayer.library.
25.9. AHI: the modern audio abstraction layer
Chapter 8 mentioned AHI as the standard sound-card API. In depth: AHI is a modes-and-units audio system where:
-
Modes — configurations of a specific device (Paula 8-bit mono, Toccata 16-bit stereo, USB Codec 24-bit 5.1). Users pick a mode in AHI Preferences.
-
Units — the AHI equivalent of an audio output stream. You allocate a unit for output, configure it (sample rate, bit depth, channels), submit buffers, and read from it.
AHI is what applications should use for anything more than
"play a MOD." Any sound-card driver that exists exposes AHI.
Full API in SDK:Include/proto/ahi.h and the AHI
programmer’s manual at http://ahi.rulez.org/.
Sample: play a 16-bit stereo WAV file through AHI:
struct Library *AHIBase = OpenLibrary("ahi.library", 6);
struct AHIRequest *ai = AllocVec(sizeof(*ai), MEMF_ANY | MEMF_CLEAR);
struct MsgPort *port = CreateMsgPort();
ai->ahir_Std.io_Message.mn_ReplyPort = port;
OpenDevice(AHINAME, AHI_NO_UNIT, (struct IORequest *)ai, 0);
/* Load the WAV into memory... */
ai->ahir_Std.io_Command = CMD_WRITE;
ai->ahir_Std.io_Data = wav_pcm_data;
ai->ahir_Std.io_Length = wav_pcm_length;
ai->ahir_Std.io_Offset = 0;
ai->ahir_Frequency = 44100;
ai->ahir_Type = AHIST_S16S; /* signed 16-bit stereo */
ai->ahir_Volume = 0x10000;
ai->ahir_Position = 0x8000; /* centre */
DoIO((struct IORequest *)ai);
CloseDevice((struct IORequest *)ai);
DeleteMsgPort(port);
FreeVec(ai);
CloseLibrary(AHIBase);25.10. Making music: the modern workflow
Composing music for the Amiga in 2026 is a hybrid affair. The authentic-tracker experience of the 1990s (four channels, 8-bit samples, ProTracker) still exists, but the pragmatic modern workflow uses cross-platform tools on your host machine and exports to Amiga formats. Both are legitimate; pick the one that matches your priorities.
Path A — Authentic tracker workflow on real Amiga hardware.
-
Install ProTracker 2.3D or later on your Amiga. The actively-maintained community version is on Aminet at
mus/edit/PT23e.lhaand its cross-platform sibling ProTracker Clone runs on macOS/Linux/Windows too (https://16-bits.org/pt.php). -
Record your own samples with a mic on the Amiga’s audio-in port (if you have a Delfina or Toccata card) or drop pre- recorded 8-bit signed samples from your host.
-
Compose patterns note-by-note in ProTracker’s tracker interface.
-
Sequence patterns in the song-position list.
-
Save as
.mod.
This is the correct workflow if you want to compose in the same UI the 1990s scene composers used. Learning-curve is real — tracker composition is a distinct skill from playing a keyboard.
Path B — Modern tracker (Renoise / OpenMPT) → MOD export.
-
Install Renoise (https://renoise.com/, commercial, €75) or OpenMPT (https://openmpt.org/, free, Windows-only but runs under Wine on macOS/Linux) on your host.
-
Compose using modern tracker features: MIDI input, automation, plugin effects, high sample rates during editing.
-
Down-sample your samples to 8-bit signed for MOD compatibility (both Renoise and OpenMPT have "convert to MOD" options).
-
Export as 4-channel
.mod. -
Copy to your Amiga; play with HippoPlayer or your own program.
This is what most modern Amiga-scene composers actually do: compose on a modern host with modern tools, export to MOD for playback on real hardware.
Path C — Compose on modern host, ship as-is (any format).
If you’re targeting AmigaOS 4 or MorphOS with AHI, you’re not
limited to MOD. Any format the Amiga’s decoder library
supports works — MP3 via mpega.library, Ogg Vorbis via
vorbisfile.library, FLAC via libFLAC port. On these
platforms you might as well compose in Logic Pro, Ableton,
Bitwig, whatever your usual tool is, then export.
For classic 68k, MP3 decoding is CPU-bound (a stock 68030 can’t decode 128 kbps MP3 in real time). MOD, OctaMED, and SID are the formats that play well on modest 68k CPUs.
25.11. A recommended music-making tool inventory
Modern tools that work well for Amiga-targeted composition:
-
ProTracker Clone (https://16-bits.org/pt.php) — a bit-perfect cross-platform recreation of ProTracker 2.3E. Runs natively on macOS/Linux/Windows. Saves ProTracker MODs that play identically on classic Amiga. Free.
-
OpenMPT (https://openmpt.org/) — the standard modern tracker. Compose in modes like MOD, XM, IT; export to any of them. Free, open source, Windows (Wine-compatible on Mac/Linux).
-
Renoise (https://renoise.com/) — commercial modern tracker with plugin support (VST/AU), audio recording, automation. €75. Mac/Linux/Windows native. Exports MOD.
-
MilkyTracker (https://milkytracker.org/) — free cross-platform tracker, focused on XM and MOD. Native on Mac/Linux/Windows. Simpler than OpenMPT; good for learning.
-
MOD Sample Editor — Renoise, OpenMPT, and PT Clone each have built-in sample editors. For standalone work, Audacity (https://audacityteam.org/) with a "signed 8-bit PCM" export works.
-
AMOS Music Bank builder — for AMOS-based games, a dedicated tool that packages MODs into playable music-bank files. Aminet
mus/misc/.
For composing on real Amiga hardware — as the retro- authentic experience:
-
ProTracker 2.3E (Aminet
mus/edit/PT23e.lha) — the canonical Amiga tracker. -
OctaMED SoundStudio (Aminet
mus/edit/OctaMEDSSE.lha) — extended tracker with 8+ channels, MIDI, richer effects. -
AmiTracker — a modern MorphOS/OS 4 tracker with FM synthesis, native compositor rendering.
-
Sequencer One (Aminet
mus/midi/) — MIDI sequencer, for external hardware synths.
25.12. Converting between music formats
The Amiga world uses a specific set of formats. Converting between them and modern equivalents is one of those things you do a lot in practice.
MP3 / Ogg / FLAC → 8-bit sample. For loading a modern
audio recording into a MOD sample slot: use Audacity or
sox to down-sample, downmix to mono, and convert to
signed 8-bit PCM at 22050 Hz (Paula’s practical maximum):
$ sox input.mp3 -b 8 -c 1 -r 22050 --encoding signed-integer \
output.rawThen load output.raw into ProTracker or Renoise as a raw
sample. Signed 8-bit at 22050 Hz mono is the "Amiga default"
format most tools understand.
8SVX ↔ WAV. The Amiga’s native sound format is IFF-8SVX
(chapter 17); modern is WAV. sox handles both:
# WAV → 8SVX
$ sox input.wav -t 8svx output.iff
# 8SVX → WAV
$ sox input.iff output.wavOr on the Amiga side, ProTracker imports 8SVX directly.
MOD → WAV (render to audio). Handy for uploading a MOD to Bandcamp, YouTube, or similar:
$ openmpt123 --render input.mod --output-type wav > input.wavopenmpt123 is a CLI renderer bundled with libopenmpt; runs
on macOS/Linux. Renders any tracker format to WAV/MP3/FLAC
at any sample rate.
MOD → MP3. Chain openmpt123 with LAME:
$ openmpt123 --stdout input.mod | lame - output.mp3MOD → OGG:
$ openmpt123 --stdout input.mod | oggenc - -o output.oggXM / S3M / IT → MOD (down-convert to 4-channel). OpenMPT does this via File > Save As > MOD — it forces the format down, dropping any channels beyond 4 and merging where possible. Quality suffers if the source uses features MOD doesn’t support (many samples, XM envelopes, IT NNAs).
MIDI → MOD is genuinely hard because MIDI is event-based (notes with timings) and MOD is sample-based (pattern of what to play when). Tools exist (MIDI2MOD, MIDI2SMF) but produce basic conversions. For anything nuanced, use OpenMPT to import the MIDI as patterns and manually set up sample slots.
Raw sample → 8SVX / WAV. For hand-crafted samples:
use Audacity’s export as-signed-8-bit-raw, then IFF-wrap
with sox or with ProTracker’s sample loader.
25.13. A minimal composition and playback pipeline
The typical "I want to make a short MOD for my game" flow in 2026:
-
Compose in OpenMPT on your Mac or PC.
-
Use MilkyTracker or PT Clone to verify the MOD plays identically to what OpenMPT shows.
-
Export
.mod(ProTracker 4-channel) — the lowest-common-denominator that ptplayer.library and every Amiga music player understands. -
Copy the
.modfile into your game’s assets directory. -
Play in-game via
ptplayer.library(as incode/c-examples/portable/mod-play.c). -
On the composer side, also export a
.oggor.mp3rendering for cross-promotion (Bandcamp, YouTube gameplay videos, etc.).
Total tooling cost: free if you use OpenMPT + MilkyTracker; €75 if you want Renoise’s polish. Neither requires an Amiga until playback time.
25.14. The Amiga sound-card ecosystem
Third-party sound cards on Amiga:
-
Toccata (MacroSystems, mid-90s) — Zorro II, 16-bit stereo, direct-to-disk recording.
-
Delfina (Petsoff Limited Design) — 16-bit DSP + DAC. The Amiga’s "professional" sound card of the mid-1990s.
-
Prelude (Individual Computers) — Zorro II 16-bit stereo, contemporary manufacturing.
-
Concierto (RBM digitec) — daughter card for Picasso IV, 16-bit stereo.
All route through AHI. Native Paula (via audio.device) is
also an AHI mode.
Modern setups on FPGA hardware (Vampire, MiSTer) expose Paula plus a high-resolution "SAAYM" 16-bit DAC via AHI.
25.15. Communities and resources
-
ModArchive — https://modarchive.org/ — 150,000+ MODs with metadata, curated, searchable.
-
AmiNET’s
mus/— the raw archive for Amiga music software. -
ProTracker Clone — modern cross-platform ProTracker https://16-bits.org/pt.php.
-
Milkytracker — modern cross-platform tracker https://milkytracker.org/.
-
The Mod Archive Discord — active community.
-
Demozoo — https://demozoo.org/ — indexes demos with their soundtracks and MOD downloads.
-
The Modland archive — http://modland.com/ — 500,000+ modules of every format across every platform, with a browseable per-composer view.
For live composition on modern hardware, MilkyTracker or
Renoise on your Mac/Linux, then export to .mod and copy to
the Amiga for playback on real Paula hardware. The workflow
combines modern editing with authentic playback.
25.16. References
-
Karsten Obarski, Original SoundTracker source and documentation, on Aminet at
mus/edit/OldSoundTracker.lha. -
Peter Hanning, MOD Format Reference, Aminet
docs/misc/AmigaModFormat.lha. -
Anders Enger Jensen and Frank Wille, ptplayer.library documentation, on Aminet under
mus/play/. -
Amiga Music Programming by Timo Rossi (available in archived form on the Amiga Documentation Archive) — long-form tutorial on Paula.
-
AHI developer documentation at http://ahi.rulez.org/.
-
Jimmy Maher, The Future Was Here, chapter on Amiga music and its cultural impact.
-
Chris Bailey, The Amiga Music Documentary (YouTube, 2020). Two-hour documentary on the tracker scene.
Next: games and how they were built.
Chapter 26. Games and How They Were Built
The Amiga was, commercially, a games machine. Six million A500s were sold in Europe primarily to play games. The tools and techniques for building those games are their own subculture — overlapping with the demoscene, distinct from the "business software" side of the platform, and still active in 2026 for retro-development competitions and homebrew.
This chapter surveys what got made, how it got made, what tools you would use today to make new Amiga games, and the modern re-implementations that preserve the classics on non-Amiga hardware.
26.1. The Amiga games canon
A short, opinionated list of the games that defined the platform, grouped by what they achieved technically. Every one of these is on ADF form on hallowed archives (Home of the Underdogs, ADF Preservation Society, Amiga Hall of Light).[41]
Games that showed off the chipset:
-
Shadow of the Beast (Psygnosis, 1989) — 13-layer parallax scrolling, sample-based soundtrack, 200-colour palette from 32 registers via Copper. The single game that most established "the Amiga is a graphics powerhouse."
-
Lionheart (Thalion, 1992) — the AGA-era answer, with sprite-heavy platforming and per-scanline palette effects.
-
Turrican (Rainbow Arts, 1990) — hardware-scrolling run-and-gun with an original Chris Hülsbeck MOD soundtrack.
-
Batman: The Movie (Ocean, 1989) — one of the first movie tie-ins to feel like a real game, using the Blitter intelligently for smooth animation.
Games that pushed the CPU:
-
Frontier: Elite II (David Braben, 1993) — 3D space simulator running on a stock 68000 with software rasterisation and a scripted galaxy generation model.
-
Chaos Engine (The Bitmap Brothers, 1993) — top-down isometric shooter with pre-rendered sprites and physics.
-
Kick Off 2 (Anco, 1990) — football with fluid ball physics and top-down view.
Games that were engineering feats:
-
Speedball 2: Brutal Deluxe (The Bitmap Brothers, 1990) — arcade sport in a small window with parallax and lots of simultaneously animated sprites.
-
Lemmings (Psygnosis, 1991) — puzzle game where a hundred lemmings are individually pathfinding. Cross-platform hit that started on Amiga.
-
Sensible Soccer (Sensible Software, 1992) — real-time football with a whole match view in one screen, 22 players under smooth control.
Games that were art:
-
Another World / Out of This World (Éric Chahi, 1991) — cinematic platformer with vector-drawn rotoscoped animation. Bespoke virtual machine executing a per-scene bytecode.
-
Flashback (Delphine, 1992) — Prince-of-Persia-lineage cinematic platformer with hand-drawn animation.
-
The Secret of Monkey Island (LucasArts, 1990) — SCUMM engine port; one of the finest point-and-click adventures ever made.
Games that were weird:
-
It Came from the Desert (Cinemaware, 1989) — 1950s B-movie giant-ants game with digitised video sequences and branching narrative on floppies.
-
Wings (Cinemaware, 1990) — WWI flight combat with narrative segments and a cinematic overworld.
-
Universe (Core Design, 1994) — comedic point-and-click with full-motion video cutscenes.
The Amiga games catalogue is enormous — Amiga Hall of Light lists 9,700+ commercial games plus thousands of shareware and PD releases. Every genre is represented; every playstyle has its Amiga champion.
26.2. The commercial development toolchains
Games in the 1990s were built with commercial or in-house toolchains. The common combinations:
-
68000 assembly for the game engine, especially in the early years and for anything performance-critical (physics, scroll routines, sprite animation).
-
C (Lattice/SAS or Aztec) for higher-level logic — the world model, save-game format, UI. Layered on top of the assembly engine.
-
DevPac for the assembler; GenAm for the assembler proper; MonAm for the debugger.
-
DPaint for pixel art and animation frame construction.
-
ProTracker or OctaMED for music.
-
Bespoke tooling for level design — many studios wrote a small tool per game to convert level data from a graphical editor to a compact binary format loadable at runtime.
Notable engines and reusable pieces:
-
The Rainbird / Bitmap Brothers engine, used across Speedball, Chaos Engine, The Bitmap Brothers' later titles. Highly optimised sprite and scroll routines in 68000 assembly.
-
The Cinemaware system, based around IFF images plus a bytecode interpreter for scripts.
-
SCUMM (Lucasfilm/LucasArts) — the "Script Creation Utility for Maniac Mansion" interpreter, ported to Amiga for Maniac Mansion, Monkey Island, Indiana Jones and the Fate of Atlantis, Sam & Max Hit the Road. The engine is now reimplemented as ScummVM (chapter 24).
-
AGI (Sierra Adventure Game Interpreter) — port of the Sierra adventure engine.
-
The DOOM engine port (id Software, 1994 for AmigaOS 4.x; a modern homebrew port also exists for 68030+ Amigas) — a proof that a competitive first-person shooter runs on high-end 68k hardware.
26.3. Modern game-development stacks
If you want to write a new Amiga game in 2026:
26.3.1. C plus modern cross-toolchain
Cross-compile with bebbo GCC or vbcc. Use graphics.library
for drawing, intuition.library for windowing (or open your
own screen), Paula/AHI for sound, timer.device for game-loop
timing. Reference the companion code (chapter 20’s
gadtools-demo for the input-loop pattern; chapter 10’s
Copper section for background effects).
For a first-full-Amiga-game-in-C tutorial, the Amiga Game Development tutorial series by Andrew Bell (https://ada.stfu.tech/) is currently the best modern-C introduction. It walks through window opening, input handling, sprite management, and a complete Space Invaders clone.
26.3.2. AmiBlitz
AmiBlitz (chapter 16) — the modern descendant of Blitz Basic. Compiled BASIC with rich Amiga-native primitives: BLIT, BOB, INTUITION, MENU, SLICE (multi-part screen). Genuinely competitive for game work. Free-software; on GitHub at https://github.com/AmiBlitz.
Sample AmiBlitz — an animated sprite:
BitMap 0,320,256,3
Screen 0,0,0,320,256,3,0,"Playfield",1,2
ScreensBitMap 0,0
Sprite 0
Move Sprite 0,160,100
ShowSprite 0
While Not Joyb(0)
MouseXY ; wait for mouse move
WendThe AmiBlitz3 distribution ships with dozens of small game
examples. Modern developers use it for jam-style Amiga game
competitions.
26.3.3. Hollywood
Hollywood (chapter 16) — Lua-flavoured multimedia scripting. Cross-platform (runs on modern host too), so you develop and prototype on your Mac then export to Amiga. Rich 2D and 3D primitives, tracker-music playback, image handling. Commercial (~€100).
26.3.4. SDL / rebbo / Amiga-native libraries
Third-party game libraries on the Amiga in 2026:
-
SDL — has an Amiga 68k port (SDL 1.2) and OS4/MorphOS ports (SDL 2.0). Direct porting target for SDL-based games.
-
Allegro — long-standing game library; Amiga port available.
-
KISS FFT / DR_WAV / DR_MP3 — small self-contained libraries that port cleanly.
-
libslime2 / libslimec — modern Amiga-native game helpers.
Cross-compilation with SDL_amigaos.h shim lets a Linux game
often build for the Amiga with minor tweaks.
26.4. A minimal game skeleton
Here is a working double-buffered animated sprite loop that demonstrates the game-frame pattern on classic Amiga:
#include <proto/exec.h>
#include <proto/dos.h>
#include <proto/intuition.h>
#include <proto/graphics.h>
int main(void)
{
struct Library *IntBase =
OpenLibrary("intuition.library", 39);
struct Library *GfxBase =
OpenLibrary("graphics.library", 39);
if (!IntBase || !GfxBase) return 20;
struct Screen *scr = OpenScreenTags(NULL,
SA_DisplayID, (ULONG)PAL_MONITOR_ID | LORES_KEY,
SA_Depth, 5,
SA_Title, (ULONG)"Game Skel",
SA_ShowTitle, FALSE,
TAG_END);
struct Window *win = OpenWindowTags(NULL,
WA_CustomScreen, (ULONG)scr,
WA_Backdrop, TRUE,
WA_Borderless, TRUE,
WA_Activate, TRUE,
WA_IDCMP, IDCMP_RAWKEY | IDCMP_MOUSEBUTTONS,
TAG_END);
/* Set a simple 4-colour palette. */
ULONG cmap[] = { 3,
0x00000000, 0x00000000, 0x00000000, /* black */
0xffffffff, 0xffffffff, 0xffffffff, /* white */
0xff000000, 0x00ff0000, 0x00000000, /* red */
0x00000000, 0xff000000, 0x00ff0000, /* green */
0 };
LoadRGB32(&scr->ViewPort, cmap);
LONG x = 100, y = 100;
LONG dx = 2, dy = 1;
BOOL done = FALSE;
while (!done) {
/* Clear the previous frame's sprite. */
SetAPen(win->RPort, 0);
RectFill(win->RPort, x, y, x + 16, y + 16);
/* Move. */
x += dx; y += dy;
if (x < 0 || x > 320-16) dx = -dx;
if (y < 0 || y > 256-16) dy = -dy;
/* Draw the new sprite. */
SetAPen(win->RPort, 2);
RectFill(win->RPort, x, y, x + 16, y + 16);
/* Wait for vblank to sync frame rate. */
WaitTOF();
/* Handle events. */
struct IntuiMessage *im;
while ((im = (struct IntuiMessage *)GetMsg(win->UserPort))) {
if (im->Class == IDCMP_RAWKEY) {
if (im->Code == 0x45) done = TRUE; /* Esc */
}
ReplyMsg((struct Message *)im);
}
}
CloseWindow(win);
CloseScreen(scr);
CloseLibrary(GfxBase);
CloseLibrary(IntBase);
return 0;
}WaitTOF() blocks until the vertical retrace, giving you a
consistent 50 Hz (PAL) or 60 Hz (NTSC) frame rate. Add
double-buffering (allocate two BitMaps and swap between them
per frame) for tear-free rendering.
The companion code/c-examples/game-skel.c is this program.
Build and drop it onto your Amiga; a small square bounces
around the screen. Extend from there.
26.5. Preservation and reimplementation
For classic games to remain playable in 2026:
-
WHDLoad (http://whdload.de/) — a system for running disk-based Amiga games from hard drive with the OS intact underneath. Hundreds of games converted, most from the 1988-1994 golden age. Free for personal use; slot-machine fee model.
-
ScummVM — cross-platform port of the SCUMM engine, plus many other classic adventure engines. Runs original Amiga data files on any modern host. https://www.scummvm.org/.
-
DOSBox-X — for the small number of Amiga-and-DOS cross-platform games with the DOS version fully re-runnable.
-
The Cave Story engine and other retro-language runtimes.
-
OpenLara — Tomb Raider engine port that runs the original PSX/PC data files on modern hardware.
-
Amiga Forever’s Games Room — Cloanto’s curated collection of ~100 games licensed for redistribution with the emulator.
For technical preservation:
-
The Software Preservation Society (SPS/IPF) — http://www.softpres.org/ — dedicated to preserving Amiga copy-protected floppies as IPF files that reproduce the exact bit-pattern of the original.
-
Amiga Preservation Society — companion project focused on games.
-
The Cave Story engine and other retro-language runtimes.
For playing classic games in 2026, WHDLoad on an emulator or PiStorm-equipped real Amiga is the most authentic option.
26.6. The Amiga games homebrew scene
New games ship regularly. Notable modern releases:
-
Reshoot Proxima 3 (2020, Richard Löwenstein) — AGA shoot-'em-up, commercially released with a limited edition physical run.
-
Tiny Bobble (2020) — Bubble Bobble tribute in AmiBlitz.
-
Metro Siege (2023) — beat-'em-up in the style of Streets of Rage.
-
Return to Genesis (planned 2025) — modern 68000 shoot-'em-up.
Publishers still active in Amiga homebrew:
-
RGCD — https://www.rgcd.co.uk/ — publishes for Amiga alongside Commodore 64 and Vic-20.
-
Bitmap Brothers Reunion — occasionally releases new Amiga content from the original team.
Modern game jams:
-
Amiga Game Jam — annual online competition, active Discord community.
-
Retro Fest — physical event with an Amiga category.
26.7. References
-
Amiga Hall of Light — http://hol.abime.net/ — the definitive Amiga game database.
-
Steven L. Kent, The Ultimate History of Video Games (Prima, 2001). ISBN 0-7615-3643-4. Broad video-games history; Amiga chapters in volumes 1 and 2.
-
Jimmy Maher, The Future Was Here, chapters on games and the demoscene.
-
Anthony & Nicola Caulfield, From Bedrooms to Billions: The Amiga Years (2016). Documentary specifically on the British Amiga games industry.
-
AmigaGuide sources for many 90s games — often shipped with the game or on Aminet under
docs/games/, with technical notes from developers. -
AmiBlitz project — https://github.com/AmiBlitz.
-
Andrew Bell’s Amiga Game Development tutorial — https://ada.stfu.tech/.
-
WHDLoad game database — http://whdload.de/.
Next: the demoscene, where a lot of these game engineers came from and where the deepest chipset tricks were developed.
Chapter 27. The Demoscene and Its Techniques
The demoscene is a subculture of programmers, musicians, and artists who make non-interactive audiovisual programs (demos) to show off technical mastery. It grew up around the C64 and the Amiga in the 1980s and persists today across dozens of platforms. On the Amiga the scene produced most of the classic chipset tricks — the effects everyone else eventually copied — and its output constitutes the deepest study of the machine’s actual capabilities.
For a returning engineer, the demoscene is fascinating for two reasons. First, its techniques are pedagogically valuable — studying a scroller reveals more about Copper timing than any manual paragraph. Second, its ethos of doing more with less resonates well with anyone who thinks modern software is bloated.
The primary reference is Tamás Polgár’s Freax: The Brief History of the Computer Demoscene (2005), plus the ongoing work at https://demozoo.org/ (the definitive demo database) and https://www.pouet.net/ (the community forum and voting site).[42]
27.1. What is a demo, technically
A demo is a Hunk executable that:
-
Opens its own screen (or takes over the display directly).
-
Runs a scripted sequence of effects, typically synchronised to a MOD or custom music format.
-
Ends after a few minutes, or on keypress.
-
Fits into an announced size budget: 4K (four kilobytes), 64K, intro (typically <100K), demo (larger).
Demo compos have categories: 4K intro, 64K intro, 256b intro (256 bytes!), wild demo, oldschool Amiga (strictly OCS/ECS/AGA on real hardware), modern Amiga (any hardware including RTG and PPC).
The most-remembered demos live in the following categories:
-
State of the Art (Spaceballs, 1992) — the first Amiga demo to make heavy use of digitised rotoscope-style character animation. Nearly a music video.
-
Nine Fingers (Spaceballs, 1993) — sequel to State of the Art, more polished.
-
Enigma (Phenomena, 1991) — a compendium of every technique the scene had by 1991.
-
Odyssey (Alcatraz, 1992) — huge (six-disk) demo with a narrative structure.
-
Chromag (TRSI, various) — 4K intros with impossibly detailed effects.
-
Elude (Dekadence, 2007) — modern-era Amiga demo that showed the platform still had life.
Watch a curated selection at https://www.pouet.net/ under the Amiga OCS/ECS/AGA categories, sorted by all-time score.
27.2. The canonical effects, briefly
Every serious Amiga demo uses some combination of these techniques. Each one is a small self-contained programming exercise; each one teaches you something about the chipset.
27.2.1. Copper bars
A rainbow of horizontal colour bands scrolling behind text or
sprites. Achieved by a Copper list that changes COLOR00
between every scan line, cycling through a table of colours
that shifts by one entry each frame.
Cost: ~256 Copper entries (one WAIT + one MOVE per scan line, plus another WAIT + MOVE for the tick of the actual palette update). Effectively zero CPU.
Pseudocode:
setup_copper_bars(color_table):
copper_list = []
for y = 0 to 255:
copper_list.append(WAIT(x=0, y=y))
copper_list.append(MOVE(COLOR00 = color_table[y]))
copper_list.append(WAIT_END())
each_frame():
rotate(color_table) # shift one entry27.2.2. Sinuscroll
Text scrolling horizontally along a sine wave. Each character appears to bob up and down as it slides across the screen.
Two implementations:
-
Software — bit-shift the character bitmap left by one pixel per frame, with each character positioned at
sin(x + phase) * amplitudefor its Y coordinate. -
Copper-driven — set up a scroll register per scan line; the Copper writes different
BPLxMODvalues per line to shift each line by a different amount, producing the sine effect entirely in hardware.
Method 2 is what the classic scene demos use. Zero CPU during the effect; the whole thing is Copper timing.
27.2.3. Plasma
Rippling coloured surfaces produced by adding two or more sinusoidal functions and mapping the sum to a palette index. Real-time animation by rotating the palette (which itself just cycles the colours of pixels already drawn).
CPU cost: a lookup per pixel, at reduced resolution (160×100, not 320×256). About 5-10% CPU on a 68000 with careful coding.
27.2.4. Tunnels
3D tunnel effect where the camera flies down a repeating texture-mapped tube. Achieved with a precomputed distance table (per pixel, "what angle and depth in the tunnel does this correspond to?") and a per-frame lookup that fetches the appropriate texture pixel.
Also runs at reduced resolution. A 68000-friendly tunnel is 80×50 pixels tall (double-scanline).
27.2.5. Rotozoomer
Rotating and scaling a texture in real time. Done via
per-pixel affine transformation. Every pixel is a texture
lookup at (u_transform(x, y), v_transform(x, y)).
CPU cost: dominated by the affine math. Fixed-point tricks (precomputed rotation delta per row) bring it down.
27.2.6. Chunky-pixel effects on OCS/ECS
The Amiga’s planar bitmap makes chunky-pixel effects (where each pixel is a colour index in one byte) awkward because you have to write the index into 8 separate bitplanes. A classic technique — the chunky-to-planar converter — accepts a chunky buffer and produces a planar bitmap for display.
The fastest c2p converters on 68000 use a series of MOVEP
and LSR instructions to shuffle the bits from chunky to
planar. Hundreds of engineer-hours have been spent
optimising c2p; the top-of-the-line 1993 c2p converter is
about 15% faster than the theoretical bound of a naïve
implementation.
Real-time-rendered chunky effects (plasma, tunnels, particle systems) on OCS Amigas usually pass through a c2p step before display.
27.2.7. Digitized video
Playing back a sequence of pre-recorded video frames from disk, one frame per game tick. The Amiga’s DMA lets you stream raw bitmap data from chip RAM at high rates; combined with a Copper trick to swap between two frame buffers, you get tear-free video playback at 15-25 fps.
State of the Art is the most famous example.
27.2.8. Vector graphics
Software-rasterised 3D primitives (lines, filled polygons, textured polygons). Every 1990s Amiga vector demo (Second Reality, Anarchy, and dozens more) uses hand-optimised 68000 routines. Bresenham for lines; Sutherland-Hodgman for polygon clipping; hand-scaled span-drawing for filled polygons.
Modern demos use the same techniques with the improvements that come from decades of collective optimisation.
27.2.9. Ray-tracing
Real-time ray-tracing on a 68000 is impossible for any useful scene, but demos have shipped that pre-render frames to disk and play them back at Amiga rates. Later 68040/060 CPUs can run modest real-time ray-traced scenes.
27.3. Where to find and study demos
-
Pouet — https://www.pouet.net/ — the demoscene forum and voting portal. Every demo has a page with author info, the party where it competed, and a link to the download.
-
Demozoo — https://demozoo.org/ — comprehensive database of demos, sceners, groups, and parties. Cross-linked to Pouet.
-
The Party and Assembly — the two big annual European demoscene events. Both have Amiga categories.
-
Revision — the modern successor to The Party, in Saarbrücken, Germany, annually.
-
Amiga Demoscene Archive — https://ada.untergrund.net/ — curated archive of Amiga-only demos.
Watching demos on modern hardware: any UAE-based emulator plays them correctly. Some Copper-heavy effects need cycle-exact emulation, which WinUAE and FS-UAE both support (check the "cycle exact" box in the config).
For a starter tour:
-
State of the Art — Spaceballs, 1992. Music-video style.
-
Elude — Dekadence, 2007. Modern-era polish.
-
Chromag III — TRSI, 4K intro. Impossible-looking detail.
-
Nine Fingers — Spaceballs, 1993. Sequel to State.
-
Enigma — Phenomena, 1991. Every effect in one demo.
-
Guardian Dreams — Ram Jam, 1992. Vector graphics showpiece.
-
Fairlight AGA-demo — Fairlight, 1993. AGA showcase.
Each ~4-8 minutes; a full "canon" tour is an evening.
27.4. Programming your first demo effect
Because the Amiga’s chipset was designed to be programmed directly, a minimal demo effect is remarkably small. The classic first effect — a colour bar behind a static-text title screen — is about 100 lines of C plus a small Copper list.
The companion code/c-examples/copper-bars.c implements
a scrolling-colour-bars effect. Overview:
-
Take over the display (
Forbid()/LoadView(NULL)). -
Build a Copper list that WAITs on each scan line and MOVEs a colour into COLOR00 per line.
-
Install the Copper list.
-
Enter a loop that shifts the colour table by one entry per frame (vertical-blank interrupt).
-
On keypress, restore the OS view.
You get an effect that runs entirely on the Copper — the CPU does effectively nothing during rendering. This is why the Amiga looks like the Amiga.
For a more elaborate starter project, the community-maintained AmigaOS Demo Framework at https://github.com/AmigaDemoFramework provides a scaffold with:
-
Custom-screen setup with cycle-exact Copper timing.
-
Effect scheduler synchronised to a MOD file.
-
Text overlay system.
-
Modern build with vasm/vlink.
Clone, tweak the effect list, produce a small demo in an afternoon.
27.5. The scene’s cultural output
Notable groups whose Amiga catalogue is worth studying:
-
Spaceballs — Norwegian; State of the Art and Nine Fingers.
-
Phenomena — Swedish; classic ECS-era demos.
-
Anarchy — UK; polished '92-'94 output.
-
The Silents — Norwegian; long-lived, still-active members.
-
TRSI (Tristar Red Sector Inc) — international; 4K intros a specialty.
-
Fairlight — Swedish; especially strong on AGA.
-
Sanity — English; slick tracker-driven demos.
-
Dekadence — Finnish; modern-era Amiga (post-2000).
-
Ephidrena — Norwegian; modern-era Amiga.
-
Loonies — Danish; produced Rink a Dink.
Party competitions:
-
Assembly (Finland, annually) — the largest demo-friendly event, though PC-dominant now.
-
Revision (Germany, annually) — the current premier event; strong Amiga presence.
-
Kindergarden (Norway) — Amiga-focused.
-
Datastorm (Sweden) — Commodore-heritage focused.
-
Payback (UK) — smaller, retro-focused.
Every party’s productions are on Pouet within hours of the awards ceremony. Voting is public; the scene is welcoming to newcomers who show up with a decent 4K intro.
27.6. References
-
Tamás Polgár, Freax: The Brief History of the Computer Demoscene (CSW Verlag, 2005). ISBN 978-3-9812508-1-5.
-
Markku Reunanen, How Those Great Demos Were Done (2010), academic paper on demo techniques and their optimisation.
-
Erdész Ábel, The Demoscene Documentary (2010-2012, six parts on YouTube). Longform documentary with contemporary scener interviews.
-
Pouet — https://www.pouet.net/.
-
Demozoo — https://demozoo.org/.
-
Amiga Demoscene Archive — https://ada.untergrund.net/.
-
The classic DemoManual (Amiga scene wiki) — http://demomanual.org/ — technique-by-technique programming guide.
-
The Amiga Coder’s Diary blog series by Nils Hammerich — https://amigacoderblog.wordpress.com/ — active modern-day demo-coding walkthroughs.
Next: printing, which is genuinely nontrivial on the Amiga and worth its own chapter.
Chapter 28. Printing
Printing is genuinely nontrivial on the Amiga. Every operating
system solves the "give me an abstract way to draw pages that
gets rasterised for whichever specific printer the user has"
problem; the Amiga’s answer, printer.device, dates from
Kickstart 1.0 and works essentially unchanged in 2026. This
chapter covers the printing stack from the application down to
the printer wire, and how to make it work with modern printers
that no longer speak the languages the OS knows about.
28.1. The stack
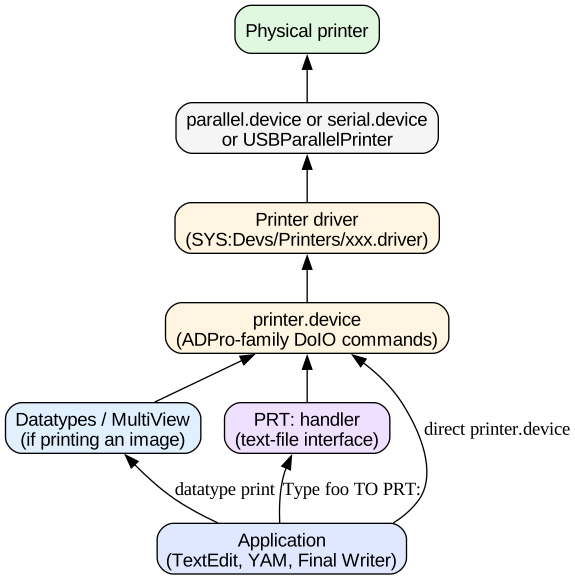
The unusual thing is PRT: — a filesystem handler. To print
plain text you can do:
1> Type notes.txt TO PRT:
1> Copy notes.txt TO PRT:
1> Echo "Hello, printer!" >PRT:PRT: is a normal filesystem device (from the app’s point of
view) whose bytes go through printer.device, which translates
them into whatever binary language the currently-configured
printer driver expects, and dumps that to parallel.device or
serial.device.
For graphics or formatted text, applications talk to
printer.device directly, using I/O commands to request
"print this bitmap" or "render text at this size." The device
handles the conversion.
28.2. Preferences: choosing a printer
SYS:Prefs/Printer and SYS:Prefs/PrinterGfx are the two
prefs editors. Between them they set:
-
Printer driver — which
.driverinSYS:Devs/Printers/handles the current printer. Choose one that matches your printer’s language (Epson, HP LaserJet, PostScript, generic ASCII, …). -
Printer port —
parallel.device(Centronics parallel, the historical default) orserial.device(RS-232), or something more modern via a third-party driver. -
Paper size, margins, character-set, DIP-switch equivalents — the Printer prefs.
-
Density (dpi), colour handling, dithering, aspect ratio, smoothing — the PrinterGfx prefs.
-
Text/graphics defaults — page orientation, print speed, Draft vs LQ, form-feed on job end.
Standard drivers bundled in SYS:Devs/Printers/:
-
Generic — plain ASCII, no formatting. Works with almost anything.
-
EpsonQ — Epson LQ series ESC/P protocol. Works with any Epson dot-matrix or many ink-jet printers in "Epson emulation" mode.
-
HP_LaserJet — HP LaserJet PCL 4 protocol. Works with any LaserJet-compatible printer.
-
PostScript — generic PostScript output. Goes to any PostScript-capable printer.
-
HP_DeskJet — original DeskJet PCL 3 protocol.
-
Canon_BJC — Canon BubbleJet BJC ink-jet.
Each driver is a .driver file — actually a library — that
exposes standard driver-side entry points. Third-party drivers
for specific printers live on Aminet under text/print/.
28.3. Modern printing: TurboPrint and IFF-print
Two commercial extensions bring modern printer support to classic Amiga:
-
TurboPrint (IrseeSoft) — a replacement printer subsystem that supports hundreds of modern inkjet, laser, and colour printers, with modern colour management, dithering, and driver quality. Roughly €30 as of writing.[43]
-
IFF-Print (community) — a driver that saves output as an IFF-ILBM image instead of sending it to a printer. Useful for "print to file" workflows and screen previews.
For 2026 users with a modern network printer (which speaks PostScript or PCL over IPP or CUPS on the LAN), the recommended workflow is:
-
Use the AmigaOS PostScript driver.
-
Route PostScript output through the parallel port to a small Raspberry Pi (or the host machine, via serial).
-
Have the Pi/host run CUPS with the printer configured.
-
CUPS accepts the raw PostScript and drives the physical printer.
This "Amiga PS → host CUPS" bridge is the most robust way to
get modern-printer output. Setup is manual (a stub script on
the Pi that reads from serial/USB and pipes to lp), but
reliable.
28.4. Printing text from the shell
Basic usage of PRT::
1> Type memo.txt TO PRT:
1> Copy memo.txt TO PRT:
1> Cat memo.txt | Sort >PRT:
1> List Work: >PRT:Text is sent to the printer driver, which converts it (adds page-break commands, converts newlines to the printer’s expected form, applies the character-set translation configured in Prefs). The printer handles the physical print.
To make the printer emit escape sequences for bold/italic/ underline from your own scripts, wrap them in the printer’s control codes. For an Epson-emulation printer:
1> Echo "*e[1mBold*e[0m normal text" >PRT:*e is the AmigaShell escape for ESC. *e[1m is ANSI-style
"bold on"; *e[0m resets. Most drivers translate these ANSI
codes to the printer’s native escapes.
28.5. Printing graphics from an application
Applications that need to print pictures use printer.device
directly via a struct IODRPReq:
#include <proto/exec.h>
#include <devices/printer.h>
#include <devices/prtbase.h>
struct MsgPort *port = CreateMsgPort();
struct IODRPReq *req = (struct IODRPReq *)CreateIORequest(port,
sizeof(*req));
OpenDevice("printer.device", 0, (struct IORequest *)req, 0);
/* Print bitmap. */
req->io_Command = PRD_DUMPRPORT;
req->io_RastPort = my_rastport;
req->io_ColorMap = my_screen->ViewPort.ColorMap;
req->io_Modes = GetVPModeID(&my_screen->ViewPort);
req->io_SrcX = 0;
req->io_SrcY = 0;
req->io_SrcWidth = width;
req->io_SrcHeight = height;
req->io_DestCols = 0; /* 0 = full page */
req->io_DestRows = 0;
req->io_Special = SPECIAL_TRUSTME;
DoIO((struct IORequest *)req);
CloseDevice((struct IORequest *)req);
DeleteIORequest((struct IORequest *)req);
DeleteMsgPort(port);PRD_DUMPRPORT is "dump the given rastport as a bitmap
image, at the requested dimensions." The printer driver
handles the conversion from Amiga bitplanes to whatever
raster format the physical printer needs, including colour
matching and dithering.
For text with formatting, apps typically render their own bitmap into an in-memory rastport and print that — which is what Wordworth, PageStream, and Final Writer do.
28.6. PostScript
For PostScript output, either:
-
Send PostScript through the PostScript driver — the driver’s
PRD_RAWWRITEcommand accepts raw bytes and forwards them to the port. Your app builds a PostScript document in memory and pipes it out. -
Use a PostScript-aware application — Final Writer, PageStream, and Wordworth all generate PostScript internally when printing to a PostScript-configured driver.
Modern network laser printers usually accept PostScript over IPP; the AmigaOS-to-printer path is Amiga → serial/parallel → Pi/host → CUPS → printer. If your Amiga has an Ethernet card and Roadshow, and your printer supports LPD, you can also print directly from the Amiga to the printer:
1> lpr Type document.ps >TCP:printer.local/515TCP: handler + raw LPD protocol works for simple cases.
28.7. Printing under emulation
Under FS-UAE the printer output goes to a file (printer_file
== /path/to/file.ps in the config). The file accumulates
whatever the Amiga would have printed. You can then open it
in Preview.app (macOS) or Evince (Linux), or send it to your
real printer via lp or lpr.
Under WinUAE the parallel port can be mapped to LPT1: on
Windows, from where the standard Windows printer subsystem
takes over.
This is the easiest way to test print output — the emulator captures it, you inspect it on the host, and if it looks right you spool it to a real printer.
28.8. Printing under MorphOS and AmigaOS 4
MorphOS ships a modern printing subsystem with:
-
Support for PostScript, PCL, and CUPS-style raster.
-
Native drivers for many current printers.
-
A GUI print-configuration panel that resembles modern desktop OSes.
AmigaOS 4 similarly modernised the printing stack. Print
Manager (Hyperion) replaces the classic Printer preferences
with a more capable panel. Applications can talk to a modern
CUPS-style print system without knowing about printer.device.
For classic 68k in 2026, the best experience is:
-
Bundle TurboPrint for modern printer support.
-
Or use PostScript-to-file and route through a modern host.
28.9. References
-
Amiga ROM Kernel Reference Manual: Devices, chapter on
printer.device. -
Commodore-Amiga, AmigaDOS Manual, chapter on
PRT:and the Printer preferences. -
TurboPrint documentation, http://www.irseesoft.de/turboprint.html.
-
Aminet’s
text/print/category — drivers, tools, filters. -
Amiga Print HOWTO on the community wiki: http://wiki.amigaos.net/wiki/Printing.
Next: modern practicalities — porting Unix software, dealing with modern web, CI, and floppy imaging.
Part VI: Part VI: Modern Amiga
The four living platforms in 2026 and the practical work of using an Amiga in the modern world — porting Unix software, getting online, building with CI, rescuing floppies.
|
Platform coverage: deliberately spans all four families (classic 68k AmigaOS 3.2, AmigaOS 4.x PowerPC, MorphOS, AROS) with per-section markers indicating what applies where. |
Chapter 29. Modern Amiga: Where the Platform Lives in 2026
Everything up to this point has been about classic 68k AmigaOS, because it is the version most returning users will run and the one whose lineage all the others trace back to. This final chapter is a tour of the three other living Amigas — AmigaOS 4 (PowerPC), MorphOS, and AROS — plus a note on Kickstart 3.2 itself, which is a "modern" thing that runs on old hardware.
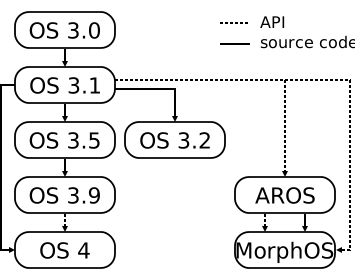
The four branches all trace back to the AmigaOS 3.1 API and the ROM Kernel Reference Manuals Commodore published between 1991 and 1994. What happened after Commodore’s bankruptcy in April 1994 is that the API forked. Two commercial teams (Hyperion for AmigaOS 3.2 and 4.x; the MorphOS Team for MorphOS) and one open-source project (AROS) each took the classic API forward on different hardware and with different implementation choices, without formally merging back. As a result you have four systems in 2026 that all look like an Amiga to an application programmer but differ significantly in kernel design, memory model, and target hardware. This chapter goes through each in turn.
29.1. AmigaOS 3.2 on classic 68k hardware
Hyperion Entertainment’s 3.2 series (3.2, 3.2.1, 3.2.2 as of writing) is a first-party update to classic 68k AmigaOS, shipping between 2021 and 2024. It targets exactly the hardware AmigaOS 3.1 targets — real Commodore machines from 1985 to 1994, plus modern FPGA and PiStorm accelerators — and is almost fully backward-compatible.
The commercial position: Hyperion holds the licence to distribute classic AmigaOS. You buy Kickstart 3.2 and Workbench 3.2 as a boxed package (physical ROM chips for machines with a socketed ROM; disk images and installation media for everything else). Support and updates run through their online store.[44]
29.1.1. What is new relative to Kickstart/Workbench 3.1
The changes in aggregate over the 3.1.4 → 3.2 → 3.2.2 line-up are substantial:
-
Shell — persistent history across sessions (kept in
ENVARC:Sys/shell-history), coloured output, an improvedMorecommand, backward/forward search on history with Ctrl+R, and a set of new built-ins includingWhich,Env,Which, andVolimprovements. -
ReAction — the OS-4-first-party widget toolkit is now shipped in ROM on 3.2. Applications can target ReAction on 3.2 and count on it being present.
-
Filesystem — the Fast File System is updated to a version that stores modification times on directories (not just files), and the disk-cache layer is more robust to power-off events. Full 64-bit device I/O throughout the DOS layer means large partitions (>4 GB) work natively — a real problem on 3.1 which was 32-bit-limited to 2 GB per partition.
-
Kickstart ROM size — up from 256 KB (Kickstart 1.3) or 512 KB (Kickstart 3.1) to 512 KB in 3.2. On A500 and A600 the extra size is fitted by socketing a bigger EPROM; on A1200, A3000, A4000 the ROM sockets already accept 512 KB parts.
-
CPU support — clean 68020/030/040/060 detection and MMU handling. On a real 68060 with an MMU you get memory-touch detection out of the box, which is the closest thing 3.x has to Enforcer.
-
Datatypes — PNG, JPEG, GIF, WebP datatype handlers are supplied in the base install; any datatype-aware program (MultiView, YAM, IBrowse) can display those formats without installing anything else.
-
Locale — expanded language catalogue, improved date and time formatting, better handling of non-ASCII filenames.
-
Prefs — a new DevInfo preferences editor for partitioning and mount management, a new Overscan editor that understands modern flicker-fixed and VGA display modes, and improvements to Screenmode.
-
Ringhio — an OS-level notification pop-up system, similar to macOS notifications. Any program can post one via a small library call; users can review recent notifications in a history window.
-
New commands in
C:includingAVail(memory display with fragmentation info),Env(dump the ENV: namespace),Delay(drop-inWaitwith tick granularity), a fixedSearch, and modernisedInfoandVersion.
The catch: 3.2 costs money. Hyperion charges roughly €35 for a digital licence, €60 for the boxed 68020+ set with printed manual, more for A500/A600/A1000 ROMs. There is no legal free alternative for real hardware; AROS m68k is the closest thing but is not source-compatible at the ABI level.
29.1.2. Installing OS 3.2 on your emulator
If you already have a working 3.1 setup:
-
Buy the "AmigaOS 3.2 for Emulation" bundle from Hyperion. You get a
.romfile (the Kickstart) and.adf/.isodisks (Workbench + Extras + Storage + Locale + Fonts + Install). -
In FS-UAE, edit your config: change
kickstart_file =to the new ROM path. Restart the emulator to a "no bootable disk" screen. -
Boot from the Install disk (change
floppy_drive_0 =to point atInstall3.2.adf, restart). The Install program walks you through the choices: HD size, filesystem, language. -
When install completes, remove the floppy, boot from the HD. You get the new Workbench.
Keep a copy of your old 3.1 HDF around — some old software (some demos, some games) is picky about the Kickstart version and resents 3.2. Being able to swap in a 3.1 config for a few minutes is worth the disk space.
29.2. AmigaOS 4.1 Final Edition (PowerPC)
Hyperion’s PowerPC continuation of AmigaOS. Ships on the AmigaOne series (from Eyetech’s original AmigaOne 2001 board to A-Eon Technology’s current AmigaOne X5000 and Tabor boards) and, in the "OS 4 Classic" build, on some 68k Amigas with a PowerPC accelerator card.
The version history is easier to follow than the number scheme suggests:
-
AmigaOS 4.0 shipped as a "Developer Pre-Release" in 2004 on the AmigaOne SE and XE. Not commercial-quality; largely ignored today.
-
AmigaOS 4.0 October Update (2006) is the first version most people call "AmigaOS 4."
-
AmigaOS 4.1 (2008) is a substantial rewrite of the graphics and window management layers. Introduces proper compositing, memory protection improvements, and the current SDK.
-
AmigaOS 4.1 Final Edition (2014) plus Final Edition Update 1 and Update 2 (through the late 2010s) is what ships today. Continuous update packages have shipped since.
29.2.1. The interface ABI
The single biggest change from classic AmigaOS is the introduction of interfaces. Instead of calling library functions through a global base pointer plus a fixed negative offset — the way classic Amiga library calls have worked since 1985 — OS 4 calls go through a per-interface function-pointer table:
/* Classic OS 3.x: */
struct Library *DOSBase = OpenLibrary("dos.library", 39);
Printf("Hello\n"); /* macro to DOSBase->LVO_Printf */
/* AmigaOS 4: */
struct Library *DOSBase = IExec->OpenLibrary("dos.library", 53);
struct DOSIFace *IDOS = (struct DOSIFace *)IExec->GetInterface(DOSBase, "main", 1, NULL);
IDOS->Printf("Hello\n");The IExec, IDOS, IIntuition etc. pointers replace the
implicit "global base + offset" ABI. This maps cleanly to the
PowerPC calling conventions and enables features the classic ABI
could not: multiple versions of a single library co-existing,
per-thread library state, extensible interfaces where new
functions can be added at the end without breaking old callers.
Hyperion supplies compatibility macros in the SDK
(SDI_compiler.h and friends) so a single source file can build
cleanly on both 3.x and 4.x. The pattern is:
#include <proto/dos.h> /* pulls in the right glue */
Printf("Hello\n"); /* works both places */For truly cross-platform code you use IDOS→Printf on OS 4 and
plain Printf on 3.x. Which the header hides behind a macro.
29.2.2. Memory protection
OS 4 has real memory protection. Each process runs in its own
address space; a wild pointer touches page zero and gets a page
fault, not a Guru Meditation across the whole system. The
per-process pages are on top of a "shared" heap for structures
that need to be visible to exec.library (message ports,
signal semaphores, tasks) — those still live in the classic-style
shared address space.
For applications written to the classic API assumptions — passing raw pointers across process boundaries — OS 4 has a compatibility mode where those pointers get transparently mapped to shared pages. It costs performance and it does not always work; a handful of old apps still need the emulator’s "no protection" switch on OS 4.
29.2.3. The Grim Reaper
When a task does crash, a diagnostic requester appears — the Grim Reaper. You can inspect the crash, see a register dump and a symbolic backtrace, choose to dismiss the offending process (rather than reboot), or ask the OS to attempt a recovery.
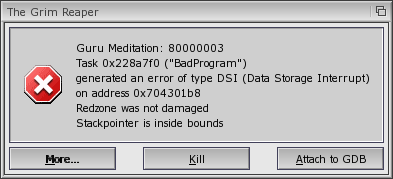
The Reaper’s dump includes:
-
The task name and process name.
-
CPU registers at fault time — all 32 GPRs plus the PowerPC special registers.
-
Instruction address with a nearby disassembly.
-
Stack backtrace — up to a few hundred frames.
-
Optional module map — which loaded segment the fault fell in, and the offset within it, for post-mortem debugging with
gdbagainst the module’s.debugfile.
This is the debugging experience Enforcer/MuForce approximated on classic AmigaOS; on OS 4 it is built-in.
29.2.4. SMP and threading
OS 4.1 Final Edition on the X5000 (dual-core PA6T-1682M) uses
both cores. The scheduler is symmetric — tasks can run on either
CPU. Semaphore primitives are extended with atomic operations
(AtomicInc, AtomicDec, AtomicSwap) that generate
lwarx/stwcx. sequences on the PowerPC to guarantee
correctness across cores.
For application programmers writing new code, exec.library on
OS 4 provides real threads (CreateThread, NewProcess) that
share address space explicitly rather than accidentally. Old
code using CreateNewProc still works but implicitly gets the
"my child shares my address space" behaviour.
29.2.5. Toolchain
The OS 4 SDK includes:
-
GCC — the reference compiler; current versions target PowerPC EABI with the AltiVec extension when present.
-
clang — LLVM 15+ ports for OS 4 exist and are maintained by the AmigaOS 4 community.
-
GDB — with hardware debug support on the X5000 and X1000.
-
AmigaOS SDK Autodocs — HTML reference for every library interface.
-
A set of examples — Hello-world through OpenGL windowing.
Cross-compilation from Linux to OS 4 is supported; the
Adtools toolchain project on GitHub packages a working
ppc-amigaos-gcc you can install on any modern Linux or Mac.
29.2.6. Practical: getting started with OS 4
If you want to try OS 4 today, the routes are:
-
Buy an X5000 or Tabor. Both boards ship new with a licensed OS 4.1 install. €700+.
-
Buy a used A1222 Plus (Tabor). Cheapest current-market entry to genuine AmigaOne PPC hardware.
-
Install into WinUAE’s OS 4 emulation mode. Recent WinUAE supports emulating a PowerPC via QEMU; it is slow but genuine. Requires purchased OS 4 media.
-
Install on a used PowerMac G5 via the community-supplied "AmigaOS 4 for Classic Amiga+" patch. Not officially supported by Hyperion. Requires a PowerPC accelerator config that Hyperion never shipped a version for; use at your own risk.
For new development, buy an X5000 or a Tabor. For evaluation and learning, WinUAE’s PPC emulation is genuinely usable on a 2020-vintage or newer host.
29.3. MorphOS
MorphOS is an independent operating system that runs Amiga applications. It is not derived from AmigaOS source; it is a separate PowerPC OS written from scratch by a Belgian/Finnish/German team that started in 1999, source-compatible with the AmigaOS API where it made sense to be.
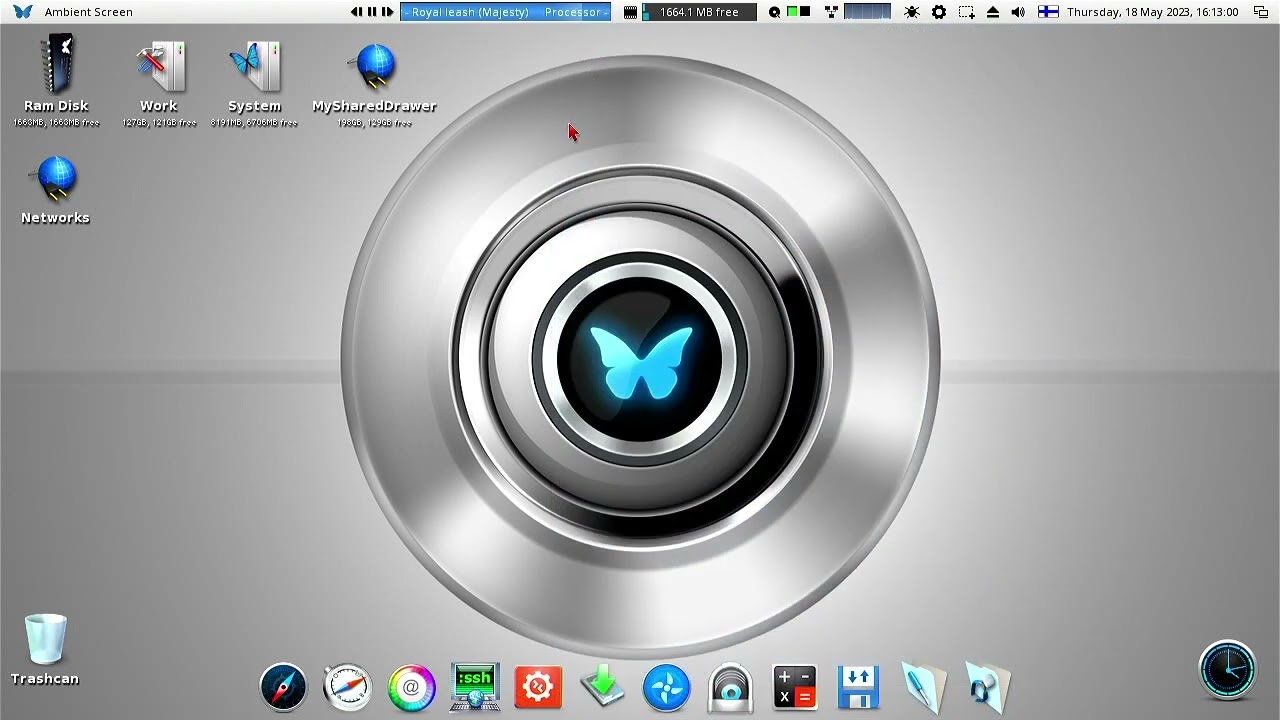
The MorphOS architecture, showing where the compatibility layers sit relative to the native Quark microkernel and the PowerPC hardware:
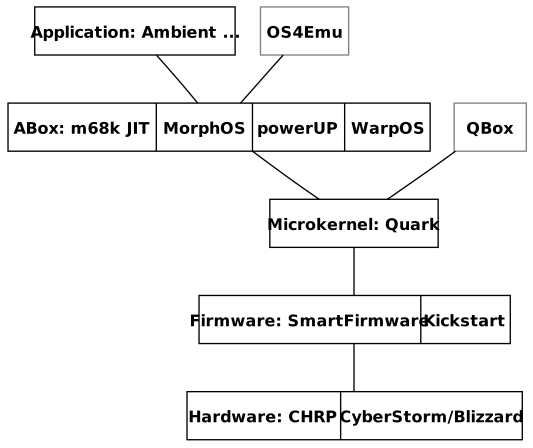
The layers, top to bottom:
-
Ambient — the desktop, replacing Workbench. Skinnable, uses MUI 5 (a substantial evolution of MUI 4) for its widgets, supports composited window drawing with alpha, drop-shadows, and hardware-accelerated blits on any supported GPU.
-
MUI 4 and MUI 5 — the toolkit ships as part of the OS. A modern MUI application (say, WebKit-based Odyssey Web Browser) runs natively on MorphOS with GPU-accelerated rendering, and the same source will build on classic AmigaOS under MUI 3.9 with software rendering.
-
ExecSG / ELF ABI — MorphOS uses ELF for its native executables (unlike classic’s Hunk format or OS 4’s ELF-with- Hunk-metadata). Native binaries are ordinary PowerPC ELF and can be examined with standard
readelf. -
ABox — an emulator for classic 68k Amiga code, running as part of the OS. Includes a JIT compiler (Trance) that dynamically recompiles frequently-executed 68k code to PowerPC. Real-world 68k programs run at speeds comparable to or better than a 68060, sometimes much faster.
-
Quark — the microkernel. Small (~250 KB), preemptive, supports SMP, provides message passing, address-space isolation, and low-level scheduling.
29.3.1. Supported hardware
Because MorphOS started on the Genesi Pegasos and later added PowerPC-Mac support, the hardware list is genuinely varied for a niche OS:[45]
-
PowerMac G4 — Sawtooth, Gigabit, Digital Audio, QuickSilver, Mirror Drive Doors. All 100-MHz+ FSB variants supported.
-
PowerMac G5 — 1.6/1.8 GHz single and dual, 2.0 GHz DP.
-
PowerBook G4 — Titanium and Aluminium, 400 MHz to 1.67 GHz.
-
Mac mini G4 — 1.25 GHz to 1.5 GHz.
-
iBook G4 — 800 MHz to 1.42 GHz.
-
eMac — single-CPU G4.
-
Efika 5200B — Genesi’s low-power PowerPC evaluation board.
-
Pegasos I and II — Genesi motherboards.
-
AmigaOne X5000 — added support in MorphOS 3.15.
That list means MorphOS is by far the cheapest way to get a modern Amiga-family desktop OS on real hardware. A used PowerBook G4 costs €150–€250 on eBay; MorphOS itself is a "buy a licence" model at around €80 (with a demo mode that limits sessions to 30 minutes but is otherwise fully-functional and unlimited in time).
29.3.2. Ambient and MUI 5
The desktop, called Ambient, is arguably the most polished UI in the Amiga family. Layered, alpha-blended windows; live-preview window-dragging; drag-and-drop across every widget; hardware- accelerated font rendering; a docked launcher bar that can be themed and re-arranged in place. MUI 5 handles all of it.
Writing an application for Ambient is writing an application for MUI, using the same object-oriented tag-list API you would use on classic AmigaOS with MUI 3.9 installed. MUI 5’s additions are mostly backward-compatible enhancements: new class variants for image display, animation, richer notification. Applications that target MUI 4 (or even MUI 3.9) run and look correct on MUI 5.
29.3.3. Application ecosystem
MorphOS has ports of many of the applications you would want:
-
Odyssey Web Browser — WebKit-based, handles modern JavaScript-heavy sites. This is the single biggest reason to run MorphOS on real hardware: it is the only Amiga-family browser that reasonably handles the 2026 web.
-
MPlayer — full-featured; hardware-accelerated video where the GPU is supported (Radeon 9700+).
-
Wayfarer — a lightweight MorphOS-native browser built on the same WebKit as Odyssey.
-
VLC — via MPlayer’s engine.
-
PageStream — DTP with MorphOS-native rendering.
-
Hollywood — the multimedia scripting language, MorphOS version fully-featured.
Classic 68k Amiga applications from Aminet run under ABox at approximately or exceeding real-hardware 68k speed.
29.3.4. The commercial model
MorphOS is not open source but has a very generous demo mode: the full OS runs in 30-minute sessions, unlimited number of sessions, no other restrictions. A registered licence removes the timer.
Purchase and registration are per-machine — a licence for your PowerBook is not usable on your PowerMac. Prices are around €80 per licence.[46]
29.4. AROS
AROS Research Operating System is a clean-room reimplementation of the AmigaOS 3.1 API, open-source, portable to any CPU. It began in 1995 as "Amiga Replacement OS" and is now called "AROS Research OS" to sidestep the AmigaOS trademark.
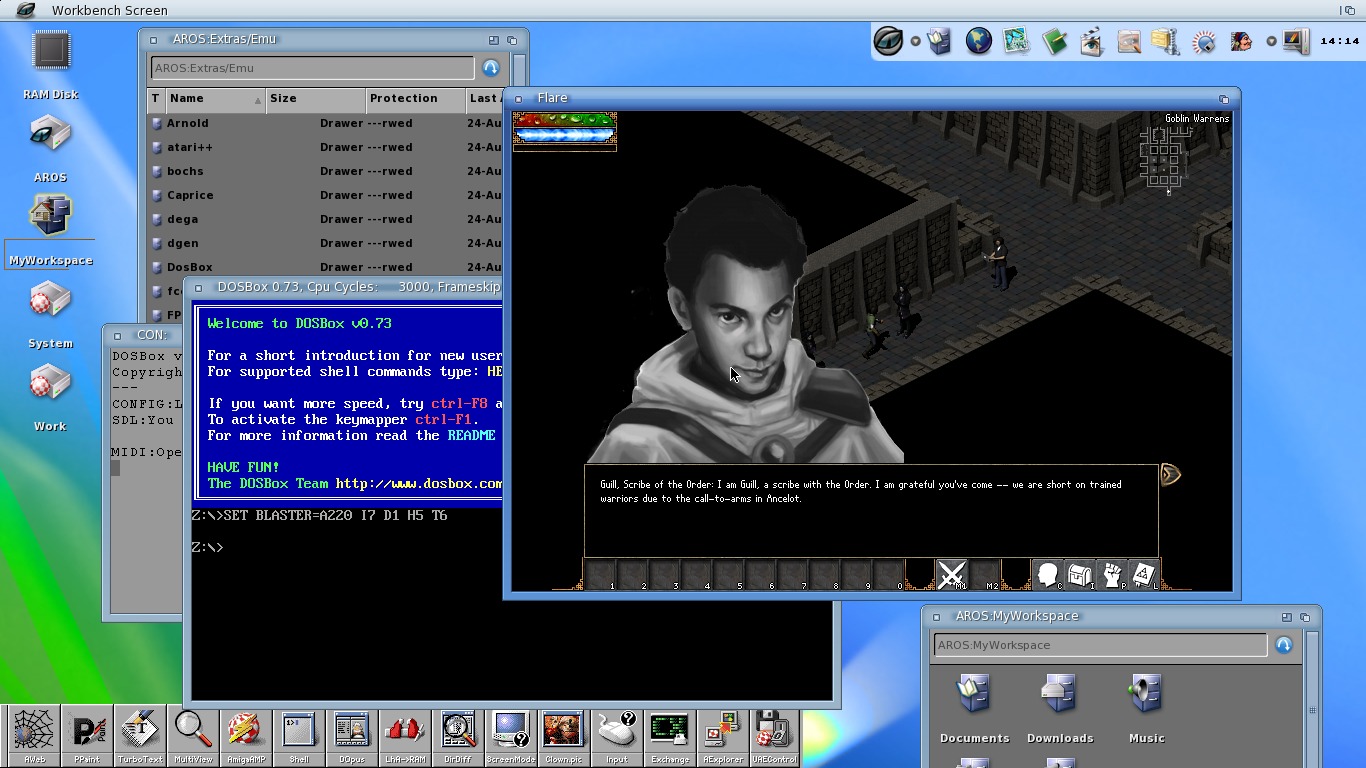
29.4.1. The idea
Read the classic AmigaOS 3.1 API documentation (the RKM). Write a new implementation from scratch that matches the documented behaviour, without looking at Commodore’s source. Ship it under an open licence (AROS uses APL, roughly MPL-flavoured). Port to new CPUs by abstracting the CPU-specific bits.
That is the whole idea, and it has worked. AROS is a full working OS with:
-
Exec — including tasks, priorities, memory allocation, signals, semaphores, message ports, libraries. Loaded on demand; API-identical to classic.
-
dos.library — full DOS including packet handling, ReadArgs, filesystem handlers, path resolution. Assigns, mountlists, the whole model works as in classic.
-
intuition.library — windows, screens, gadgets, menus, IDCMP. Zune (see below) provides the widget-toolkit layer.
-
graphics.library — including a modern RTG substrate that drives modern PCI/PCIe graphics cards.
-
Wanderer — the desktop, playing the role of Workbench. Renders the classic Amiga icons and drawer metaphor.
-
A modern I/O layer — USB (via
poseidon.libraryport), Ethernet, sound (AHI-based), full ATA and SATA support.
29.4.2. Ports as of 2026
AROS runs on more architectures than any other Amiga-family OS:
-
i386-hosted — runs as a Linux, Windows, or macOS application, in a window on the host desktop. Excellent for development because you can hack on AROS and reboot the "OS" by relaunching the process.
-
i386-native — bare-metal boot on any 32-bit PC.
-
x86-64 (as of ABIv2 — the modern branch) — bare metal on modern PCs.
-
arm-native — Raspberry Pi 2/3/4 and similar ARM boards.
-
m68k-native — runs on real 68k Amigas, providing a Kickstart-compatible ROM. This one is binary-compatible with classic AmigaOS at the ABI level (because 68k is 68k), and is a legal way to run "a Kickstart" on real hardware without buying Hyperion’s ROM.
-
ppc-native — PowerPC ports exist but are less mature than the x86 branches.
29.4.3. ABIv0 versus ABIv1
AROS ships in two ABI variants. The ABIv0 branch is source-compatible with AmigaOS 3.1 and stable. The ABIv1 branch adds 64-bit types, richer library dispatch (similar in spirit to OS 4 interfaces), memory protection on architectures that support it, and a series of API extensions. ABIv1 is not backward- compatible with binaries built for ABIv0 or classic AmigaOS.
For most users this does not matter: pick a distribution (Icaros
uses ABIv0), install it, everything works. If you write code, use
AROS_ABIV1 conditional preprocessor blocks to handle the
differences.
29.4.4. Distributions
Like Linux, AROS itself is a kernel-plus-userland; distributions package it with themes, applications and drivers into a bootable installer:
-
Icaros Desktop — the most polished distribution. x86 native and 64-bit hosted builds. Ships with a curated set of applications, themes, and up-to-date drivers.[47]
-
AROS One — an Italian community distribution, more aggressively themed than Icaros, with different application choices.
-
AspireOS — an ARM-focused distribution aimed at the Raspberry Pi 4.
-
AROS Broadway — an older i386 distribution, less active now but still downloadable.
-
AROS-Vision — a m68k distribution for real hardware or emulated Amigas.
For a first experience, download Icaros as a VirtualBox image and boot it. You are on Wanderer within thirty seconds.
29.4.5. Zune, the toolkit
Zune is AROS’s toolkit. It is a MUI-compatible reimplementation: the same class hierarchy, the same attribute tags, the same event notification. MUI source code targets Zune unchanged. This matters because it means the vast Aminet library of MUI applications rebuild on AROS and run natively.
29.4.6. What AROS does not get you
-
Binary compatibility with 68k Amiga executables. AROS on x86 is API-compatible but not ABI-compatible — you rebuild source, you do not run Amiga floppy binaries. (The m68k-native port is binary-compatible; it is a 68k system.)
-
The commercial polish of AmigaOS 3.2 or 4.1. Some corners are rough. The colour scheme is a bit spartan compared to MorphOS Ambient.
-
A rigid update cadence. AROS is a rolling development target; the distributions release semi-regularly, the underlying OS commits every day.
29.4.7. Why bother
-
You want an Amiga-family desktop on modern hardware for zero cost.
-
You want to hack on the OS itself.
-
You want to run a legal Kickstart-substitute on real 68k hardware.
-
You are interested in the historical value of a clean-room reimplementation project that actually shipped.
29.5. Comparing the four
| Aspect | AmigaOS 3.2 | AmigaOS 4.1 FE | MorphOS 3.x | AROS |
|---|---|---|---|---|
CPU |
68000/020/030/040/060 (+ FPGA) |
PowerPC (AmigaOne, X1000, X5000, Tabor, Sam4xx) |
PowerPC (Apple G4/G5, Pegasos, X5000) |
x86-32, x86-64, ARM, 68k, PPC |
Memory protection |
No (single flat address space) |
Yes, per-process, with compat mode |
Yes, per-process |
Optional (ABIv1) |
SMP |
No (single core) |
Yes (on X5000) |
Yes |
Yes (on ABIv1) |
ABI |
Classic (base+offset) |
Interface (function-pointer tables) |
ELF native |
Both (ABIv0 classic, ABIv1 modern) |
Native binaries |
Hunk |
ELF+Hunk metadata |
ELF |
Hunk (m68k) or ELF (others) |
Widget toolkit |
gadtools + ReAction (in ROM) |
ReAction (in ROM) + MUI (add-on) |
MUI 5 (in OS) |
Zune (MUI-compatible) |
Web browser |
NetSurf, IBrowse |
Odyssey, NetSurf, Timberwolf |
Odyssey, Wayfarer |
NetSurf, OWB port |
Cost (2026) |
~€35 digital |
Included with X5000 or Tabor; €150 upgrade |
€80 licence (free demo) |
Free (open source) |
Kernel size |
512 KB ROM |
~4 MB modules |
~250 KB Quark + modules |
~1 MB modules |
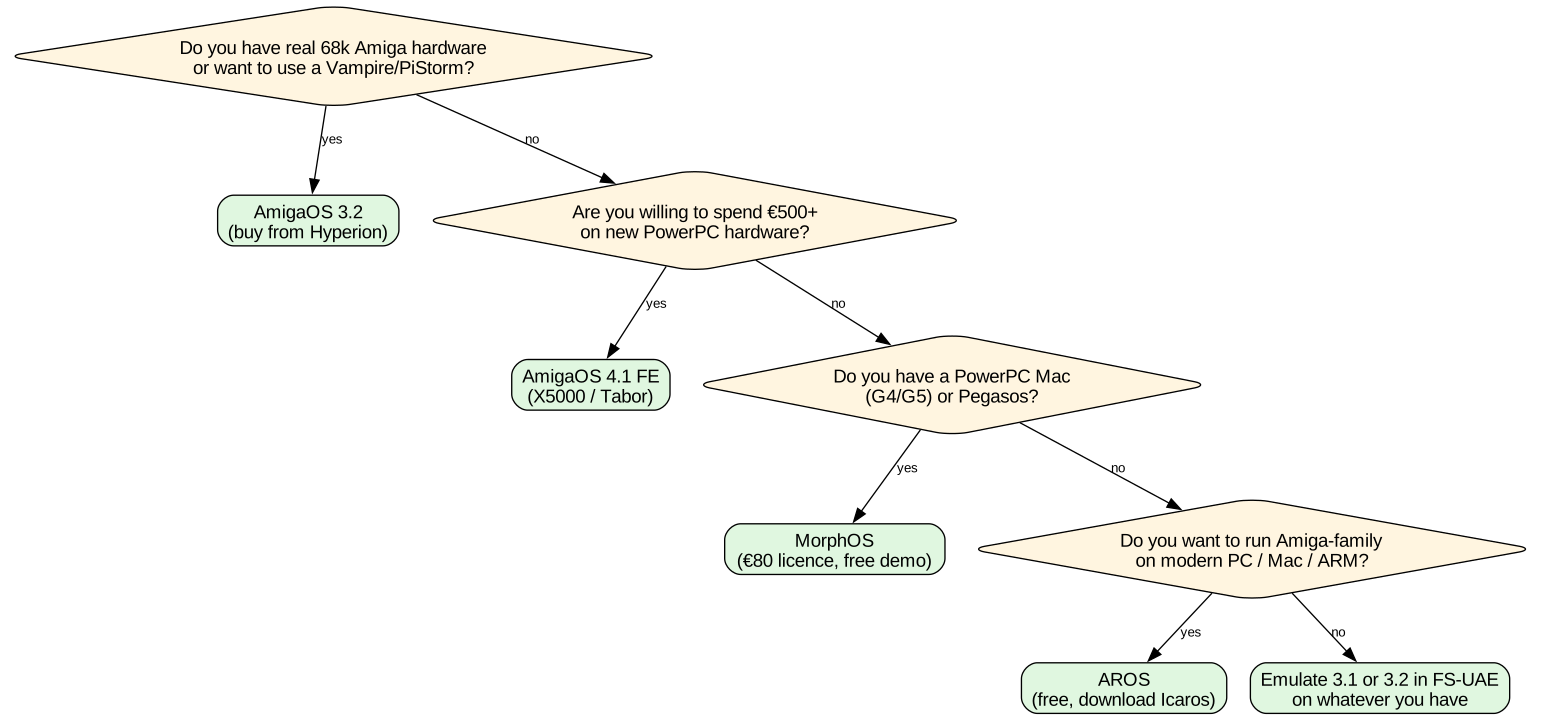
29.6. Hardware today
Beyond emulation and second-hand original hardware, the retro-active side of the community produces new machines. This is not the tiny niche it sounds — several of these have thousands of active units in the field.
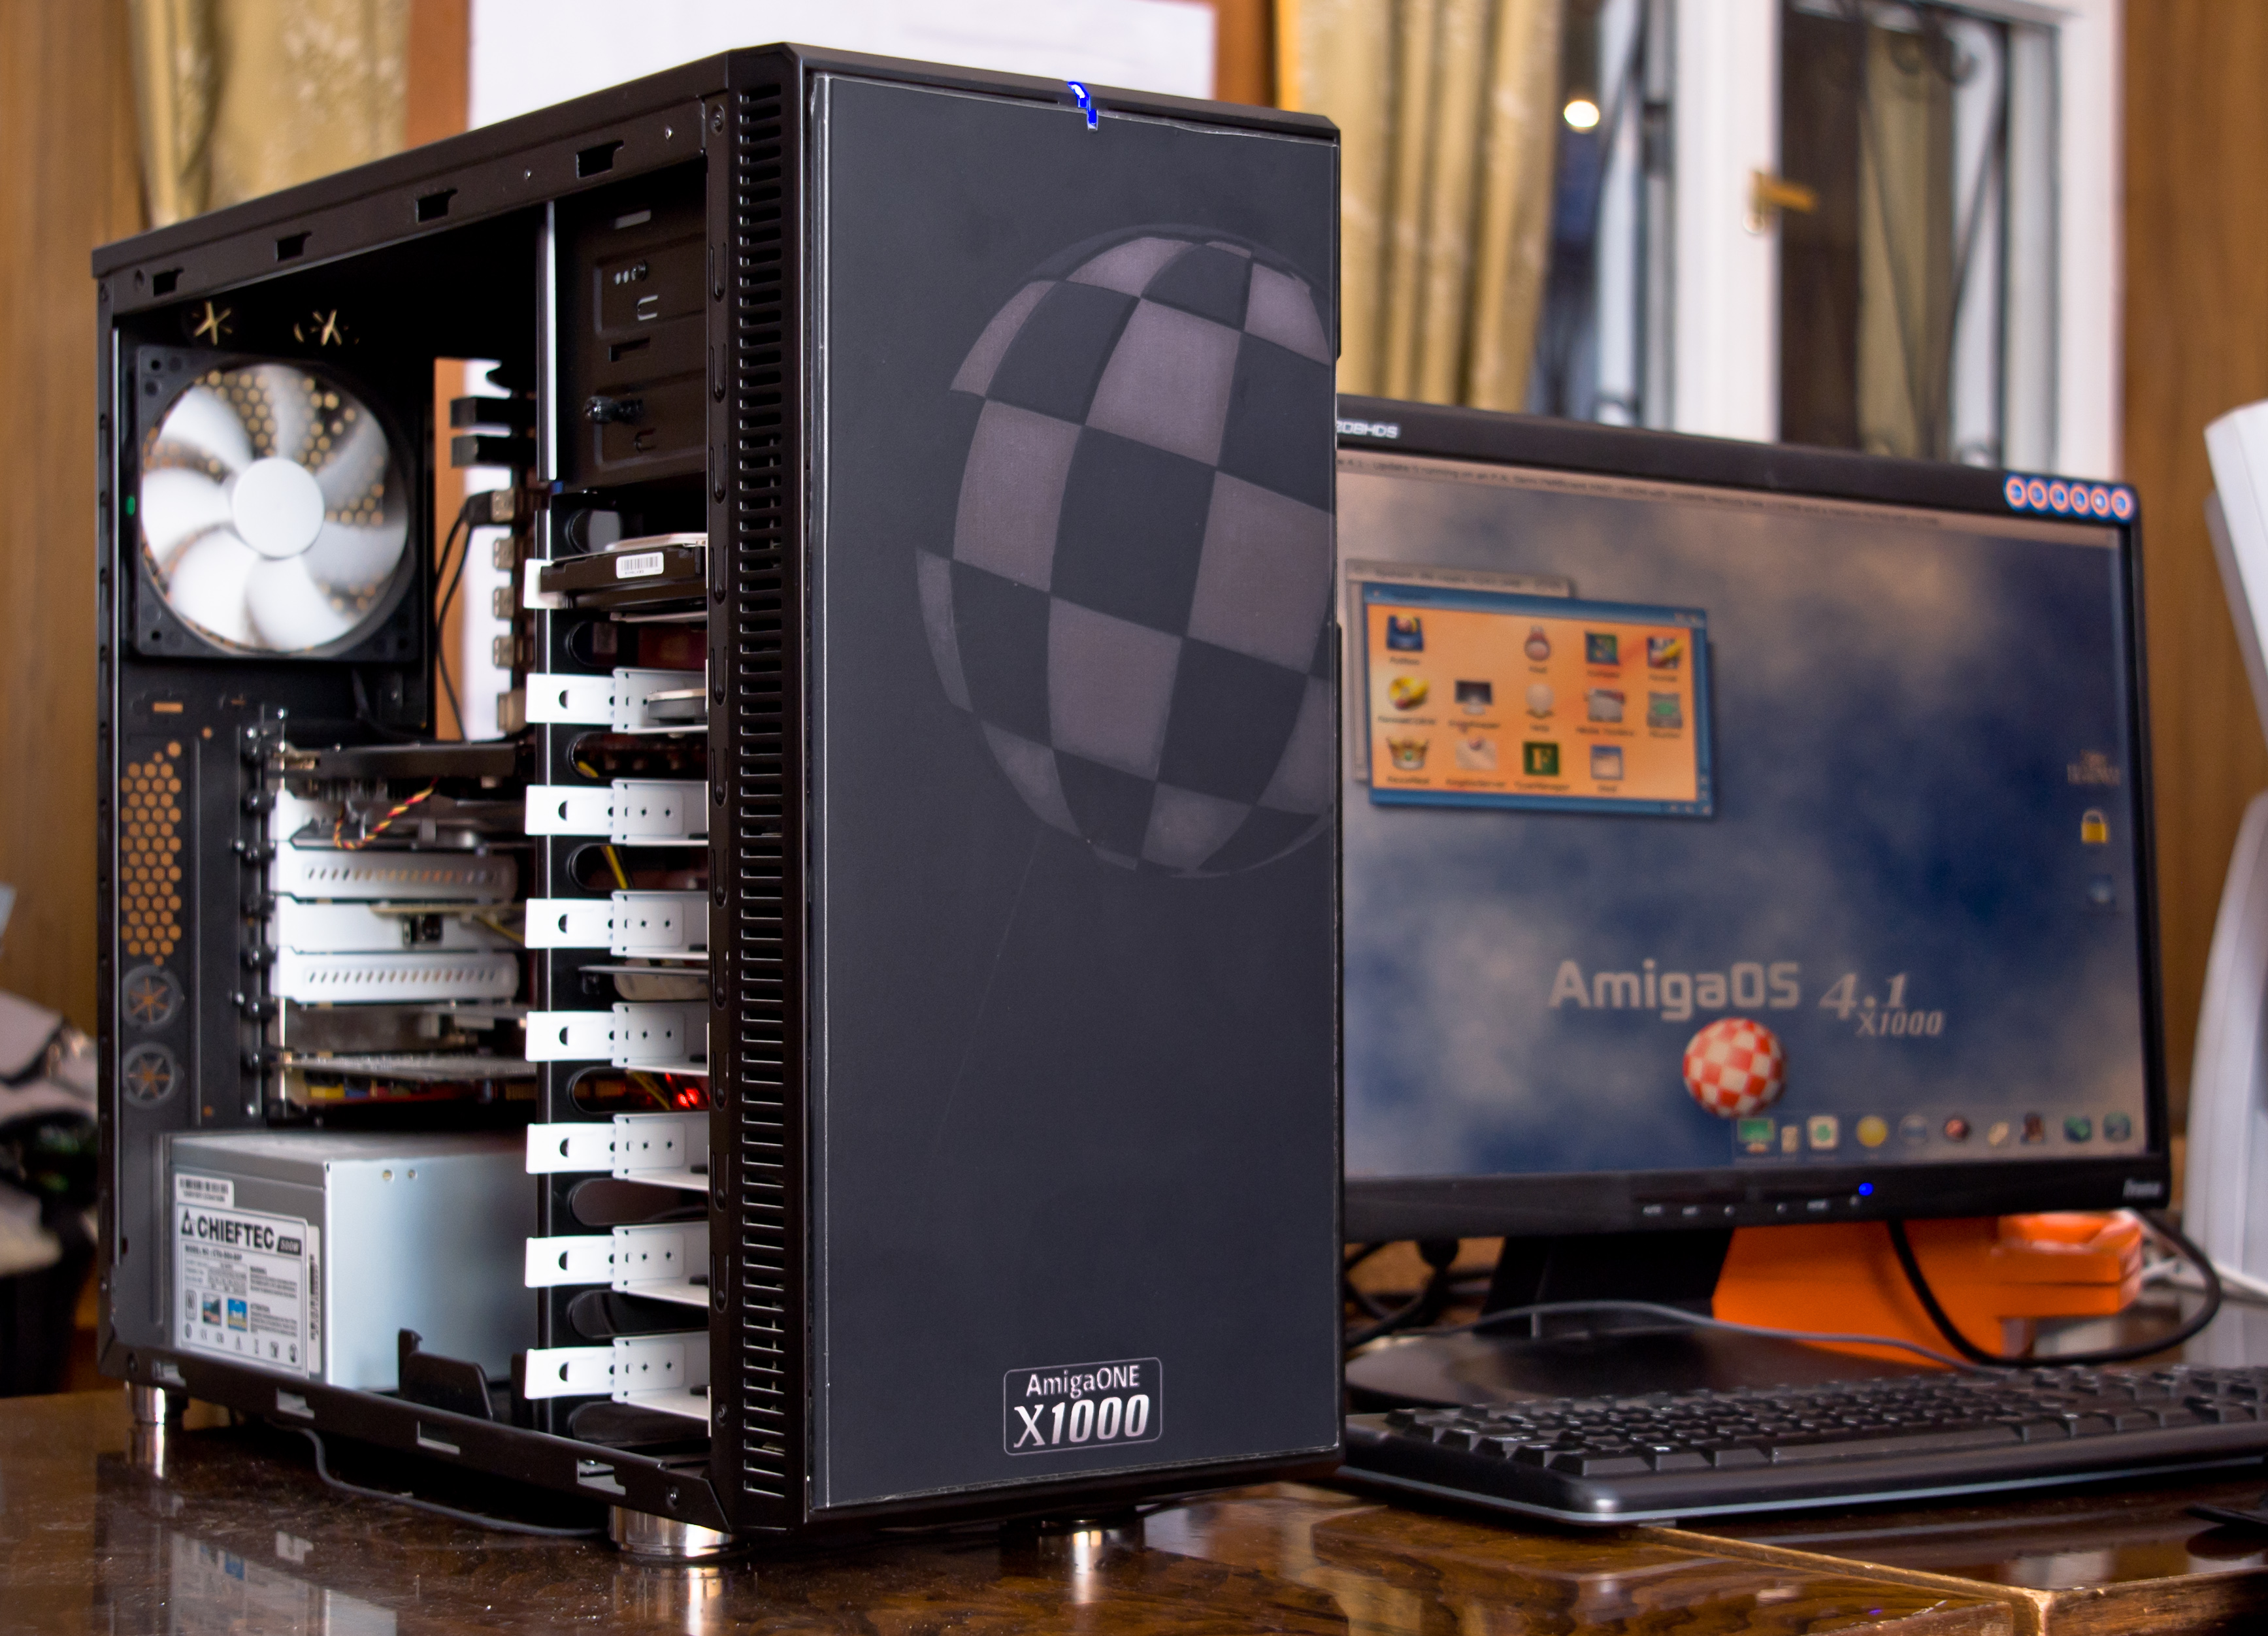
29.6.1. A-EON’s AmigaOne family
-
AmigaOne X5000 — the flagship, released 2016 and still shipping in updated revisions. Dual-core PA6T-1682M PowerPC at 2 GHz (the "40" model) or a single-core Freescale P5020 at 2 GHz (the "20" model). PCIe expansion, USB 3.0, SATA-3, Radeon-family GPU. Ships with AmigaOS 4.1 Final Edition and Update 3 pre-installed. €1500+ new.
-
AmigaOne X1000 — 2011 predecessor to the X5000. Notable for its custom Xena XMOS coprocessor (a small 4-core RISC chip you can program from AmigaOS 4 for real-time work). No longer in production; used-market values ~€800.
-
AmigaOne A1222 Plus (Tabor) — cost-reduced PPC board with a 1.2 GHz e5500 PowerPC. Small ITX form factor. €600–€700 new. The current "entry level" for a genuine AmigaOne.
-
AmigaOne 500 — a Sam460 board (Freescale MPC8347) in an Amiga-shaped mini-tower. Discontinued but common on eBay for €400–€500.
-
Sam460ex, Sam460le — ACube Systems boards, MPC8347 or MPC8377. Older but still supported by AmigaOS 4.
29.6.2. FPGA recreations
-
MiSTer on the DE-10 Nano — the general FPGA retro platform whose Minimig core is an accurate A500/A600/A1200 recreation. Also runs cores for dozens of other machines (Atari ST, Neo Geo, SNES). Total cost ~US$300 including a case, SD card, and USB hub. Actively developed with monthly updates and a passionate community.[48]
-
Minimig-style boards — the ancestor of MiSTer’s Amiga core. Various small FPGA boards from the mid-2010s, still supported but generally superseded by MiSTer for new builds.
-
Vampire V4 Standalone — an Amiga-shaped FPGA machine containing an Apollo Core CPU (a superscalar 68080-compatible) and RTG graphics. Ships with a Kickstart-compatible ROM (AROS m68k by default). Roughly €500. The Apollo Team also sells Vampire V4 A600 and V4 A1200 accelerator cards that fit inside real Amigas.[49]
-
ReAmiga 1200 and similar — modern-manufactured A1200 motherboards using surface-mount replicas of the original chips, letting you build a new A1200 from parts.
29.6.3. PiStorm
The PiStorm and PiStorm32-lite are boards that plug into the CPU socket of a real Amiga and use a Raspberry Pi (Pi 3A/3B or Pi 4/CM4) to emulate a fast 68040 (or Apollo Core 68080-compatible) plus hundreds of MB of shared memory. Effect:
-
An A500 becomes something that outperforms an A4000/40 by 2–4×.
-
A1200 with a PiStorm32-lite runs Kickstart 3.2 at 100 MHz- equivalent speeds.
-
Optionally, the Pi side can also emulate an RTG graphics card, a hard drive, an Ethernet card, and USB support — all through the CPU-socket bus.
PiStorm is genuinely transformative for real 68k hardware. Under €100 all-in, and it turns a rescued A500 into a machine you would use as a serious workstation. The community documentation on GitHub is excellent.[50]
29.6.4. What to actually buy in 2026
The pragmatic recommendations:
-
First time returning, want to just play: FS-UAE + Amiga Forever, on the Mac you already have. €30, ready in an hour.
-
Want the feel of real Amiga hardware without hardware headaches: MiSTer FPGA on a DE-10 Nano. €300, works out of the box.
-
Want to breathe life into real 68k hardware: A used A500 or A1200 (€150–€300 depending on condition) plus a PiStorm (€100). Modern speed, modern connectivity, original chipset.
-
Want to hack on the OS: AROS hosted on your current Linux or Mac. Free, source-hackable, boots in five seconds.
-
Want a modern Amiga-family desktop as a daily driver: MorphOS on a used PowerBook G4 (€200–€300 total). Genuine modern desktop OS, modern browser, actively developed.
-
Want the flagship AmigaOS 4 experience: an X5000. €1500+, ships ready to go, community is active.
For books to read while your machine downloads Aminet, see [Appendix B: Sources and Further Reading]. The community is not in decline. It is, if anything, more active in 2026 than it was in 2005, powered by cheap FPGAs, working emulation, and the same stubborn love of a machine that shouldn’t still exist but does.
Enjoy the Amiga.
Chapter 30. Porting Unix Software
Every modern Unix codebase ports to Amiga with the right shim. It won’t always be worth porting (a modern Node.js runtime is unmanageable; a Rust webserver requires infrastructure the Amiga doesn’t have), but small-to-medium C codebases usually port cleanly, and many major utilities (git, vim, emacs, nginx, sqlite, sqlite-based tools) already have Amiga ports maintained by the community.
This chapter is a practical guide: which C library shim to pick, what the common gotchas are, how to structure your build for cross-compilation from a modern host, and where to find prior art so you don’t reinvent the wheel.
30.1. Three C library shims
The compiler ships object code; the C library provides printf,
malloc, strcmp, and everything else. Three options for the C
library on classic 68k AmigaOS:
| Library | Strengths | Weaknesses |
|---|---|---|
libnix |
Bundled with bebbo GCC. Small binaries. Native AmigaOS memory allocation. No POSIX layer overhead. |
Not fully POSIX. Missing many stdio features (open flags, fseek modes). Some |
ixemul |
Full POSIX layer: |
Big shared library (~200 KB). Slow startup. Programs feel less native. |
clib2 |
Modern replacement for libnix. Fuller stdio. Better POSIX than libnix without ixemul’s overhead. Now the recommended default for new work. |
Newer, some rough edges. Requires |
newlib |
Cygnus Newlib port. Full ANSI C library. Used on AmigaOS 4 and increasingly on 68k. |
Larger footprint than libnix. Not universally available on old 68k toolchains. |
Recommendation for new work — clib2 or newlib. Both give you
fopen/fread/stdint.h/unistd.h without the ixemul weight.
For porting existing Unix code — start with ixemul; if performance matters, do a second pass with clib2.
Under bebbo’s m68k-amigaos-gcc:
# clib2 (default in recent versions):
$ m68k-amigaos-gcc -mcrt=clib2 -o foo foo.c
# newlib:
$ m68k-amigaos-gcc -mcrt=newlib -o foo foo.c
# libnix (small binaries):
$ m68k-amigaos-gcc -noixemul -o foo foo.c
# ixemul (full POSIX):
$ m68k-amigaos-gcc -o foo foo.c30.2. Common porting gotchas
The pattern of Unix source not compiling on Amiga is usually one of six things.
30.2.1. 1. Path syntax
Unix code writes paths like /etc/foo.conf. On Amiga that’s a
parent-directory reference (chapter 6). Programs that call
open("/etc/passwd") will get ENOENT because there is no /etc
in the parent of the CWD.
Fix: introduce a path_translate() helper at the boundary. Unix
paths in config files map to Amiga assigns:
static char *translate_path(const char *unix_path)
{
static char buf[512];
if (strcmp(unix_path, "/etc/foo.conf") == 0)
strcpy(buf, "ENVARC:foo/foo.conf");
else if (strncmp(unix_path, "/var/log/", 9) == 0)
snprintf(buf, sizeof(buf), "LOGS:%s", unix_path + 9);
else
strcpy(buf, unix_path);
return buf;
}For any nontrivial port, provide a per-app tooltype in the icon that overrides the default paths.
30.2.2. 2. Fork and process model
Unix programs fork() and exec() freely. AmigaOS has no
fork() and (until OS 4 introduced threads) shares one address
space between all "processes."
Options:
-
Under ixemul,
fork()works (implemented as a task-level copy on write via ixemul’s runtime). Slow but functional. -
Under clib2/newlib, no
fork(). Rewrite asCreateNewProc()— spawn a new AmigaOS process, which shares your address space. -
For fork-then-exec patterns, use
SystemTagList()— the Amiga’s "run this command" primitive. Blocking or non-blocking.
Concrete: replace
pid_t p = fork();
if (p == 0) { execvp("ls", args); }
waitpid(p, &status, 0);with
#include <proto/dos.h>
LONG rc = SystemTagList("ls -la", NULL); /* blocks until done */or, for concurrent execution:
LONG rc = SystemTagList("ls -la",
(struct TagItem[]) {
{ SYS_Asynch, TRUE },
{ TAG_END, 0 }
});30.2.3. 3. Signals
POSIX SIGINT, SIGTERM, SIGQUIT do not exist on classic
AmigaOS. What you have is Exec signals (SIGBREAKF_CTRL_C,
_D, _E, _F) accessed via SetSignal and Wait.
Trivial mapping:
-
SIGINThandler → checkSetSignal(0, 0) & SIGBREAKF_CTRL_Cperiodically. -
SIGTERM→ treat Ctrl-C as terminate. -
Long-running commands should check the break signal at reasonable intervals.
ixemul’s signal handling maps POSIX signals to Exec signals
where it can, so ixemul-linked programs can use `signal(3)
directly. For clib2/newlib, do the check manually.
30.2.4. 4. Endianness and word size
68k is big-endian. If your Unix source assumes little-endian
(x86 code), byteswap explicitly:
#include <netinet/in.h>
/* Network byte order (big-endian) — no-op on 68k. */
uint32_t val = htonl(local_value);
uint32_t back = ntohl(val);If it assumes 32-bit-integer int, note that plain int on
68k AmigaOS is 32 bits. If it assumes 32-bit long and 64-bit
long long, that’s also correct on 68k. If it assumes 64-bit
long, that’s an LP64 assumption and 68k is ILP32; use
int64_t/uint64_t explicitly.
For any binary I/O that came from little-endian:
#include <stdint.h>
static uint32_t le32(const uint8_t *p) {
return (uint32_t)p[0] | ((uint32_t)p[1] << 8) |
((uint32_t)p[2] << 16) | ((uint32_t)p[3] << 24);
}30.2.5. 5. Missing libraries
Unix programs pull in pthread, dl, crypt, pcap, X11,
GLib, libcurl, openssl. AmigaOS has:
-
Threads — no pthread in 68k, but
CreateNewProc
semaphores approximate. On OS 4, use OS 4 threads. -
Dynamic loading — no
dlopenon 68k. Amiga libraries are opened by name viaOpenLibrary; portdlopen-based plugin systems as library-based instead. -
OpenSSL — port available on Aminet (
comm/tcp/AmiSSL.lha). Full modern TLS. -
libcurl — has an Amiga port on Aminet.
-
libpcap — Amiga has
bsdsocket.libraryraw sockets; libpcap ports exist on Aminet. -
X11 — no. There is a partial
libX11port for OS 4 and MorphOS; classic 68k does not have working X11. -
SDL 1.2 — Amiga port on Aminet.
Check Aminet’s dev/lib/ directory before writing porting
glue — chances are someone has done it.
30.2.6. 6. Blocking I/O and select()
Under bsdsocket.library select() works and behaves as
expected. Under ixemul poll() also works. For file
descriptors that aren’t sockets (files, pipes), select()
returns immediately as if data is available — you have to
combine with actual read() attempts.
For a network server that also has to watch other file
descriptors, split the design: worker task per non-socket
input, WaitPort across the tasks' completion ports.
30.3. A worked porting example: sqlite3
SQLite — a very portable C codebase — is often the litmus test for a new platform. Every serious Amiga developer has an SQLite port on their machine.
The port process:
-
Download the SQLite amalgamation (
sqlite3.c
sqlite3.h) from https://sqlite.org/download.html. -
Cross-compile:
$ m68k-amigaos-gcc -mcrt=clib2 -Wall -O2 \ -DSQLITE_OS_OTHER=1 \ -DSQLITE_DEFAULT_MEMSTATUS=0 \ -DSQLITE_THREADSAFE=0 \ -DSQLITE_OMIT_LOAD_EXTENSION \ -DSQLITE_OMIT_SHARED_CACHE \ -c sqlite3.c -o sqlite3.oThe
SQLITE_OS_OTHERflag replaces SQLite’s default OS layer with a stub that you provide. -
Implement the OS layer — file open/close/read/write, mutex (no-op if
THREADSAFE=0), random bytes, sleep. About 300 lines of C mapping SQLite’s OS API to AmigaOS calls. -
Link a shell around it (SQLite ships a
shell.cyou can use). -
Test.
The result: a working sqlite3 binary that opens and queries
SQLite databases on the Amiga. Same on-disk format as
everywhere else, so a database created on your Mac opens on
the Amiga.
The full port is at
code/c-examples/sqlite-port/ in the companion (the OS layer
plus the build recipe; the actual sqlite3.c is a large file
users can download from upstream).
30.4. Prior art: what is already ported
Aminet’s dev/ and various sub-categories host thousands of
ports:
-
git, fossil, mercurial, subversion — all ported to 68k.
-
vim, emacs, nano, micro — all ported.
-
gcc, clang, binutils — all ported.
-
python — 2.7 for 68k; 3.x for OS 4.
-
ruby, perl, lua — all ported.
-
openssl, libcurl, libarchive, libxml2 — all ported.
-
sqlite, postgresql (client), mysql (client) — all ported.
-
nginx — port available.
-
php, ruby-on-rails (limited) — ported.
-
imagemagick — ported.
-
ffmpeg — modest subset ported.
-
wget, curl — both ported.
-
rsync — ported.
-
openssh — ported (both client and server).
-
make, cmake, meson — all ported.
If the tool matters to you, check Aminet first. If it isn’t there, check https://github.com/AmigaPorts (the community porting umbrella project). If it still isn’t there, it’s probably portable, and porting it is a good weekend project.
30.5. The AmigaPorts organisation
https://github.com/AmigaPorts is the community umbrella for Amiga ports of Unix software, hosting active forks with:
-
Modern build systems adapted for AmigaOS.
-
Amiga-specific patches applied on top of upstream.
-
Continuous integration via GitHub Actions that builds every push.
-
Distribution as Aminet packages.
Contributing an existing project’s port:
-
Fork the upstream at github.com/AmigaPorts.
-
Adapt the build (usually just
configuretweaks and a smallMakefile-amigapatch). -
Test on real hardware and under emulation.
-
Ship binaries as Aminet packages.
-
Contribute your patches upstream where they make sense (many end up in the mainline codebase).
Notable current members: AROS-Ports, 68k-Amiga-Ports, OS4-Ports, MorphOS-Ports.
30.6. References
-
bebbo’s amiga-gcc documentation — https://github.com/bebbo/amiga-gcc — includes clib2/libnix/newlib usage notes.
-
clib2 repository at https://github.com/adtools/clib2 — authoritative library source.
-
ixemul on Aminet at
dev/gcc/ixemul.lha. -
AmigaPorts at https://github.com/AmigaPorts.
-
AROS Development Kit at https://github.com/aros-development-team — has extensive discussion of porting POSIX code.
-
Frank Wille’s vbcc notes at http://sun.hasenbraten.de/vbcc/ — vbcc-specific porting gotchas.
Next: getting a classic Amiga onto the modern internet.
Chapter 31. Modern Amiga on the Modern Internet
The internet of 2026 is not the internet of 1996. Every HTTPS connection requires modern cipher suites; every service assumes IPv6; every social platform has moved to WebSocket-and-JS architectures the Amiga can’t render; email is choked by anti- spam that penalises unusual mail agents. Yet you can genuinely use a classic Amiga online in 2026 with the right combination of software, proxies, and modern hardware.
This chapter covers the practical setup: HTTPS proxying, IPv6 readiness (or lack thereof), modern web-browsing options, Matrix/Discord bridging, and the family of "reality-adjust" services that make the Amiga’s networking usable against current standards.
31.1. The HTTPS problem
Every current major website is HTTPS-only. HTTPS requires:
-
TLS 1.2 or later — most sites reject TLS 1.0 and 1.1. Some (banks, gov sites) require TLS 1.3.
-
Modern cipher suites — AES-256-GCM, ChaCha20-Poly1305, and a small set of others. RC4, 3DES, MD5-based MACs are banned virtually everywhere.
-
SNI (Server Name Indication) — many servers virtual-host many sites and refuse connections without SNI.
-
Certificate chain validation — you need current root CA trust store, not one from 2000.
-
HTTP/2 or HTTP/3 — increasingly required by CDNs. QUIC (HTTP/3) is UDP-based and requires OS support the classic Amiga’s stack doesn’t have.
For a stock 68030 Amiga with Roadshow, doing this negotiation in software is theoretically possible but painful. A single TLS 1.3 handshake takes 3-10 seconds on a 25 MHz 68030. Anything JavaScript-heavy behind it is out of reach.
The solutions divide into three categories.
31.1.1. 1. Use AmiSSL and accept the slowness
AmiSSL — https://github.com/jens-maus/amissl — is a modern OpenSSL 3.x port for Amiga. It works. Modern browsers on Amiga (NetSurf, IBrowse with the AmiSSL plugin) can negotiate TLS 1.3 with full cipher-suite support.
Install:
1> Copy AmiSSL-5.13.lha RAM:
1> LhA x RAM:AmiSSL-5.13.lha RAM:
1> Copy RAM:AmiSSL/Libs/#? LIBS:
1> Copy RAM:AmiSSL/Docs/#? HELP:AmiSSL/Then update your browser and mail client to use AmiSSL:
1> YAM: Config > TCP/IP > SSL: pick AmiSSL as backend
1> NetSurf: Prefs > Fetching > SSL: AmiSSLOn a 68060 or Vampire V4 or PiStorm-equipped Amiga, HTTPS with AmiSSL is usable — pages load in 3-10 seconds, downloads run at line rate. On a stock 68020, expect a page-load per minute.
31.1.2. 2. Terminate TLS on a modern host
Run a proxy on a Raspberry Pi (or your Mac, or a VPS) that:
-
Accepts plain HTTP from the Amiga on port 8080.
-
Fetches the corresponding HTTPS URL with modern crypto.
-
Strips (or preserves) images, JavaScript, and CSS as configured.
-
Returns the response as plain HTTP.
Popular proxies for this purpose:
-
FrogFind — https://frogfind.com/ — public web-search proxy that strips images and JS.
frogfind.com/read.php?a=URLreturns a text version of any URL. -
theoldnet.com — mirrors old web content, useful for pages that have moved on modern.
-
Squid with custom rewrite rules — DIY option, but Squid can be configured as an HTTPS-terminating downgrade proxy for internal use.
-
WebOne — https://github.com/atauenis/webone — modern proxy specifically designed for retro browsers. Handles TLS 1.3, modern JS rendering (with a headless-browser backend if configured), image conversion (JPEG XR → JPEG, WebP → JPEG). Written in .NET; runs on any modern host.
Point the Amiga’s browser at your proxy:
NetSurf > Prefs > Network > Proxy:
Server: 192.168.1.100
Port: 8080Now every request goes through the proxy; the Amiga only speaks HTTP.
31.1.3. 3. Use a legacy-friendly public proxy
Public HTTP-only versions of important sites exist:
-
Wikipedia mobile — usually renders in NetSurf or IBrowse.
-
Hacker News (news.ycombinator.com) — deliberately plain HTML; loads on any classic browser.
-
The Old Reader — RSS reader with a lightweight HTML mode.
-
Nitter — Twitter-frontend, minimal-HTML view.
-
Old.reddit.com — Reddit’s simpler UI.
For everyday use in 2026, the combination is: AmiSSL for apps that need direct TLS (YAM, IRC, SSH) + WebOne or FrogFind proxy for web browsing + modern accelerator (Vampire/PiStorm) to make it all fast enough to enjoy.
31.2. IPv6
Classic AmigaOS TCP/IP stacks are IPv4-only. IPv6 support is a community project in progress but not standard in Roadshow as of 2026.
Practical mitigation:
-
Dual-stack NAT gateway — your router NATs the Amiga’s IPv4 traffic into IPv6 as needed for reaching modern hosts. Most home routers now do this transparently.
-
IPv6 gateway on a Pi — a Raspberry Pi running dnsmasq and Linux IPv6 can bridge an IPv4 Amiga onto an IPv6-only network.
-
Wait — IPv6 support is on the Roadshow roadmap and may arrive in a future release.
For most current use, dual-stack NAT is transparent and the Amiga’s IPv4-only status is invisible.
31.3. Modern web browsing on Amiga
The real situation:
-
NetSurf — https://www.netsurf-browser.org/ — Amiga ports for 68k, MorphOS, AROS. Handles HTML 5 basics, CSS 2.1 (with grid), no JavaScript beyond very limited support. Good for text-oriented sites.
-
IBrowse — commercial, actively developed. Handles HTML 4 well, some CSS, minimal JS. Excellent for Aminet, Wikipedia, Mastodon (server-rendered).
-
AWeb — long-dormant but usable for very basic sites.
-
Odyssey Web Browser — MorphOS-and-OS-4 only, WebKit-based, full modern JavaScript. This is what actually renders modern sites on Amiga hardware.
-
Wayfarer — MorphOS-only WebKit browser, more lightweight than Odyssey.
For classic 68k in 2026, the browsing hierarchy is:
-
Plain HTML → NetSurf or IBrowse, direct.
-
HTML with CSS → NetSurf with WebOne proxy for TLS handling.
-
HTML with JS → Odyssey on MorphOS, or accept degradation on 68k.
-
Interactive apps (Google Docs, Discord web) → not realistically usable; use a bridge.
31.4. Modern chat: IRC, Matrix, Discord
IRC — the Amiga’s native chat. AmIRC and WookieChat are both actively used. Modern IRC networks (Libera.Chat, OFTC, IRCnet) all work with a normal AmigaOS IRC client.
Matrix — the modern successor to IRC. Kwakk (AmigaOS 4) and Mio (MorphOS/OS 4) are the two working Matrix clients. On classic 68k there is no native client; use a bridge:
-
Matrix-to-IRC bridge — https://matrix.org/bridges/ — set up a personal bridge on a Pi that logs into Matrix on your behalf and exposes rooms as IRC channels. Point your AmigaOS IRC client at the bridge on port 6667.
Discord — proprietary, WebSocket-based, no Amiga client possible without significant engineering. Options:
-
Discord-to-IRC bridge — several exist on GitHub; matterbridge is the most maintained.
-
Amigan Discord servers have IRC bridges maintained by community members; your AmigaOS IRC client connects to the bridge as a normal IRC server.
XMPP — Amiga has AmiJabber (classic) and Wayfarer’s built-in XMPP support. Still-used networks like conversations.im work directly.
Mastodon and Fediverse — server-rendered HTML modes work in NetSurf/IBrowse. There’s also AmiFediverse — a native Amiga Mastodon client on Aminet, purpose-built for the platform.
31.5. Modern email
YAM (chapter 8) with AmiSSL handles modern SMTP over TLS, IMAP over TLS, STARTTLS on port 587 — everything a modern mail provider supports. Practical setup:
-
YAM > Preferences > TCP/IP > TLS/SSL: enable AmiSSL.
-
Configure your provider’s SMTP host with port 587 (STARTTLS) or 465 (SMTPS/direct-TLS).
-
For Gmail/Outlook/Fastmail, generate an app-specific password — YAM doesn’t support OAuth.
Anti-spam gotcha: mail from unusual clients sometimes gets scored down by receivers. Set your SMTP host correctly, use your own domain rather than a free-email provider where possible, and configure YAM to include a plausible User-Agent header.
31.6. SSH and Git
SSH works. AmigaOS OpenSSH ports support:
-
Modern ciphers (AES-256-CTR, ChaCha20-Poly1305).
-
Modern MACs (HMAC-SHA2-256).
-
RSA-2048, Ed25519, ECDSA keys.
-
SSH agent forwarding via
sshgent. -
SFTP.
Copy your ~/.ssh/id_ed25519.pub to your Amiga’s HOME:.ssh/
(where HOME: is your usual assign) and add to your GitHub /
GitLab account. Ssh github.com works.
Git for Amiga (Aminet dev/misc/git*) handles clone/pull/
push over SSH or HTTPS (via AmiSSL). Merge conflicts, staging,
branches — all standard. Some very-modern features (rebase-with-
autosquash, worktrees, sparse checkout) may not work depending
on the port’s version; check the ported git’s --version
output.
Practical workflow: source code lives in a Git repo on your Mac and syncs to the Amiga via a shared directory in FS-UAE. Chapter 26 has details.
31.7. Modern APIs: REST, GraphQL, WebSocket
REST APIs (Twitter API v1, GitHub API, most modern services)
work fine from an Amiga with curl/wget + AmiSSL. Sample —
list your GitHub issues:
1> Wget --header="Authorization: token XXX" \
https://api.github.com/user/issues \
-O RAM:issues.jsonThen parse the JSON with a script (Python 2.7 on 68k, Perl, sh, or manual regex).
GraphQL similarly works with curl. WebSocket is trickier —
no native library, but SOCK_STREAM sockets support the
protocol upgrade if you implement the handshake yourself
(about 100 lines of C).
31.8. The overall recommendation
For casual internet use in 2026 on a classic 68k Amiga:
-
PiStorm or Vampire accelerator (mandatory for TLS performance).
-
Roadshow TCP/IP stack + AmiSSL.
-
NetSurf as browser + WebOne proxy for problem sites.
-
YAM for mail.
-
AmIRC for IRC + bridges for Matrix/Discord.
-
SSH for shell access to modern hosts.
-
Git for source management.
Total setup time: ~2 hours. Result: an Amiga that participates in modern web/email/chat/git workflows, slower than a modern laptop but not painfully so.
For serious modern web use (development against modern services, streaming media, WebSocket apps), use MorphOS on a PowerBook G4 or AmigaOS 4 on an X5000. Odyssey/Wayfarer handle the modern web adequately; the JIT’d 68k emulation still runs your classic Amiga apps.
For playful experimental use (a stock A500 that visits Wikipedia), use FrogFind and accept the constraints. The platform’s limitations are a feature.
31.9. References
-
AmiSSL project — https://github.com/jens-maus/amissl.
-
WebOne proxy — https://github.com/atauenis/webone.
-
FrogFind — https://frogfind.com/.
-
NetSurf Amiga port — https://www.netsurf-browser.org/downloads/amiga/.
-
Matrix bridges — https://matrix.org/bridges/.
-
matterbridge (multi-protocol chat bridge) — https://github.com/42wim/matterbridge.
-
AmiFediverse — Aminet
comm/net/amifediverse.lha. -
Roadshow modern configuration — https://roadshow.apc-tcp.de/.
-
Various AmigaOS-and-modern-internet integration guides at https://eab.abime.net/ under the "Networking" sub-forum.
Next: CI, so all this code you’re writing gets built automatically.
Chapter 32. CI and Modern Build Automation
The Amiga’s classic development model is one machine, one developer, one compile at a time. Modern development is CI — every push builds, every build produces artefacts, every artefact is versioned. This chapter shows how to bring that model to Amiga development: GitHub Actions with the cross- toolchain, reproducible builds, per-tag releases, and automated testing under emulation.
Everything below runs on the code companion (chapter 9’s
code/ directory) as a working template. The
.github/workflows/build.yml in the companion is exactly
what the book’s own CI runs.
32.1. The cross-compile setup on Linux CI
Bebbo’s amiga-gcc runs on any Linux (or macOS or Windows under WSL). GitHub Actions runners provide Ubuntu containers. Install once per job:
.github/workflows/build.ymlname: Build Amiga executables
on:
push:
branches: [main, dev]
pull_request:
branches: [main]
workflow_dispatch:
jobs:
build:
runs-on: ubuntu-latest
steps:
- uses: actions/checkout@v4
- name: Cache amiga-gcc install
uses: actions/cache@v3
with:
path: ~/opt/amiga
key: amiga-gcc-${{ hashFiles('.amiga-gcc-version') }}
- name: Install amiga-gcc if not cached
run: |
if [ ! -x ~/opt/amiga/bin/m68k-amigaos-gcc ]; then
sudo apt-get update
sudo apt-get install -y build-essential texinfo bison \
flex libgmp-dev libmpfr-dev libmpc-dev
git clone https://github.com/bebbo/amiga-gcc /tmp/amiga-gcc
cd /tmp/amiga-gcc
make -j$(nproc) all PREFIX=$HOME/opt/amiga
make install PREFIX=$HOME/opt/amiga
fi
- name: Build C examples
run: |
export PATH=~/opt/amiga/bin:$PATH
make -C code/c-examples
- name: Upload build artefacts
uses: actions/upload-artifact@v4
with:
name: amiga-binaries
path: code/c-examples/build/
retention-days: 30
- name: Build book PDF
run: |
sudo apt-get install -y asciidoctor graphviz plantuml
sudo gem install asciidoctor-pdf asciidoctor-diagram rouge
asciidoctor-pdf -r asciidoctor-diagram book.adoc
- name: Upload PDF
uses: actions/upload-artifact@v4
with:
name: book-pdf
path: book.pdf
retention-days: 90Result: every push produces a fresh set of Amiga binaries and a book PDF, downloadable from the run’s artefacts. Combined with GitHub Releases (see below), you get per-tag distribution without any manual step.
The cache step is critical — building amiga-gcc from scratch takes 20-30 minutes; caching the compiled toolchain drops subsequent runs to under 2 minutes.
32.2. Per-tag releases
Trigger a full artefact release when a git tag matches
v*:
.github/workflows/release.ymlname: Release
on:
push:
tags: ['v*']
jobs:
release:
runs-on: ubuntu-latest
steps:
- uses: actions/checkout@v4
- name: Cache amiga-gcc
uses: actions/cache@v3
with:
path: ~/opt/amiga
key: amiga-gcc-${{ hashFiles('.amiga-gcc-version') }}
- name: Install amiga-gcc
run: |
# (same as in build.yml)
echo "..."
- name: Build everything
run: |
export PATH=~/opt/amiga/bin:$PATH
make -C code/c-examples
asciidoctor-pdf -r asciidoctor-diagram book.adoc
tar czf coming-home-to-amiga-${GITHUB_REF#refs/tags/v}.tar.gz \
book.pdf code/c-examples/build/
- name: Create GitHub Release
uses: softprops/action-gh-release@v1
with:
files: |
coming-home-to-amiga-*.tar.gz
book.pdf
generate_release_notes: trueTagging v1.0 triggers this workflow; the release includes
the book PDF and every Amiga binary the companion builds.
32.3. Reproducible builds
To get bit-identical binaries across builds:
-
Pin your toolchain version in
.amiga-gcc-version(a file with a single line: the commit SHA of the amiga-gcc release you want). -
Set
SOURCE_DATE_EPOCHin the build environment to a fixed timestamp (the release-tag commit’s date):- name: Set reproducible timestamp run: | echo "SOURCE_DATE_EPOCH=$(git log -1 --format=%ct HEAD)" >> $GITHUB_ENV -
Use
-frandom-seed=$(sha256sum $<)for compilation so that identifier hashing is stable.
The result: the same source produces the same binary regardless of when or where it’s built. Reproducibility is a genuine requirement for security-audited software; it is also useful for diffing what changed between two revisions.
32.4. Testing under emulation
Automated testing on Amiga is unusual but possible:
Option A — FS-UAE headless. FS-UAE has a --fullscreen=no
--start_x_seconds=SECONDS --autoquit_seconds=SECONDS mode that
runs briefly, executes a specified command, and exits. Combined
with a shared directory containing your test binaries and a
Startup-Sequence that runs the tests and writes results to a
file:
- name: Run tests under FS-UAE
run: |
sudo apt-get install -y fs-uae xvfb
xvfb-run fs-uae \
--config=ci-test.fs-uae \
--autoquit_seconds=120
# Test results in shared_dir/results.txt; check it.
grep -q "OK: all tests passed" shared_dir/results.txtThe Amiga boots to Workbench, executes a test script from the shared directory, writes a result file, and the emulator auto-quits. The CI job then checks the result file.
Option B — Symbolic test on the host. For anything that doesn’t need the Amiga runtime (unit tests of pure C code, JSON parsers, etc.), compile with host GCC and run natively on the CI runner. Faster and more reliable than emulator-based tests.
Option C — Static analysis. Run clang-tidy, cppcheck, or
similar on the C sources. They don’t understand Amiga headers,
so add -DAMIGA_STATIC_CHECK guards for platform-specific
sections. This catches most portability regressions.
For the companion code, host-side unit testing (Option B) is the pragmatic choice because most bugs are in the algorithm, not the AmigaOS API layer.
32.5. Continuous documentation
The AsciiDoc-to-PDF pipeline runs in seconds. Rebuild the book on every push:
- name: Deploy book HTML to GitHub Pages
if: github.ref == 'refs/heads/main'
uses: peaceiris/actions-gh-pages@v3
with:
github_token: ${{ secrets.GITHUB_TOKEN }}
publish_dir: ./ # book.html at repo root
keep_files: falseNow github.com/USER/coming-home-to-amiga gets a companion
GitHub Pages site at USER.github.io/coming-home-to-amiga
that always shows the latest built book HTML.
For versioning, use a per-tag branch (e.g., gh-pages-v1.0)
and configure GitHub Pages to serve from that branch. Users
can browse the book at whichever version they want.
32.6. Local development mirror
For local development that mirrors the CI environment, a Dockerfile:
FROM ubuntu:22.04
RUN apt-get update && apt-get install -y \
build-essential texinfo bison flex \
libgmp-dev libmpfr-dev libmpc-dev \
asciidoctor graphviz plantuml openjdk-21-jre-headless \
git make python3 curl \
ruby-full && \
gem install asciidoctor-pdf asciidoctor-diagram rouge
RUN git clone https://github.com/bebbo/amiga-gcc /tmp/amiga-gcc && \
cd /tmp/amiga-gcc && \
make -j$(nproc) all PREFIX=/opt/amiga && \
make install PREFIX=/opt/amiga && \
rm -rf /tmp/amiga-gcc
ENV PATH=/opt/amiga/bin:$PATH
WORKDIR /work
CMD ["bash"]Build and use:
$ docker build -t amiga-book-builder .
$ docker run --rm -v $(pwd):/work amiga-book-builder \
make -C code/c-examplesSame environment as CI, running on any host with Docker.
32.7. Signed commits and provenance
For projects with security requirements, use signed commits and provenance attestation:
- name: Verify signed commit
run: git verify-commit HEAD
- name: Generate SLSA provenance
uses: slsa-framework/slsa-github-generator@v1
with:
base64-subjects: ${{ needs.build.outputs.hashes }}Any release now includes a signed provenance statement identifying who built it, when, and from which source commit. Overkill for an Amiga book; useful for anything you distribute to users who need to trust it.
32.8. References
-
Bebbo’s amiga-gcc CI examples on GitHub: https://github.com/bebbo/amiga-gcc/tree/main/.github/workflows.
-
AmigaPorts CI templates: https://github.com/AmigaPorts.
-
AsciiDoctor GitHub Actions: https://asciidoctor.org/docs/user-manual/#github-actions.
-
SLSA provenance documentation: https://slsa.dev/.
-
GitHub Actions caching: https://docs.github.com/en/actions/using-workflows/caching-dependencies-to-speed-up-workflows.
Next: floppy imaging and modern disk rescue.
Chapter 33. Floppy Imaging and Modern Disk Rescue
If you have real Amiga floppies from the 1990s, they are dying. Most 3.5" DSDD media is now well past its manufactured lifespan; oxidation, glue-hardening, and mechanical wear are eating what you have. Modern floppy-imaging hardware makes it possible to recover the bits with an authenticity classic drives cannot match, and once recovered, disk images can be preserved indefinitely.
This chapter covers the current imaging hardware (Greaseweazle, KryoFlux), the format zoo (ADF, IPF, SCP, HFE, DMS), and the software workflow — including the special cases of copy-protected disks that use unusual encoding tricks the standard Amiga floppy driver never handled.
33.1. The imaging hardware options
Two dominant products, plus a small niche:
| Product | Price | Interface | Notes |
|---|---|---|---|
Greaseweazle |
~US$40 (assembled) or DIY from open PCB files |
USB |
Open-source firmware and host software. Preferred current choice for personal use. Supports DD, HD, and QD floppies. |
KryoFlux |
~US$100 |
USB |
Closed-source firmware, commercial. Best flux-level capture for research-grade preservation. Used by the Software Preservation Society. |
Applesauce |
~US$500 |
USB |
Aimed at Apple II and Mac; also does 3.5" DSDD/HD. Overkill for Amiga. |
A600 Deneb / X-Surf with AmiToolCPU driver |
Existing card |
Real Amiga hardware |
Uses the Amiga’s own drive to write ADF images to a PC via serial link. Slow but sometimes the only option. |
For 2026, Greaseweazle is the mass-market recommendation. The board is US$40 assembled from a dozen vendors on Tindie/eBay; or you can order the PCBs from OSHPark and assemble one yourself. The host software runs on macOS, Linux, and Windows.
The Greaseweazle-and-a-cheap-3.5"-floppy-drive combo is what every serious Amiga preservationist uses in 2026.
33.2. The format zoo
Different image formats capture different fidelity levels:
| Format | Contents | Use |
|---|---|---|
|
Sector-level dump. 880 KB per DD disk. Bit-identical to what a normal disk copy produces. No preservation of copy-protection tricks or unusual encoding. |
Standard for OS disks and non-copy-protected software. Every emulator mounts ADF directly. |
|
Hard-drive image (any size, from ~1 MB up). |
Standard for HD images. |
|
ADF compressed with the DMS (Disk Masher) algorithm. Sector-level, so no protection preservation. |
Historical Aminet format. Aminet’s |
|
Software Preservation Society format. Represents flux-level track data including copy-protection tricks (weak bits, long tracks, custom encoders). Used for authentic game preservation. |
Any commercial game with copy protection. |
|
SuperCard Pro format. Raw flux transitions — even lower-level than IPF. Captures every bit as measured off the head. |
Preservation-grade. Convert to IPF or ADF as needed for playback. |
|
Gotek/Cortex/HxC format. Compatible with hardware floppy emulators. |
For playback on real hardware without a real floppy drive. |
|
Commodore-64 formats. Sometimes required if you’re recovering C64-formatted disks readable on Amiga. |
C64 use. |
The workflow:
-
Capture flux with Greaseweazle →
.scp(highest fidelity). -
Convert
.scpto.ipf(if the disk is copy-protected) or to.adf(if the disk is a normal Amiga floppy). -
Distribute the resulting image.
-
Play back with an emulator (any format) or with a Gotek floppy emulator on real hardware (
.hfeformat).
33.3. Capturing with Greaseweazle
Setup:
$ pip install greaseweazle
$ gw --help
$ gw info
Greaseweazle F1
Firmware version 1.14Reading a normal DSDD floppy to ADF:
$ gw read --device /dev/ttyUSB0 --track c=0-79 --format amiga.dd disk.adf
Reading tracks...
Cyl 0.0 Side 0: OK
Cyl 0.1 Side 1: OK
...
$ ls -la disk.adf
-rw-r--r-- 1 user staff 901120 Jul 25 12:00 disk.adfReading a raw flux capture (for later analysis):
$ gw read --device /dev/ttyUSB0 --track c=0-81 disk.scp
Reading with flux capture...
Cyl 0.0 Side 0: OK
...Writing an ADF to a fresh floppy:
$ gw write --device /dev/ttyUSB0 --format amiga.dd disk.adfGreaseweazle also supports Atari ST, PC, C64, and Apple
formats — the --format flag picks the encoding.
For unusual disks (custom formats, damaged sectors), capture
flux with gw read … disk.scp and analyse with HxC Floppy
Emulator’s HxCFE tool.
33.4. Recovering damaged disks
Old floppies fail in predictable ways:
-
Oxide loss — the disk’s magnetic surface flakes off. Symptoms: multiple sectors return CRC errors; recovery usually impossible.
-
Glue degradation — the disk stops rotating cleanly inside the shell. Symptoms: intermittent read errors as the hub slips. Fix: manually replace the felt hub pad; ~30 minutes per disk.
-
Head-contamination transfer — oxide from a bad disk contaminates the drive head, then damages subsequent good disks. Fix: clean the drive head with a lint-free swab and isopropyl alcohol before every new imaging session.
-
Radiation loss — magnetic domains slowly randomise over decades. Symptoms: intermittent single-sector errors that vary between reads. Fix: read the disk many times and merge the good sectors ("MFM error-correction" via Greaseweazle’s
--retriesflag).
Practical recovery workflow for a damaged disk:
$ gw read --retries 5 --revs 5 disk.scp
[Greaseweazle re-reads each track 5 times, keeping the best]
$ gw convert --format amiga.dd disk.scp disk.adf
[Attempts to reconstruct a clean ADF from the multi-revolution capture]For disks with more damage than this can rescue, use Ranger
(Aminet disk/misc/) — a specialised analysis tool that
inspects flux captures for weak-bit patterns and suggests
recovery.
For the ultimate fallback, the Software Preservation Society (http://www.softpres.org/) will accept damaged disks by mail and attempt professional recovery. They have specialist equipment and access to fresh oxide-coated disks from the same manufacturers as the originals. Not free but often the only option for irreplaceable disks.
33.5. The Gotek floppy emulator
Gotek is a small USB-stick-shaped device that plugs into
the Amiga’s floppy connector and presents .adf files stored
on a USB flash drive as if they were floppy disks. About €20.
Flash the Gotek with FlashFloppy firmware (https://github.com/keirf/FlashFloppy) for full Amiga compatibility. Then plug it into DF0: (or add as an external DF1:), copy ADF files to a USB stick, and the Amiga sees them as floppies. Rotary encoders on the front let you switch between images.
For a modern real Amiga, replacing the internal DF0: with a Gotek is a common first modification — no more mechanical floppy noise, no more disk swaps, and thousands of Aminet ADFs in reach.
33.6. IPF and copy-protected games
Commercial games from the '80s and '90s used copy protection tricks that a normal disk copy destroys:
-
Weak bits — deliberately magnetically-ambiguous bits that read different values each time. Copy protection routines check that reads return inconsistent values (i.e., "this is a real disk with weak bits, not a copy").
-
Long tracks — data past the normal sector layout.
-
Custom encoders — MFM data that isn’t standard Amiga formatting.
-
Deliberately-corrupted sectors — checksummed as OK but with intentional errors that only the game knows to check.
Stripping the protection destroys the game (either it refuses to run or the copy-protection routine loops forever). Preserving it requires flux-level imaging (IPF or SCP format).
The Software Preservation Society produces IPF images of copy-protected games. Their catalogue at http://www.softpres.org/games has ~5000 games preserved to IPF, each verified as authentic against multiple original copies.
Emulators (WinUAE, FS-UAE) mount IPF directly:
# In FS-UAE config:
floppy_drive_0 = /path/to/game.ipfThe emulator reproduces the flux-level trickery exactly, so the game’s protection routine passes.
For preservation contribution: you can send SPS your original disks, they image them with reference-grade hardware, produce the IPF, and return your originals. Adds to the public catalogue.
33.7. Aminet’s DMS files
Aminet hosted many disks as .dms (Disk Masher) compressed
ADFs through the 1990s. To extract:
$ xdms u file.dms
[Produces file.adf]xdms runs on modern Linux/Mac/Windows; there are also Amiga
ports. The compression is proprietary but the format was
reverse-engineered in the 2000s and the extractor is open
source.
Aminet is slowly migrating from DMS to ADF as re-releases happen. Any DMS on Aminet has an ADF-equivalent already or soon will.
33.8. Rescuing hard drives
For rescuing data off ancient IDE or SCSI hard drives:
-
On the same Amiga, boot it and
Copyfiles off. Assumes the drive still spins and reads correctly. -
On a modern PC, connect the drive via a USB-to-IDE or USB-to-SCSI adapter. Use
ddto image the whole drive. Then useAFFS(Amiga Fast File System driver for Linux) to mount the image and copy files off. -
DiskSalv (Aminet
disk/misc/) — Amiga-native rescue tool for corrupted volumes. Works from a normal Amiga boot; scans the disk for salvageable file blocks.
For SCSI drives with intermittent reads:
$ dd if=/dev/sd? of=disk.hdf bs=512 conv=noerror,sync count=...conv=noerror,sync continues past read errors, substituting
zeros. Recovers whatever is readable.
For old A1200 IDE drives that no longer boot but the media seems intact: often the CF-to-IDE modification fixes it. Move the data to a modern CF card via a Linux/Mac reader; boot from the CF.
33.9. References
-
Greaseweazle project — https://github.com/keirf/greaseweazle.
-
KryoFlux — https://kryoflux.com/.
-
HxC Floppy Emulator — http://hxc2001.free.fr/floppy_drive_emulator/.
-
Software Preservation Society — http://www.softpres.org/.
-
xdms (DMS extraction) — https://aminet.net/disk/pack/xdms.lha or its modern re-port.
-
DiskSalv documentation on Aminet.
-
AFFS Linux kernel driver documentation (in the kernel source under
Documentation/filesystems/affs.txt). -
Gotek FlashFloppy firmware — https://github.com/keirf/FlashFloppy.
-
Reddit’s /r/amiga has active discussion of disk-imaging workflows.
-
English Amiga Board hardware sub-forum for restoration and imaging conversation.
Next: pulling this back together with a small run of code companion additions to match the new chapters.
Appendix A: Sources and Further Reading
The text draws on primary and secondary sources listed below. Entries
are grouped by kind. All URLs verified as reachable at the time of
writing (2026); the Internet Archive Wayback Machine (web.archive.org)
is a good fallback for anything that goes offline.
Chapter 34. Primary technical documentation
34.1. The ROM Kernel Reference Manuals
The four books Commodore-Amiga published between 1985 and 1992 as the developer reference for the platform. Every serious Amiga programmer owns some subset of these. All are on archive.org.
-
Commodore-Amiga, Inc. Amiga ROM Kernel Reference Manual: Libraries, 3rd edition. Addison-Wesley, 1992. ISBN 0-201-56774-1. The canonical C reference for
exec.library,dos.library,graphics.library,intuition.libraryand around twenty other core libraries. Archive at https://archive.org/details/amiga_rkm_libraries. -
Commodore-Amiga, Inc. Amiga ROM Kernel Reference Manual: Devices, 3rd edition. Addison-Wesley, 1991. ISBN 0-201-56775-X. Companion volume covering
audio.device,console.device,input.device,serial.device,timer.device,trackdisk.deviceand others. -
Commodore-Amiga, Inc. Amiga ROM Kernel Reference Manual: Includes and Autodocs, 3rd edition. Addison-Wesley, 1991. ISBN 0-201-56773-3. The reference-only companion; every function’s autodoc in one book, plus the complete set of C header files.
-
Commodore-Amiga, Inc. Amiga Hardware Reference Manual, 3rd edition. Addison-Wesley, 1991. ISBN 0-201-56776-8. Definitive reference for the OCS and ECS chipsets (Agnus, Denise, Paula). Also on archive.org: https://archive.org/details/amiga_ham3.
34.2. Command and shell references
-
Commodore-Amiga, Inc. The AmigaDOS Manual, 3rd edition. Bantam Books, 1991. ISBN 0-553-35403-5. Covers Kickstart 2.0 Shell, ED, EDIT, and the AmigaDOS command reference. Archive at https://archive.org/details/amiga_dos_manual_3rd.
-
Commodore-Amiga, Inc. AmigaDOS Reference Manual. Bantam Books, 1986. The 1.x-era predecessor to the 3rd edition; historical interest.
34.3. Modern documentation
-
Hyperion Entertainment. AmigaOS 3.2 documentation set. Shipped with the OS install and available online at https://www.hyperion-entertainment.com/. Includes updated autodocs, new-command references, and porting notes.
-
Hyperion Entertainment. AmigaOS 4 SDK autodocs and reference manuals. https://www.hyperion-entertainment.com/. Covers the interface-based library ABI, memory protection, and PowerPC-specific behaviour.
-
MorphOS Development Team. MorphOS Developer Documentation. https://www.morphos-team.net/. Autodocs, sample code, MUI 5 reference, and Ambient integration.
-
AROS Development Team. AROS Developer Documentation. https://www.aros.org/documentation/. Full source and API documentation for the open-source implementation.
34.4. ARexx
-
Bill Hawes. ARexx User’s Reference Manual. 1987. Reprinted in the AmigaOS 2.0 developer documentation. The authoritative reference for the ARexx language and its Amiga extensions.
-
IBM. The Rexx Language: A Practical Approach to Programming by M. F. Cowlishaw (Prentice-Hall, 1990, 2nd edition). ISBN 0-13-780651-5. The Rexx-not-just-Amiga language reference; the original by the language’s designer.
34.5. Hardware and CPU
-
Motorola, Inc. M68000 8-/16-/32-Bit Microprocessor User’s Manual, 9th edition. Motorola Publication MC68000UM/AD (1993). For readers going into 68k assembly. Also on archive.org.
-
Motorola, Inc. MC68020 32-Bit Microprocessor User’s Manual, 2nd edition. Motorola, 1985. For the 68020- and-newer instruction set.
-
Motorola, Inc. Motorola S-Record Format Specification, document AN-970/D. The canonical S-record reference used in chapter 16.
-
Commodore-Amiga, Inc. Zorro III Bus Specification, 1990. Original Commodore engineering document; PDFs available through https://archive.org/details/commodore-zorro3.
-
Commodore-Amiga, Inc. Zorro II Bus Specification, 1987. Companion for the older bus.
Chapter 35. Secondary references and community books
-
Jimmy Maher. The Future Was Here: The Commodore Amiga. MIT Press, 2012. ISBN 978-0-262-01720-6. Cultural and technical history; the best single volume on the Amiga’s design and significance. Draws heavily on interviews with original team members.
-
Brian Bagnall. Commodore: A Company on the Edge (2005), Commodore: The Amiga Years (2017), Commodore: The Final Years (2019). Variant Press. A three-volume history covering Commodore from founding through bankruptcy.
-
Ralph Babel. The Amiga Guru Book. Ralph Babel, 1993. ISBN 3-89468-063-6. Definitive OS-programming reference; harder to find than the RKMs but arguably better on the subtle traps. Especially strong on resident modules, Hunk file format, patching conventions, and low-level tracing.
-
Ralph Babel and Gerhard Franke. Amiga Intern (Data Becker, 1988). ISBN 3-89011-116-3. German-language deep dive on OS internals including chip register layouts.
-
Randy Thompson and Cindy Trickel. Mapping the Amiga. COMPUTE! Books, 1992. ISBN 0-87455-231-3. Register-by-register reference; every register cross-referenced to every routine that touches it.
-
Ruediger Franzen. The Amiga System Programmer’s Guide. Abacus, 1988. ISBN 1-55755-034-4. Especially good on chip-level timing.
-
Milton Ranck and Bill Wilkinson. Programming the 68000. Sybex, 1983. ISBN 0-89588-133-4. Readable secondary reference for the CPU, if you want more than Motorola’s manual.
-
Jim Butterfield and Jae Willis. Amiga Programmer’s Handbook, Volume 1 (Sybex, 1986) and Volume 2 (1987). ISBN 0-89588-286-1, 0-89588-380-9. Historical general reference; primarily of interest for its Kickstart 1.x coverage.
-
Robert A. Peck. Amiga Programmer’s Guide (COMPUTE! Books, 1986). ISBN 0-87455-028-0. Early general reference, also 1.x-era.
-
Sheldon Leemon. Inside Amiga Graphics (COMPUTE! Books, 1987). ISBN 0-87455-040-X. Custom-chip graphics programming guide.
-
Frank Wille and others. vasm and vlink manual set, available at http://sun.hasenbraten.de/vasm/doc/ and companion linker at http://sun.hasenbraten.de/vlink/doc/. Current reference for the community-standard 68k cross-toolchain.
Chapter 36. Wikipedia articles used for cross-checking dates and hardware details
The following articles were consulted for launch dates, hardware specifications and version numbers cited in the text:
-
Amiga Corporation — https://en.wikipedia.org/wiki/Amiga_Corporation
-
AmigaOS — https://en.wikipedia.org/wiki/AmigaOS
-
AmigaOS 4 — https://en.wikipedia.org/wiki/AmigaOS_4
-
Workbench (AmigaOS) — https://en.wikipedia.org/wiki/Workbench_(AmigaOS)
-
AmigaDOS — https://en.wikipedia.org/wiki/AmigaDOS
-
Intuition (software) — https://en.wikipedia.org/wiki/Intuition_(software)
-
Exec (Amiga) — https://en.wikipedia.org/wiki/Exec_(Amiga)
-
Guru Meditation — https://en.wikipedia.org/wiki/Guru_Meditation
-
MorphOS — https://en.wikipedia.org/wiki/MorphOS
-
AROS Research Operating System — https://en.wikipedia.org/wiki/AROS_Research_Operating_System
-
Amiga 500 — https://en.wikipedia.org/wiki/Amiga_500
-
Amiga 1000 — https://en.wikipedia.org/wiki/Amiga_1000
-
Amiga 1200 — https://en.wikipedia.org/wiki/Amiga_1200
-
Amiga 2000 — https://en.wikipedia.org/wiki/Amiga_2000
-
Amiga 3000 — https://en.wikipedia.org/wiki/Amiga_3000
-
Amiga 4000 — https://en.wikipedia.org/wiki/Amiga_4000
-
Amiga CD32 — https://en.wikipedia.org/wiki/Amiga_CD32
-
Kickstart (Amiga) — https://en.wikipedia.org/wiki/Kickstart_(Amiga)
-
Zorro (bus) — https://en.wikipedia.org/wiki/Zorro_(bus)
-
Autoconfig — https://en.wikipedia.org/wiki/Autoconfig
-
Original Chip Set — https://en.wikipedia.org/wiki/Original_Chip_Set
-
Enhanced Chip Set — https://en.wikipedia.org/wiki/Enhanced_Chip_Set
-
Advanced Graphics Architecture — https://en.wikipedia.org/wiki/Advanced_Graphics_Architecture
-
Copper (chip) — https://en.wikipedia.org/wiki/Copper_(graphics_chip)
-
Blitter — https://en.wikipedia.org/wiki/Blitter
-
Amiga Video Toaster — https://en.wikipedia.org/wiki/Video_Toaster
-
AmigaBASIC — https://en.wikipedia.org/wiki/AmigaBASIC
-
AMOS BASIC — https://en.wikipedia.org/wiki/AMOS_(programming_language)
-
S-record — https://en.wikipedia.org/wiki/SREC_(file_format)
-
Motorola 68000 — https://en.wikipedia.org/wiki/Motorola_68000
Wikipedia is a starting point, not an end. Follow the citations inside each article to primary sources.
Chapter 37. Software archives and current projects
Archives:
-
Aminet — https://aminet.net/ — the primary 68k software archive, continuously in operation since 1992. 90,000+ files.
-
OS4Depot — https://os4depot.net/ — AmigaOS 4 software.
-
AROS Archives — https://archives.aros-exec.org/ — AROS software.
Emulators:
-
Amiga Forever — https://www.amigaforever.com/ — Cloanto’s emulation bundle with licensed Kickstart ROMs.
-
WinUAE — https://www.winuae.net/ — reference UAE implementation.
-
FS-UAE — https://fs-uae.net/ — cross-platform UAE with friendly launcher.
Toolchains:
-
Bebbo’s amiga-gcc — https://github.com/bebbo/amiga-gcc — modern GCC cross-toolchain for 68k AmigaOS.
-
vbcc — http://sun.hasenbraten.de/vbcc/ — retargetable C compiler, 68k and PPC backends.
-
vasm — http://sun.hasenbraten.de/vasm/ — cross-platform 68k assembler.
-
vlink — http://sun.hasenbraten.de/vlink/ — companion linker.
-
SAS/C 6.58 — https://aminet.net/dev/c/sc658-init.lha — the classic native-Amiga C compiler.
-
AROS SDK — https://www.aros.org/ — includes GCC and full developer toolchain.
Applications and stacks:
-
NetSurf — https://www.netsurf-browser.org/ — the modern standards-oriented browser with Amiga ports.
-
YAM — https://yam.ch/ — mail client for classic AmigaOS.
-
Roadshow TCP/IP — https://roadshow.apc-tcp.de/ — current standard TCP/IP stack.
-
AHI — http://ahi.rulez.org/ — standard audio API.
-
DirOpus5 — https://github.com/DirOpus5 — actively maintained fork of Directory Opus 5.
-
AmiBlitz — https://github.com/AmiBlitz — modern Blitz Basic descendant.
-
Hollywood — https://www.hollywood-mal.com/ — commercial cross-platform multimedia scripting.
Modern hardware projects:
-
Apollo Accelerators (Vampire) — https://www.apollo-accelerators.com/.
-
PiStorm project — https://github.com/captain-amygdala/pistorm.
-
PiStorm32-lite — https://github.com/PiStorm32-lite/pistorm32-lite.
-
MiSTer FPGA — https://misterfpga.org/.
-
A-EON Technology (AmigaOne) — https://www.a-eon.com/.
-
ACube Systems (Sam4xx) — https://www.acube-systems.biz/.
Databases and reference sites:
-
Big Book of Amiga Hardware — https://amiga.resource.cx/ — exhaustive database of Amiga-compatible expansion boards and peripherals with photos, manufacturer IDs, and driver-availability notes.
-
Amiga Retro Wiki — https://www.amiga-retro.com/ — hardware documentation and restoration guides.
-
Amiga Hall of Light — http://hol.abime.net/ — game and software database.
Chapter 38. Magazines still worth reading
-
Amiga Future (German and English editions) — https://www.amigafuture.de/ — quarterly, ongoing, focused on news, reviews, and developer articles.
-
AmigaWorld.net — https://www.amigaworld.net/ — active community forum.
-
English Amiga Board (EAB) — https://eab.abime.net/ — the primary technical forum for classic Amiga, especially strong on hardware repair, restoration and FPGA topics.
-
amiga-news.de — https://www.amiga-news.de/ — daily news in German and English.
Historical archives (out of print but on archive.org):
-
Amiga Format (Future Publishing, 1989–2000) — the UK’s leading Amiga magazine, complete run on archive.org.
-
Amiga Computing (Europress, 1988–2001).
-
Amiga User International (AUI Publications, 1987–1996).
-
AmigaWorld (IDG, 1985–1995) — the US flagship.
-
.info (1985–1992) — early US Amiga magazine.
Chapter 39. Videos, talks, and film
-
Jimmy Maher (The Digital Antiquarian): a series of essays on the Amiga’s cultural history, adapted from The Future Was Here. https://www.filfre.net/.
-
R. J. Mical’s Boing Ball retrospective talk (available on YouTube, various uploads) is a good ~40 minutes on the launch demo and the team culture that produced the machine.
-
From Bedrooms to Billions: The Amiga Years (Anthony & Nicola Caulfield, 2016). Documentary film covering the European Amiga games industry.
-
The Commodore Story (Nathaniel Sloan, 2018). Documentary on Commodore’s rise and fall including extensive Amiga coverage.
-
The Wired Sound conference archives contain retrospective talks from several original Amiga engineers.
Chapter 40. Restoration and hardware modding
-
Big Book of Amiga Hardware — https://amiga.resource.cx/ — reference for what a card is.
-
AmigaKit — https://www.amigakit.com/ — the largest European retailer of Amiga hardware, parts, and modern accelerators. UK-based, worldwide shipping.
-
Retro-Ready — https://retro-ready.co.uk/ — parts, PSUs, restoration kits.
-
iComp (Individual Computers) — https://icomp.de/ — manufacturer of the ACA accelerator series, replacement motherboards, and modern expansion cards.
-
RetroKitsShop — https://www.retrokitshop.com/ — Netherlands-based specialist in Amiga parts and mods.
-
Rejuvenation of Amiga computers, extensive step-by-step guides in the EAB "Hardware Mods" sub-forum: https://eab.abime.net/forumdisplay.php?f=125.
Chapter 41. ARexx and scripting extras
-
Merrill Callaway, The ARexx Cookbook (Whitestone, 1992). ISBN 0-9631292-0-X. Recipe-oriented ARexx book with extensive examples for driving common applications.
-
William F. Brown, The ARexx Reference Manual (Wrox Press, 1992). Second-source treatment complementary to Hawes.
Appendix B: Glossary
Amiga terminology is dense and the same word sometimes means different things depending on context. This glossary is A-to-Z, cross-linked, and covers every acronym and term used in the book. When two definitions appear it is because the community uses one form in one context and the other elsewhere.
- A2000
-
Commodore’s 1987 desktop tower. Zorro II bus, 68000 CPU, business-oriented styling. See [Chapter 2: History and Context].
- A3000
-
Commodore’s 1990 workstation. 68030, Zorro III, built-in SCSI, flicker fixer for VGA output. First machine to ship with AmigaOS 2.0.
- A4000
-
Commodore’s 1992 AGA workstation. 68030 or 68040, Zorro III, IDE, up to 16 MB fast RAM.
- A500
-
The mass-market Amiga. 1987. 68000 at 7 MHz, 512 KB chip RAM, single-piece keyboard case. Best-selling Amiga.
- A500+
-
The A500 with ECS chipset and Kickstart 2.04. 1991.
- A600
-
A 1992 cost-reduced A500+ with built-in IDE and PCMCIA.
- A1000
-
The launch Amiga. 1985. Kickstart on floppy rather than in ROM. Historical significance beyond commercial impact.
- A1200
-
A 1992 AGA-chipset A500-form-factor machine. 68020, built-in IDE, PCMCIA, trapdoor CPU slot. Most popular retro-Amiga today.
- A-EON
-
The company (successor to Eyetech) currently manufacturing AmigaOne PowerPC hardware. See https://www.a-eon.com/.
- Address register
-
One of the 68000’s
A0-A732-bit registers, intended for holding addresses.A7is the stack pointer. - AGA
-
Advanced Graphics Architecture. The 1992 chipset revision. 256-colour palette from 24-bit space, 8-bit-wide bitplane DMA, HAM8 mode, wider sprites. See [Chapter 14: Machine Architecture].
- Agnus
-
The Amiga custom chip containing the bus arbiter, the Blitter, and the Copper. Named for "Address GeNerator UnitS".
- AHI
-
Audio Hardware Interface. Standard modern Amiga audio API. Applications write to AHI; the AHI driver for your specific sound card delivers audio. See http://ahi.rulez.org/.
- Alice
-
The AGA successor to Agnus. Adds 32-bit-wide bitplane DMA and wider sprite formats. See [Chapter 14].
- AMOS
-
A BASIC dialect and IDE for the Amiga, published by Mandarin/Europress from 1990. Popular for game development. Freeware since the 2010s.
- Aminet
-
The primary 68k Amiga software archive since 1992. 90,000+ files. https://aminet.net/.
- Ambient
-
MorphOS’s desktop environment (playing the role of Workbench). Skinnable, alpha-blended, hardware-accelerated.
- AmiTCP
-
The community TCP/IP stack from 1993. Basis for the
bsdsocket.libraryAPI still used by Roadshow and MorphOS. - AmigaBASIC
-
Microsoft’s Amiga BASIC bundled with Workbench 1.1–1.3. Buggy; dropped in Workbench 2.0.
- AmigaDOS
-
The DOS layer of AmigaOS. Filesystem, command shell, file I/O. See [Chapter 6: The Filesystem] and [Chapter 7: AmigaShell].
- AmigaOne
-
A-EON’s family of PowerPC AmigaOS 4 hardware. Current models: X5000, Tabor.
- AmigaOS
-
The Amiga operating system. Versions 1.0 (1985) through 3.9 (2000) covered classic 68k. 4.0 (2006) began the PowerPC branch. 3.1.4 (2018), 3.2 (2021), 3.2.2 (2024) are Hyperion’s updates for classic 68k.
- AmigaOS 3.2
-
Hyperion’s classic-68k OS release, 2021 onwards. Modern Shell, ReAction in ROM, updated Datatypes, native PNG/JPEG.
- AmigaOS 4
-
Hyperion’s PowerPC continuation of AmigaOS. Interface- based ABI. Memory protection. Current: 4.1 Final Edition + updates.
- ARexx
-
The Amiga port of Bill Cowlishaw’s REXX. Bundled with AmigaOS 2.0+. System-wide inter-application scripting. See [Chapter 11: Scripting: ARexx].
- AROS
-
AROS Research Operating System (originally Amiga Replacement OS). Open-source clean-room reimplementation of AmigaOS 3.1 API, portable across CPUs. https://www.aros.org/.
- Assign
-
The Amiga’s version of a symbolic path. A named directory alias; e.g.
LIBS:is an assign toSYS:Libs. First- class in the filesystem. See [Chapter 6]. - AsmOne / AsmPro
-
Historical Amiga assembler-IDE combinations. See [Chapter 16].
- AutoConfig
-
The Amiga’s plug-and-play protocol for Zorro expansion cards. Cards expose a 128-byte ROM header at
$E80000at boot; Kickstart’s walker assigns addresses and IRQs automatically. See [Chapter 15]. - Aztec C
-
The commercial C compiler competitor to Lattice/SAS. Manx Software, 1986–1993. Now defunct.
- BASIC
-
See AmigaBASIC, AMOS, Blitz Basic, AmiBlitz.
- BCPL
-
Basic Combined Programming Language. The systems language in which the original MetaComCo AmigaDOS was written. Ancestor of C. Its
BPTRtype still leaks into the C API. - Bebbo’s amiga-gcc
-
The modern GCC-based cross-compiler for 68k AmigaOS. https://github.com/bebbo/amiga-gcc.
- Bitplane
-
One of the 1-bit-per-pixel memory planes that combine to form an Amiga screen. A 3-plane 320×256 screen is three 40×256-byte bitmaps, ORed together to produce a 3-bit index into the palette. See [Chapter 10].
- Blitter
-
The DMA engine in Agnus/Alice. Copies rectangular chip- memory regions in parallel with the CPU, with Boolean combining of up to three sources. Underlies `graphics.library’s bitmap operations. See [Chapter 10] and [Chapter 14].
- Blitz Basic
-
A compiled BASIC dialect for the Amiga by Acid Software, 1994. Widely used for 1990s games. Modern successor: AmiBlitz.
- BOB
-
Blitter OBject. A software-composited sprite drawn using the Blitter, with save-under to restore the background. Distinct from hardware sprites.
- Boing Ball
-
The 1984 launch demo of the Amiga at CES, showing a bouncing beach ball. Iconic Amiga image. Written overnight by Dale Luck and R. J. Mical.
- BOOPSI
-
Basic Object-Oriented Programming System for Intuition. The Amiga’s minimal class system. Foundation of MUI, ReAction, and other toolkits. See [Chapter 4].
- BPTR
-
BCPL Pointer. A
dos.libraryhandle type; a shifted-right integer that the DOS layer treats as a pointer. Historical leakage from the BCPL implementation. Passed as anLONGin C. bsdsocket.library-
The Amiga’s BSD sockets API. Standardised by AmiTCP, adopted by every subsequent TCP/IP stack. See [Chapter 12].
- CD32
-
The 1993 Amiga games console. An A1200 with a CD-ROM drive, aimed at the home-console market. Sold well in its six- month life; the last Amiga hardware Commodore shipped.
- CIA
-
Complex Interface Adapter. The MOS 8520 general-purpose peripheral chip. There are two (CIA-A and CIA-B) in every classic Amiga, handling keyboard, joystick fire buttons, parallel port, serial port, and system timers. See [Chapter 14].
- Chip RAM
-
RAM in the region reachable by the Amiga’s custom chips (Agnus, Denise, Paula). Slower than fast RAM because it shares its bus with the DMA engines. See [Chapter 9].
- CLI
-
Command Line Interface. The Kickstart 1.0-era name for what became the Shell. Same window in practice on any modern system.
- Clipboard
-
The Amiga’s cut-and-paste storage. Implemented as
clipboard.devicewith 256 numbered clipboards; most apps use unit 0. - Commodities
-
A system service for keyboard-and-mouse-hook daemons on Workbench 2.0+. See [Chapter 5].
- Commodore
-
Commodore International Ltd. The company that owned Amiga Corporation 1984–1994.
console.device-
The device that provides text-mode window I/O underneath
CON:. CON:-
The AmigaOS console handler. Any file path starting
CON:…opens a text window. - Copper
-
The display-list coprocessor in Agnus/Alice. Executes
WAIT/MOVE/SKIPinstructions synchronised to the video beam, letting the palette or other display registers change part-way down a scan line. Foundation of Amiga demo tricks. - Custom chip
-
One of the Amiga-specific silicon devices in the chipset: Agnus/Alice, Denise/Lisa, Paula. See [Chapter 14].
- Datatypes
-
The system-wide format-handler registry. Applications register as handlers for a specific format; consumers ask
datatypes.libraryto open any file, transparently getting the right handler. See [Chapter 4]. - Denise
-
The video shifter and sprite chip in OCS/ECS Amigas. Successor: Lisa (AGA).
- Device
-
In Amiga terminology, a
.devicefile — a library- shaped OS module with a queued-I/O front end. Serial, parallel, audio, timer, scsi, and network cards are all devices. - Devpac
-
HiSoft’s Amiga assembler-IDE, 1987–1994. Freeware since the 2000s. See [Chapter 16].
- DICE
-
Matthew Dillon’s C compiler for the Amiga. Free and compact. Aminet:
dev/c/dice.lha. - Directory Opus
-
File manager, popular from the 1990s. Version 5 Magellan II is now open-source (DirOpus5).
- DMA
-
Direct Memory Access. Data movement performed by dedicated hardware (not the CPU). All Amiga custom chips are DMA-capable.
dos.library-
The DOS layer of AmigaOS. Filesystem, path resolution, argument parsing, Shell process management.
- DOSDrivers
-
The directory (
DEVS:DOSDrivers) holding one config file per mounted device. Successor to the older Mountlist format. dos.library-
See dos.library.
- Drawer
-
The Amiga word for a directory (folder). See [Chapter 5].
- ECS
-
Enhanced Chip Set. The 1990 revision of the Amiga chipset. Adds VGA-compatible modes, productivity 1280×512 mono, larger chip RAM support. See [Chapter 14].
- EHB
-
Extra Half Brite. A 6-bit-per-pixel display mode on OCS/ECS that gives 64 colours by adding 32 half-intensity versions of the first 32 palette entries.
- ELF
-
Executable and Linkable Format. The modern binary format used by AmigaOS 4 and MorphOS native executables; classic 68k AmigaOS uses Hunk instead.
- Enforcer
-
A memory-touch detector for 68030+ Amigas with MMUs. Traps writes to page zero, to system memory, or to unallocated regions. See [Chapter 9] and the debugging chapter.
- ENV:
-
The AmigaOS environment-variable filesystem. Each variable is a file. Populated at boot from
ENVARC:, which is on disk. - Exec
-
The Amiga kernel. Provides tasks, memory, libraries, message ports, semaphores. Lives in Kickstart ROM. See [Chapter 4] and [Chapter 9].
- Extra Half Brite
-
See EHB.
- Fast RAM
-
RAM in the CPU-only region, faster than chip RAM because it does not share its bus with DMA. See [Chapter 9].
- FFS
-
Fast File System. The Amiga’s standard filesystem since Kickstart 1.3. Not journalling. See [Chapter 6].
- FPGA
-
Field-Programmable Gate Array. Reconfigurable silicon. Used by MiSTer and the Vampire family to build modern Amiga hardware clones. See [Chapter 3].
- FS-UAE
-
The cross-platform (macOS/Linux/Windows) wrapper around the WinUAE emulator core, with a friendlier launcher UI. https://fs-uae.net/.
- GadTools
-
The
gadtools.library, Commodore’s convenience layer over Intuition gadgets. Ships in ROM. - Gadget
-
The Amiga word for a widget. Buttons, sliders, and string-input fields are all gadgets.
- Genesi
-
Manufacturer of the Pegasos PowerPC boards that MorphOS originally targeted.
- Grim Reaper
-
AmigaOS 4’s crash diagnostic requester. Replaces the classic Guru Meditation; lets you inspect a crash and dismiss the offending process rather than reboot.
- Guru Meditation
-
The classic Amiga’s kernel-panic screen. Red border, hex numbers, usually followed by a reboot. Named after a joke about the Zen-master posture required to decode the hex.
- HAM / HAM8
-
Hold-And-Modify (6-bit on OCS/ECS; 8-bit on AGA). A display mode where pixels alternately reference the palette or hold-and-modify one colour component. 4096 (HAM) or 262,144 (HAM8) apparent colours from a modest bitplane depth.
- Handler
-
In AmigaOS, a filesystem-level device implemented as a
.library-shaped module.CON:,PIPE:,RAM:,PRT:,TCP:are handlers. - Hollywood
-
Commercial multimedia scripting language (Lua- flavoured) that runs on every current Amiga OS and on macOS, Linux, Windows. https://www.hollywood-mal.com/.
- Hunk
-
The Amiga’s classic executable format. A sequence of typed chunks (code, data, BSS, relocations, symbols) that
LoadSeg()walks at load time. - Hyperion Entertainment
-
Belgian company that develops modern AmigaOS 3.2 (68k) and 4.x (PPC). https://www.hyperion-entertainment.com/.
- Icaros Desktop
-
The main AROS distribution. https://vmwaros.blogspot.com/.
- Icon
-
On the Amiga, a
.infofile next to a program or drawer. Contains bitmap image, position, default tool, tooltypes. See [Chapter 5]. - IconX
-
Utility that lets a Shell script be launched by double-clicking its icon from Workbench.
- IDCMP
-
Intuition Direct Communications Message Port. The stream of events (keys, mouse, gadget changes) that Intuition delivers to a window. See [Chapter 10].
- IFF
-
Interchange File Format. The chunk-based file format used by IFF-ILBM images, IFF-8SVX sound, IFF-ANIM animation, prefs files, icon files, and much more. See the IFF chapter.
- Info file
-
A file with a
.infoextension paired with any visible-on-Workbench object. Contains its icon and metadata. - Integer register
-
One of the 68000’s
D0-D732-bit data registers. - Interrupt
-
A hardware event that causes the CPU to jump to a service routine. On the Amiga, generated by Paula (vertical blank, audio DMA, disk DMA, serial, various), by the CIA chips (timers, keyboard, TOD alarm), and by Zorro cards. See [Chapter 14].
- Intuition
-
The
intuition.library. Amiga windowing system. Screens, windows, gadgets, menus, requesters. See [Chapter 10]. - IPrefs
-
The daemon that watches
ENV:Sys/for prefs-file changes and applies them to the running system. See [Chapter 5]. - Kickstart
-
The Amiga’s kernel and core libraries in ROM. Named because Kickstart 1.0-1.1 initially "kick-started" a Workbench-disk boot.
- KickIt / RelokKick / SoftKick
-
Utilities that load a Kickstart ROM image into RAM and boot the machine from it. Useful for soft-kicking a newer Kickstart from a Kickstart 1.3 machine.
layers.library-
Handles the window-clipping algorithms used by Intuition when overlapping windows redraw.
- Lattice C
-
The first commercial C compiler for the Amiga (1986). Acquired by SAS Institute in 1989, renamed SAS/C.
- LhA
-
The default Amiga archive format (
.lhaextension). See [Chapter 4]. - Library
-
The Amiga’s shared-library abstraction. A
.libraryfile holds astruct Librarywith function pointers at fixed negative offsets. Opened withOpenLibrary(), refcounted, and closed withCloseLibrary(). See [Chapter 9]. - LibraryBase
-
A pointer to an opened library’s
struct Library. Used implicitly by inline C stubs. - Lisa
-
The AGA successor to Denise. See Alice and [Chapter 14].
- LoadSeg
-
The
dos.libraryfunction that loads a Hunk executable into memory. Returns a segment pointer usable withCreateNewProc. - Locale
-
locale.library. Amiga localisation and translation framework. See [Chapter 5] and [Chapter 10]. - LVO
-
Library Vector Offset. The signed 16-bit offset from a library’s base pointer at which a function pointer lives. See [Chapter 2].
- Magellan / DOpus5 Magellan II
-
The last major release of Directory Opus 5. See Directory Opus.
- MetaComCo
-
Bristol, UK company that wrote the original AmigaDOS under contract to Commodore-Amiga in 1984. See [Chapter 2].
- Menu
-
The Amiga’s pull-down menu system, attached to a window and rendered across the parent screen. Activated with the right mouse button.
- MiSTer
-
The DE-10 Nano-based FPGA retro platform. Runs a high-quality Minimig-derived Amiga core plus dozens of others. https://misterfpga.org/.
- MOD
-
The four-channel tracker music format popularised by ProTracker. See the Audio chapter.
- MorphOS
-
An independent PowerPC operating system from a European team; source-compatible with AmigaOS at the API level; runs classic Amiga apps via the ABox emulator. https://morphos-team.net/.
- Mountlist
-
The pre-2.0 way of describing mounted devices. Now superseded by per-device files in
DEVS:DOSDrivers/. See [Chapter 6]. - MUI
-
Magic User Interface, by Stefan Stuntz. The community- standard widget toolkit. Object-oriented, BOOPSI-based, extensible. See the MUI chapter.
- MuForce
-
Modern replacement for Enforcer on MMU-equipped 68030+ Amigas.
- NDK
-
Native Developer Kit. The header files, autodocs, and linker libraries distributed by Commodore/Hyperion for writing Amiga programs.
- NewShell
-
The command that creates a new Shell process (as distinct from a CLI). Post-1.3 the two are the same window.
NIL:-
The Amiga equivalent of
/dev/null. - OCS
-
Original Chip Set. The 1985–1990 first-generation Amiga custom chipset (Agnus, Denise, Paula). See [Chapter 14].
- Off-screen bitmap
-
A
struct BitMapin chip memory that is not attached to a screen; used for double-buffered rendering. - OS 3.x / OS 4.x
-
Shortcut for AmigaOS 3.x (classic 68k) and AmigaOS 4.x (PowerPC).
- Paula
-
The Amiga custom chip handling audio DMA (four channels), the floppy disk controller, serial UART, and interrupt routing. Unchanged across chipset revisions. See [Chapter 14].
- PCMCIA
-
The PC-Card slot present on A600 and A1200 (left-side). Standard for expansion in these machines.
- Pegasos
-
Genesi’s PowerPC motherboard, a MorphOS target.
- PFS3
-
Professional File System version 3. Third-party journalling filesystem for classic AmigaOS. Preferred over FFS for large partitions.
- Picasso96
-
The RTG driver stack from Village Tronic. Competitor to CyberGraphX. Both offer the same API.
- PiStorm
-
A Raspberry Pi board that plugs into the Amiga’s CPU socket and emulates a fast 68040/080, RTG, Ethernet, storage. See [Chapter 3]. https://github.com/captain-amygdala/pistorm.
- PipeFS /
PIPE: -
The named-pipe filesystem device.
- ProTracker
-
The seminal Amiga MOD tracker. See MOD and the Audio chapter.
- Public screen
-
An Intuition screen that other applications may open windows on. Workbench is the primary public screen; apps can declare their own.
- Rainbow Arts
-
Original publisher of AsmOne (see AsmOne) and various late-80s games.
RAM:-
The AmigaOS memory-resident filesystem. Grows and shrinks with content. Fast; volatile on cold boot.
- ReAction
-
Hyperion’s OS-first-party widget toolkit. Ships in ROM from OS 3.2 onwards. BOOPSI-based, similar in scope to MUI.
ReadArgs-
The
dos.libraryargument-template parser used by all standard commands and idiomatically by user programs. See [Chapter 9]. - Reset vector
-
The CPU’s
$000000address at power-on, holding the initialSSPandPC. Kickstart maps itself here. - Resident
-
A "resident command" is an Amiga Shell command loaded into RAM once and re-used on every subsequent call, saving disk loads. See [Chapter 7].
- Rexx
-
The IBM scripting language designed by Bill Cowlishaw. The Amiga version is called ARexx.
- RexxMast
-
The
SYS:System/RexxMastcommand; starts the ARexx interpreter as a system service. Required forrxto work. - Ringhio
-
The OS 3.2 notification-popup system. See [Chapter 13].
- Roadshow
-
The current standard AmigaOS 3.2 TCP/IP stack, by Olaf Barthel. https://roadshow.apc-tcp.de/.
- ROM
-
Read-Only Memory. The Amiga’s Kickstart lives in ROM; 256 KB in 1.x, 512 KB in 2.x and later.
- RomWack
-
A low-level ROM debugger present in every Kickstart from 1.x onwards. Accessible via serial console. See [Chapter 16].
- RTG
-
Re-Targetable Graphics. A Zorro-based graphics card with its own VRAM and RAMDAC, plus a driver stack (CyberGraphX or Picasso96) that lets applications use it as a normal Amiga bitmap.
- SAS/C
-
The commercial C compiler on the Amiga after Lattice was acquired by SAS Institute. Version 6.58 (1994) was the last; freeware since 2007.
- SANA-II
-
The Amiga’s Standard Amiga Network Adaptor Interface. The device-driver API that Ethernet, PPP, and other network interfaces implement.
- Scout
-
A MUI-based system monitor. Shows tasks, ports, semaphores, interrupts, libraries. The Amiga’s
top. Aminet:util/moni/. - Screen
-
An Intuition display mode + palette + window stack. You can have multiple screens simultaneously, each in a different resolution or colour depth.
- S-record
-
Motorola’s ASCII format for representing an executable or ROM image. Each line is a typed record with address, data, and checksum. See [Chapter 16].
- Semaphore
-
Exec’s cooperative synchronisation primitive.
ObtainSemaphore()andReleaseSemaphore(); also shared variants for reader-lock patterns. - Shell
-
The AmigaOS command-line interpreter. See [Chapter 7].
- Signal
-
One of a task’s 32 signal bits, used with
Wait()for lightweight inter-task wake-up. Not related to POSIX signals despite the name. smbfs-
The Amiga SMB filesystem handler. Mounts remote SMB shares as Amiga volumes. Aminet:
comm/net/smbfs.lha. - SnoopDos
-
The classic system-call tracer. Watches every OS call every task makes. See the debugging chapter.
- Sprite
-
One of the eight hardware-composited overlays managed by Denise/Lisa. 16-pixel-wide (OCS/ECS) or up to 64-pixel-wide (AGA). The mouse pointer is sprite 0.
- SREC
-
See S-record.
- Startup-Sequence
-
S:Startup-Sequence— the boot script sourced by Kickstart afterdos.librarystarts. Analogous to/etc/inittab+/etc/rc.localon Unix. - SYS:
-
Assign that always points at the current boot volume.
- Tabor
-
A cost-reduced AmigaOne PowerPC board (formally the AmigaOne A1222 Plus). Ships new from A-EON.
- Tag list
-
A variable-length list of
(tag, value)pairs used by modern Amiga APIs for keyword arguments. See [Chapter 9]. - Task
-
Exec’s scheduling primitive. Has a stack, priority, and signal mask. See [Chapter 9].
timer.device-
The Amiga’s timer subsystem. Handles interval requests and provides system time.
UNIT_VBLANKfor 50/60 Hz precision,UNIT_MICROHZfor microsecond precision. - Tooltype
-
A
KEY=VALUEstring stored in an icon’s.infofile. Used as the Amiga’s per-program configuration mechanism. - Trace
-
In debugging, single-step execution one instruction at a time. RomWack’s
tcommand; MonAm’sTkey. - Trapdoor
-
A hinged panel on the underside of an A500, A500+, A600, or A1200 that gives access to an internal expansion slot. See [Chapter 15].
- UAE
-
Ultimate/Ubiquitous Amiga Emulator. Bernd Schmidt, 1995. The substrate on which WinUAE, FS-UAE, and Amiga Forever run.
- Vampire
-
The Apollo Team’s FPGA accelerator family. Uses the Apollo Core (a 68080-compatible superscalar CPU). Standalone V4 machines and A500/A600/A1200/A2000 accelerator cards. https://www.apollo-accelerators.com/.
- vasm
-
Volker Barthelmann’s cross-platform 68k assembler. http://sun.hasenbraten.de/vasm/.
- vbcc
-
Volker Barthelmann’s cross-platform C compiler. Retargetable; produces 68k and PowerPC output. http://sun.hasenbraten.de/vbcc/.
- Version
-
Both a Shell command (
Versionreports library and Kickstart versions) and a concept (every library has a numeric version and revision). - ViNCEd
-
A replacement
CON:console handler with tab completion, history search, and colour support. - vlink
-
The companion linker to vasm. http://sun.hasenbraten.de/vlink/.
- Volume
-
A named mounted device.
Workbench:,Work:,Ram Disk:. See [Chapter 6]. - WBStartup
-
SYS:WBStartup/— the drawer whose contents are launched by Workbench at login (like macOS Login Items). - Wanderer
-
AROS’s desktop environment (playing the role of Workbench).
Wait()-
The Exec function that suspends the caller until any of a set of signal bits is asserted. Foundation of the Amiga’s message-passing IPC.
- WinUAE
-
The reference UAE implementation, Windows-native. By Toni Wilen. https://www.winuae.net/.
- Workbench
-
The Amiga’s desktop environment. Icons on a background, drawers, tools, projects. Successor: Ambient (MorphOS), Wanderer (AROS). See [Chapter 5].
- XAD
-
xadmaster.library. System-wide archive-extraction library with plugins for.lha,.zip,.rar,.7z,.tar,.dms(disk images), and more. - XPK
-
A system-wide stream-compression plugin architecture. Older than XAD; less used today.
- YAM
-
Yet Another Mailer. Standard 68k mail client. https://yam.ch/.
- Zorro
-
The Amiga’s expansion bus. Zorro I (A1000), Zorro II (A2000-era), Zorro III (A3000/A4000). See [Chapter 15].
- Zune
-
AROS’s MUI-compatible widget toolkit. Source-compatible with MUI applications.
Appendix C: Platform Compatibility Matrix
Which features work on which platforms. Where the answer is nuanced (e.g. "chipset feature emulated on PPC"), the cell carries the explanation.
The four platforms:
-
68k — Classic 68k AmigaOS 3.x on real hardware (any A500 through A4000 or CD32) or an emulator (WinUAE, FS-UAE) or an FPGA replica (MiSTer, Vampire, Minimig).
-
OS 4 — AmigaOS 4.x on PowerPC AmigaOne hardware (X1000, X5000, Tabor, Sam4xx). Distinct from "OS 4 Classic" which runs on a 68k Amiga with a PPC accelerator card and behaves like 68k for chipset purposes.
-
MorphOS — MorphOS 3.x on PowerPC PowerMac/PowerBook/ Pegasos/X5000 hardware.
-
AROS — AROS on x86/x86-64/ARM (hosted or bare-metal) or on m68k (in which case chipset presence matches 68k).
Legend:
-
✓ Native — first-class support.
-
✓ Compat — works via a compatibility layer or emulation.
-
✗ — not supported.
Chapter 42. Chipset features
| Feature | 68k | OS 4 | MorphOS | AROS | Notes |
|---|---|---|---|---|---|
Custom chipset (Agnus/Denise/Paula) |
✓ Native |
✓ Compat |
✓ Compat |
✗ (except m68k AROS) |
Emulated on PPC via Petunia (OS 4) / Trance (MorphOS). |
Blitter |
✓ Native |
✓ Compat |
✓ Compat |
✗ (except m68k AROS) |
Same. |
Copper |
✓ Native |
✓ Compat |
✓ Compat |
✗ (except m68k AROS) |
Same. |
Hardware sprites |
✓ Native |
✓ Compat |
✓ Compat |
✗ (except m68k AROS) |
Same. |
HAM6 / HAM8 |
✓ Native |
✓ Compat |
✓ Compat |
✗ (except m68k AROS) |
Same. |
Dual playfield |
✓ Native |
✓ Compat |
✓ Compat |
✗ (except m68k AROS) |
Same. |
Chip RAM / Fast RAM distinction |
✓ Native |
✗ |
✗ |
✗ |
Modern PPC uses one unified memory pool. |
Bitplane bitmap layout |
✓ Native |
✓ Compat |
✓ Compat |
✓ Compat |
On modern hw, |
4-channel Paula audio |
✓ Native |
✓ Compat |
✓ Compat |
✗ (except m68k AROS) |
AHI abstracts audio on all modern platforms. |
Floppy drive (DF0:) |
✓ Native |
✓ Compat |
✓ Compat |
✓ Compat |
Modern PPC has no floppy; emulator or Gotek only. |
Chapter 43. Buses and expansion
| Feature | 68k | OS 4 | MorphOS | AROS | Notes |
|---|---|---|---|---|---|
Zorro I / II / III bus |
✓ Native |
✗ |
✗ |
✗ |
AmigaOne is PCIe. |
PCI / PCIe |
✗ |
✓ Native |
✓ Native |
✓ Native |
Standard on all modern platforms. |
Trapdoor slot |
✓ Native |
✗ |
✗ |
✗ |
68k form-factor only. |
CPU accelerator slot |
✓ Native |
✗ |
✗ |
✗ |
68k form-factor only. |
PCMCIA |
✓ Native (A600/A1200) |
✗ |
✗ |
✗ |
68k only. |
AutoConfig protocol |
✓ Native |
✗ |
✗ |
✗ |
PCI/PCIe uses its own enumeration. |
IDE (2.5" / 3.5") |
✓ Native |
✓ Native |
✓ Native |
✓ Native |
Universal. |
SCSI |
✓ Native |
✓ Native |
✓ Native |
✓ Native |
Universal. |
USB |
✗ (Zorro Deneb only) |
✓ Native |
✓ Native |
✓ Native |
Standard on all modern platforms. |
Modern GPU (Radeon) |
✗ |
✓ Native |
✓ Native |
✓ Native |
Direct hardware access via RadeonHD driver. |
Chapter 44. OS APIs
| API | 68k | OS 4 | MorphOS | AROS | Notes |
|---|---|---|---|---|---|
|
✓ Native |
✓ Compat |
✓ Native |
✓ Native |
OS 4 also has the interface ABI. |
|
✗ |
✓ Native |
✗ |
✗ |
OS 4 exclusive. |
|
✓ Native |
✓ Native |
✓ Native |
✓ Native |
All Amiga OSes. |
|
✓ Native |
✓ Native |
✓ Native |
✓ Native |
All. |
|
✓ Native |
✓ Native |
✓ Native |
✓ Native |
Underlying storage differs. |
|
✓ Native |
✓ Native |
✓ Native |
✓ Native |
All. |
|
✓ Native (2.0+) |
✓ Native |
✓ Native |
✓ Native |
All modern Amiga OSes. |
|
✓ Native (3.0+) |
✓ Native |
✓ Native |
✓ Partial |
AROS has partial datatype support. |
|
✓ Compat |
✓ Native |
✓ Native |
✓ Native |
On 68k requires a TCP/IP stack (Roadshow etc.). |
|
✓ Compat |
✓ Native |
✓ Native |
✓ Native |
On 68k requires AHI install. |
|
✓ Native |
✓ Native |
✓ Native |
✓ Native |
All. |
|
✓ Native |
✓ Native |
✓ Native |
✓ Native |
All. |
|
✓ Native |
✓ Native |
✓ Native |
✓ Compat |
AROS ports ARexx. |
Memory protection between processes |
✗ |
✓ Native |
✓ Native |
✓ Optional (ABIv1) |
Classic 68k has none. |
SMP (multiple cores) |
✗ |
✓ (X5000) |
✓ Native |
✓ Native |
Classic 68k has none. |
Preemptive multitasking |
✓ Native |
✓ Native |
✓ Native |
✓ Native |
All. |
Chapter 45. Widget toolkits
| Toolkit | 68k | OS 4 | MorphOS | AROS | Notes |
|---|---|---|---|---|---|
|
✓ Native (2.0+) |
✓ Native |
✓ Native |
✓ Native |
All Amiga OSes. |
MUI 3.9 |
✓ Compat (Aminet install) |
✓ Compat |
✓ Compat via MUI 5 |
✓ via Zune |
MorphOS ships MUI 5; AROS ships Zune (source-compatible). |
MUI 4 |
✗ |
✓ Compat (add-on) |
✓ Native |
✓ Partial via Zune |
MorphOS-optimised. |
MUI 5 |
✗ |
✓ Compat (add-on) |
✓ Native |
✗ |
MorphOS-native GPU compositing. |
ReAction (core classes) |
✓ Native (3.2+) |
✓ Native |
✗ |
✗ |
Not on MorphOS or AROS. |
ReAction OS 4-specific classes (application.class, arexx.class, datebrowser, tickbox, speedbar, glyph.image, penmap.image) |
✗ |
✓ Native |
✗ |
✗ |
OS 4 exclusive. |
ClassAct |
✓ Native (2.0+) |
✓ Compat |
✗ |
✗ |
Superseded by ReAction. |
Zune |
✗ |
✗ |
✗ |
✓ Native |
AROS exclusive. |
Hollywood (cross-platform) |
✓ Native |
✓ Native |
✓ Native |
✓ Native |
Also runs on non-Amiga hosts. |
Chapter 46. Filesystems
| Filesystem | 68k | OS 4 | MorphOS | AROS | Notes |
|---|---|---|---|---|---|
OFS (Old File System) |
✓ Native |
✓ Native |
✓ Native |
✓ Native |
Read-only in some cases. |
FFS (Fast File System) |
✓ Native |
✓ Native |
✓ Native |
✓ Native |
Universal. |
FFS-DC (Directory Cache) |
✓ Native |
✓ Native |
✓ Native |
✓ Native |
Universal. |
PFS3 |
✓ Compat (install) |
✓ Compat |
✓ Compat |
✓ Compat |
All. |
SFS |
✓ Compat |
✓ Native |
✓ Native |
✓ Compat |
OS 4 uses SFS/2 as default. |
SFS/2 |
✗ |
✓ Native |
✗ |
✗ |
OS 4 exclusive. |
JXFS |
✗ |
✓ Native |
✗ |
✗ |
OS 4 exclusive; journalled. |
FAT (via mount) |
✓ Compat (via fat95) |
✓ Native |
✓ Native |
✓ Native |
For CF cards, USB sticks. |
NTFS (read-only) |
✗ |
✓ Native |
✓ Native |
✓ Compat |
OS 4 has read/write via NTFS-3G. |
ext2 / ext3 / ext4 |
✓ Compat (via ext2fs) |
✓ Native |
✓ Native |
✓ Native |
For Linux disks. |
SMB |
✓ Compat (via smbfs) |
✓ Native |
✓ Native |
✓ Compat |
Network filesystem. |
Chapter 47. Development tools
| Tool | 68k | OS 4 | MorphOS | AROS | Notes |
|---|---|---|---|---|---|
SAS/C 6.58 (native) |
✓ Native |
✗ |
✗ |
✗ |
68k Amiga only, freeware. |
Aztec C |
✓ Native |
✗ |
✗ |
✗ |
68k Amiga only, historical. |
DICE |
✓ Native |
✗ |
✗ |
✗ |
68k Amiga only. |
Bebbo’s amiga-gcc (68k cross) |
✓ Compat |
— |
— |
— |
Cross-compile only; produces 68k binaries. |
vbcc |
✓ Native/cross |
✓ Native/cross |
— |
✓ cross |
Multi-target. |
adtools ppc-amigaos-gcc |
✗ |
✓ Cross |
✗ |
✗ |
OS 4 exclusive PPC cross. |
MorphOS SDK (gcc) |
✗ |
✗ |
✓ Native/cross |
✗ |
MorphOS exclusive. |
AROS SDK (gcc) |
✗ |
✗ |
✗ |
✓ Native/cross |
AROS exclusive. |
SDL 1.2 |
✓ Compat |
✓ Compat |
✓ Native |
✓ Native |
Amiga ports of all. |
SDL 2 |
✗ |
✓ Native |
✓ Native |
✓ Native |
Not on classic 68k. |
GDB (source-level) |
✗ |
✓ Native |
✓ Native |
✓ Native |
68k has no gdb; use Enforcer + SegTracker + MonAm. |
SnoopDos / Enforcer / MuForce |
✓ Native |
✗ |
✗ |
✗ |
68k debugging tools. |
Grim Reaper |
✗ |
✓ Native |
✗ |
✗ |
OS 4 crash requester. |
Chapter 48. Applications (broad-strokes)
| Application category | 68k | OS 4 | MorphOS | AROS | Notes |
|---|---|---|---|---|---|
Modern web browser (JS-capable) |
✗ |
✓ (Odyssey, Timberwolf) |
✓ (Odyssey, Wayfarer) |
✓ (Odyssey partial) |
Classic 68k limited to NetSurf, IBrowse (no JS). |
Modern email (YAM, SimpleMail) |
✓ Native |
✓ Native |
✓ Native |
✓ Compat |
Universal. |
Directory Opus 5 |
✓ Native (DOpus5) |
✓ Compat |
✓ Native |
✓ Compat |
Multi-platform. |
Office (Final Writer, PageStream) |
✓ Native |
✓ Compat |
✓ Native |
✓ Compat |
Classic packages run on modern platforms via emulation. |
ProTracker, OctaMED |
✓ Native |
✓ Compat |
✓ Compat |
✓ Compat |
Emulated on modern PPC. |
Video Toaster |
✓ Native (A2000+) |
✗ |
✗ |
✗ |
Zorro-card exclusive. |
Modern games (Doom 3, Quake 4) |
✗ |
✓ Native |
✓ Native |
✗ |
PPC-native ports. |
WHDLoad (game preservation) |
✓ Native |
✓ Compat (via emulation) |
✓ Compat |
✓ Compat |
Standard on 68k. |
Chapter 49. A quick rule of thumb
If you’re evaluating whether an Amiga feature works on your target:
-
Anything below the OS API (custom chips, chipset registers, bitplane layout, Copper, Blitter, HAM, sprites, dual playfield) — classic 68k hardware only; emulated on modern PPC.
-
Anything at the OS API level (
intuition.library,graphics.library,dos.library,commodities.library) — works everywhere, though the underlying implementation differs. -
OS 4 interface ABI, memory protection, SMP, native ReAction application.class / arexx.class / datebrowser / tickbox / speedbar / glyph.image — OS 4 exclusive.
-
MUI 4/5-specific features — MorphOS exclusive natively; OS 4 has an add-on port.
-
Zune — AROS exclusive.
-
Hollywood — everywhere, including non-Amiga hosts.
Appendix D: Colophon, Acknowledgments, and Licence
Chapter 50. Colophon
This book was written in AsciiDoc, using the Asciidoctor
toolchain (Asciidoctor 2.0.x for HTML output; Asciidoctor PDF
2.3.x for PDF via Prawn). Diagrams are rendered from
[graphviz] and [ditaa] source blocks at build time using
the asciidoctor-diagram extension — every figure in the book
is source, not a baked image.
Source lives at the master file book.adoc, with per-chapter
.adoc files under chapters/ and the companion code
distribution under code/. The full build is a single command:
$ asciidoctor-pdf -r asciidoctor-diagram book.adocBody text uses the default PDF theme’s Noto Serif; monospaced listings use M+ 1mn. Diagrams use Helvetica for labels and the default Graphviz curved-arrow style. Section colours are subdued deliberately — this is a technical book, not a brochure.
Rendered SVG diagrams are regenerated on each build and are
gitignored; only the two Commons-sourced SVGs (morphos-arch.svg
and amiga-family-tree.svg) are tracked in the repo.
50.1. Image credits
Photographs and screenshots by other people, with their authors and licences. Files from Wikimedia Commons are used under the licence shown; follow the link for the full terms. Images marked fair use are screenshots of copyrighted operating-system user interfaces, reproduced at low resolution for identification and commentary.
| Image | Author and source | Licence |
|---|---|---|
Amiga 500 with 1084 monitor (Ch. 2, 3) |
Bill Bertram, Wikimedia Commons |
CC BY-SA 2.5 |
Amiga 500 rear panel (Ch. 2, 15) |
Priwo, Wikimedia Commons |
Public domain |
Amiga 500 Plus (Ch. 2) |
Sernot at it.wikipedia, Wikimedia Commons |
Public domain |
Amiga with Workbench 1.3 disks (Ch. 2) |
Tduk Alex Lozupone, Wikimedia Commons |
CC BY-SA 3.0 |
Kickstart 3.0 ROMs (Ch. 3, 14) |
MOS6502, Wikimedia Commons |
Public domain |
Kickstart 1.3 boot screen (Ch. 3) |
Perhelion, Wikimedia Commons |
CC BY-SA 2.5 |
Workbench 1.3.2 on a real Amiga (Ch. 5) |
Morn, Wikimedia Commons |
CC0 |
Workbench 3.1 (Ch. 5) |
Chiffre01, Wikimedia Commons |
CC BY-SA 4.0 |
Guru Meditation alert (Ch. 5) |
Mooseblaster, Wikimedia Commons |
Public domain |
Amiga family tree (Ch. 13) |
Mwtoews, Miiro and CyberSkull; derivative by Marko75, Wikimedia Commons |
CC BY 2.5 |
MorphOS 3.18 desktop (Ch. 13) |
MorphOS team, Wikimedia Commons |
GPL |
MorphOS architecture (Ch. 13) |
Polluks, Wikimedia Commons |
CC BY-SA 3.0 |
Icaros Desktop 1.3.1 (Ch. 13) |
Paolo Besser, Wikimedia Commons |
CC BY 2.5 |
AmigaOne X1000 (Ch. 13) |
Adam Kliczek, http://memoriesstay.com, Wikimedia Commons |
CC BY-SA 3.0 |
Workbench 1.0, 2.0 (Ch. 2) |
Fair use |
|
Workbench 3.9 (Ch. 2) |
Screenshot, © Amiga Inc. / Haage & Partner; via Wikipedia |
Fair use |
AmigaOS 4.1 desktop, Grim Reaper (Ch. 2, 13) |
Screenshots, © Hyperion Entertainment; via Wikipedia, Wikipedia |
Fair use |


The companion code/ directory holds runnable C programs,
ARexx scripts, and Shell scripts referenced from the book,
plus a cross-toolchain setup script and a Makefile that
delegates to a per-directory Makefile. The recommended build
target is bebbo’s m68k-amigaos-gcc for classic 68k, or
vbcc for both 68k and PowerPC targets. See code/README.md
for setup instructions.
Chapter 51. Acknowledgments
This book stands on the shoulders of the following people and projects, without whose work it would not exist:
-
The original Amiga engineering team — Jay Miner, RJ Mical, Dale Luck, Carl Sassenrath, Andy Finkel, Sam Dicker, Robert Miner, Neil Katin, Bob Peck, and dozens of others.
-
The MetaComCo team in Bristol who wrote AmigaDOS — particularly Dr Tim King and his team.
-
Bill Hawes for ARexx.
-
Jimmy Maher, whose The Future Was Here (MIT Press, 2012) is the definitive history and whose Digital Antiquarian essays informed several chapters.
-
Brian Bagnall, whose Commodore trilogy fills in the business-side history.
-
Ralph Babel, whose Amiga Guru Book remains the deepest single reference on OS programming.
-
Toni Wilen for WinUAE, and Frode Solheim for FS-UAE. Every emulated-Amiga user is in their debt.
-
Bernd Schmidt for starting UAE in 1995.
-
Volker Barthelmann and Frank Wille for vbcc, vasm, and vlink.
-
Bebbo for the modern GCC cross-toolchain.
-
Olaf Barthel for Roadshow and many years of AmigaOS library maintenance.
-
Stefan Stuntz for MUI.
-
The Hyperion Entertainment team, past and present, for keeping AmigaOS 3.x and 4.x commercially alive.
-
The MorphOS team for an independent modern Amiga-family OS.
-
The AROS project for a clean-room open-source reimplementation that also works.
-
The Apollo Team for the Vampire.
-
The PiStorm community for turning old Amigas back into fast machines.
-
Urban Müller and the Aminet maintainers for preserving three decades of Amiga software.
-
Every uploader on Aminet, OS4Depot, AROS Archives, and the English Amiga Board for keeping the platform documented.
-
Every contributor to the Big Book of Amiga Hardware (https://amiga.resource.cx/) — this book quietly reproduces facts from that database in dozens of places.
Any errors that remain are mine.
Chapter 52. Licence
The book text is © the author, 2026, released under the Creative Commons Attribution-ShareAlike 4.0 International Licence (CC BY-SA 4.0). You are free to copy, adapt, and redistribute the text under the same licence with attribution. See https://creativecommons.org/licenses/by-sa/4.0/ for the full terms.
The companion code (everything in the code/ directory) is
released under the MIT Licence — a per-file header appears
at the top of each source file. Use it in commercial or
non-commercial projects without restriction beyond
attribution.
Third-party images retain their original copyright and are used here under Creative Commons (Wikimedia Commons files) or fair use (OS user-interface screenshots), as listed under Section 50.1. Redistribution of those images independently of this book requires re-checking the source licence.
Trademarks: "Amiga" is a registered trademark of Amiga Corporation; "AmigaOS" is a registered trademark of Hyperion Entertainment; "MorphOS" is a trademark of the MorphOS Development Team; "AROS" is a trademark of the AROS Development Team. Their use in this book is nominative fair use.
Chapter 53. A note on second and later editions
This book is a first edition. The Amiga world changes slowly but does change: Hyperion releases new AmigaOS 3.2 patches; MorphOS adds hardware support; AROS reaches new ports; new FPGA hardware arrives. Corrections and additions arrive via the book’s git repository. Pull requests are welcome. The canonical repository URL is in the README.
If you want to contribute a correction, a screenshot from a system I don’t have (an X5000, a Vampire V4, a real A1000), or a chapter on a topic I’ve missed, open an issue on the repository. Contributions are credited in the acknowledgments of the next edition.